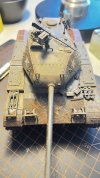
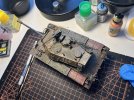
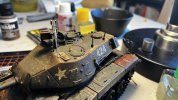
Earth texture… now what?

Jack None Reacher

New Member
Joined
Jul 23, 2022
Messages
7
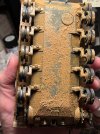
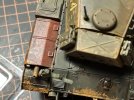
I've competed the Tamiya Walker Bulldog, and decided to weather it using some Vallejo earth texture, but am now not sure how to proceed. Just paint over it with different earth colored tones, or flick paint onto it using a toothpick?
Any thoughts?
 

Attachments

  • 1AD60DC9-1DB4-45BC-BD70-6D35CB0C6F9C.jpeg
    1AD60DC9-1DB4-45BC-BD70-6D35CB0C6F9C.jpeg
    226.3 KB · Views: 12
  • F70FD047-239C-47DC-AFF1-ED5D380B1B68.jpeg
    F70FD047-239C-47DC-AFF1-ED5D380B1B68.jpeg
    451 KB · Views: 11
  • 2FB869B6-1D01-4ACA-971D-53C6326F59CC.jpeg
    2FB869B6-1D01-4ACA-971D-53C6326F59CC.jpeg
    295.6 KB · Views: 12
  • F7F5C807-153E-4731-8129-DD80C2CB690E.jpeg
    F7F5C807-153E-4731-8129-DD80C2CB690E.jpeg
    275.9 KB · Views: 11
" Just paint over it with different earth colored tones, or flick paint onto it using a toothpick? "

Are you a good flicker ?
That might give you results you don't want .
You can add color directly to that Vallejo texture prior to application to change the tint then dab that around where you think it looks right to give it some variations .
Thinner , dry areas of mud splatter are a lighter shade than than thicker / wet mud of the same composition , so darkening the tone of the Vallejo then applying that over the lower portions of what you already have makes sense .
Or , do the reverse and lighten the texture and paint it onto the perimeter areas of what you already have .
Go lightly , you can easily add to it if necessary .

Mix a little color into a small sample of the Vallejo texture and let it dry so you can see what it will look like prior to moving forward .
Repeat that process if needed until you create the shade you find acceptable .
Makes sense. I think I screwed up by just applying it all on there at the same time rather than doing what you're saying (which makes way more sense) - add a little color to a small amount of texture and then apply that to get the color variations I want. Good advice!
-Thanks
 
Personally I'd paint it (roughly) onto the lower areas of the running gear where it would gather up under normal use, and then you could use an old worn out toothbrush to create mud splatter on the sides of the vehicle. (that way it'll randomly land on the model and look more realistic...)

https://www.heresybrush.com/en/2015/mud-splatter-effects-in-15mm/

Good idea. I obviously applied too much and should have mixed in paint with it to adjust the coloring prior to just glooping it all on there. I like the toothbrush idea as well - I've only seen the toothpick paint flicking method, which seems tricky to pull off.
-Thanks!
 
You can paint the mud you already have on there to achieve a similar effect too ; lightening the tone of thinner areas of the application .
Don't hesitate to use both techniques to blend it together .
 
Without getting into a shouting match with other members here I don't use one simple thing or technique. Some swear by oils, chalk, etc. for their weathering but I don't. Oil is only good for simulating the sunken in look on tank treads. But that's the only thing I would use it for. Oil takes forever to dry, it's messy, and it stinks, and it stains your fingers and clothing or anything else it gets on and it's expensive for no more than what you get in a tube. I use water based because it's easy to clean, no mess, and it's easy to fix your mistakes. I would use some watered down colour for the effect. No one is going to see the bottom of this unless it's going to be tipped over. Using a toothbrush would work. Just flick most of the paint off first before doing this over the model. I mean it's your choice even if no one ever sees the bottom of it. You can practice your technique on a piece of paper - even news paper is better than nothing. There are tutorials on YouTube for this very thing. Watch a few of those and decide which one you think is best in your case.
 
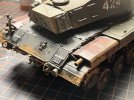
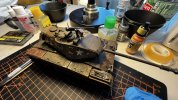
Hi, and thanks for your response. I tried the 'ole toothpick splatter method and can't say I'm happy with the results... but it's my first time trying, so I'm taking it easy on myself. :) See the results for yourself - I think I overdid it, chalk it up to beginner over zealousness.
 

Attachments

  • IMG_0522.jpg
    IMG_0522.jpg
    287.5 KB · Views: 11
  • IMG_0527.jpg
    IMG_0527.jpg
    305.6 KB · Views: 12
  • IMG_0531.jpg
    IMG_0531.jpg
    374.7 KB · Views: 12
  • IMG_0525.jpg
    IMG_0525.jpg
    197.5 KB · Views: 11
Yep, a lot of techniques, no right or wrong method, except for whatever works best for you.
I'll make a mud from ground chalk, a drop or two of water and a drop or two of dishwashing liquid. I mix it to a paste and apply it with a brush, a toothpick, or whatever seems useful at the time. I use it for caked-on mud on treads, tires, undersides of vehicles, in joints of limbs, on clothes, etc.
 
Hi, and thanks for your response. I tried the 'ole toothpick splatter method and can't say I'm happy with the results... but it's my first time trying, so I'm taking it easy on myself. :) See the results for yourself - I think I overdid it, chalk it up to beginner over zealousness.
I think you may be too close to it!
If you aren't happy meaning you want to try to do better awesome!
If you aren't happy with it, meaning you don't like it... Remember it was your first time!

I think it looks good, and I'd be proud to have it on my shelf

If you try something once and walk away thinking "I've done perfectly, no room for improvement here!" THEN there is a problem, lol.
Looks great to me.
Irishvic
 
I think you may be too close to it!
If you aren't happy meaning you want to try to do better awesome!
If you aren't happy with it, meaning you don't like it... Remember it was your first time!

I think it looks good, and I'd be proud to have it on my shelf

If you try something once and walk away thinking "I've done perfectly, no room for improvement here!" THEN there is a problem, lol.
You're probably right. Like I said, I think I was just so excited to finally try the toothpick flick method... (if that's what you'd call it :)) that I just kept going, a little overboard I'd say. Thanks for your feedback!
 
Without getting into a shouting match with other members here I don't use one simple thing or technique. Some swear by oils, chalk, etc. for their weathering but I don't. Oil is only good for simulating the sunken in look on tank treads. But that's the only thing I would use it for. Oil takes forever to dry, it's messy, and it stinks, and it stains your fingers and clothing or anything else it gets on and it's expensive for no more than what you get in a tube. I use water based because it's easy to clean, no mess, and it's easy to fix your mistakes. I would use some watered down colour for the effect. No one is going to see the bottom of this unless it's going to be tipped over. Using a toothbrush would work. Just flick most of the paint off first before doing this over the model. I mean it's your choice even if no one ever sees the bottom of it. You can practice your technique on a piece of paper - even news paper is better than nothing. There are tutorials on YouTube for this very thing. Watch a few of those and decide which one you think is best in your case.
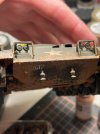
I have not tried oils, and tbh, I never intend to... for all the reasons you stated and I simply don't know what I'm doing.
 
That came out real nice, I don't think there is a right or wrong way to weather anything. It's about what you enjoy!
 

Latest posts

Back
Top