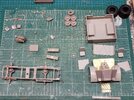
WW2 F15A Ford w/Breda in Italian service 2025-03

lost a lot of their dexterity and feeling to work
Sorry to hear that, especially if you're a hands on kinda guy. I saw that slowly happen with my mum, though she managed to keep knitting into her late 70s.
I figure I'll just keep going until I can't... I've also gone back to playing instruments from when I was younger, so hopefully that keeps 'em limber a little longer.
Cheers,
Brian
 
I still maintain that a real book, which registers as a real object, with real locations, is superior to a web page or eBook
At least the recognition of where you are in the book transfers, but digital books are so much harder to flip through that that gets in the way, for me anyway. It's not an issue if you know text you can search for (and the file allows that, of course) but if you only have a vague idea of what it is you're after, or can't remember any words that would be useful as search terms, a physical book is often a lot faster to find things in.
 
There's one I wouldn't have predicted when I got back into the hobby... :rolleyes:
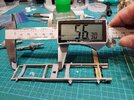
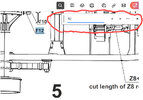
Rather than have registration pins or marks, the instructions specify 56.3 mm!

Or approximately 2.2165 inches.
Or about 2 and 7/32 of an inch.
Of course.

20250411_222805.jpg
Glad I was prepared!
 
That is really odd, and IMHO pretty poor design. Good thing you had the necessary tools :)
 
... some times you get lucky, and find exactly the tool right under your nose!
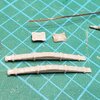
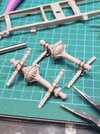
I have these cylinders for rolling and bending, with little grooves... one is an exact fit for the axles!
Trick is to cut just a bit long so they will fit into holes I drilled into plates.

20250413_153838.jpg

Glad that's over!

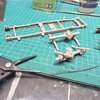
17445752495475955953612564008628.jpg
The bend over the leaf springs easier with the square tipped pliers.
 
Here you go :)

View attachment 143281View attachment 143287View attachment 143282View attachment 143283View attachment 143284View attachment 143285View attachment 143286

I came across this in 2013 (say the file creation dates) when researching British vehicle camouflage. The important things to note are that:—
  1. Many modellers and restorers of real vehicles get the pattern wrong by not applying the dark colour far enough up, down and/or along the vehicle;
  2. The popular "Mickey Mouse" camouflage is not actually shown in this pamphlet, but it is a form of it; and
  3. For much more on the colours used, and when these were in use, I recommend buying some or all of Mike Starmer's books direct from him (see the link).
Does this go with the above?
1744600482178.jpeg
 
RGB values are pointless when talking model colours, though. They're probably a good starting point if you want to make a 3D model not for printing out but for use on a computer screen, but pretty much no use for mixing paint to.

For starters, RGB is an additive colour model because it's designed for use on screens that beam light at you. That is, rgb(0, 0, 0) is black and rgb(255, 255, 255) is white, because with a pixel all the way off (all colour values 0), there is no light coming from it.

Paint, OTOH, represents a subtractive colour: light from an external source hits the paint and some of it gets absorbed by the pigment. All the light that isn't absorbed bounces off and can hit your eye.

Though this may seem like it's just achieving the same result from opposite sides, it actually makes for different perceived colours.

Add to this the fact that colours on a computer screen are dependent on that screen's settings and particularities, and the outcome is that any colour on a screen is little more than an approximation of the "same" colour in paint or ink.
 
The difference between,
light projected towards the eye, instead of reflected to the eye.
If I remember correctly, I'd gotten this picture from one of the modeling sites Mike Starmer had answered a question in. PMMS?
You're right, it's a starting point.
 
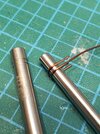
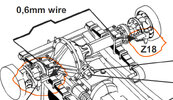
more copper wire, this time as part steering linkage/tie rod (?) between the front wheels.
instead of providing a part, they provide more wire, and expect it to be cut, bent and flush glued at the ends... (not happening) at least the flush glued part.

2025-04-15_17-09-05.jpg

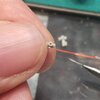
So that means get out the cheater specs, and drill out the two receiving ends.

20250415_170123.jpg

At least now, there'll be a positive connection. :rolleyes:
 
Careful with that drill bit Eugene.......

In all seriousness, I've broken all my .03 mm drill bits, two .04 mm recently. I Need to order more from the jungle site, or find some stronger ones somewhere else. :)
 
I've broken all my .03 mm drill bits,
Yes, they are ridiculously fragile.
My MO now is to hold the part in one hand, and the bit in the other.

I've tried all the other permutations, including holding the part with tweezers, pliers, and using a pin vise for the bit, drilling down with just the weight of the bit...

What I've found is that I have to be touching the part, and the bit, to detect the least bit of resistance, torsion, or oblique leverage that might snap the bit; if I do, I immediately back off, breathe, readjust the angle (which is easier if both hands are involved).

I also use my finest scribing point to start it, so there is no skating. The drilling is a subtle twist, backing out frequently to remove any waste that could jam. I would like to think that breakage has been less frequent, and hopefully I haven't just jinxed it!

...Not that I'm superstitious, but memories of my dad shouting at the TV announcer in the last minutes of a final inning who would dare to utter the words: "... and it looks like he's gonna pitch a no-hitter!"
 
This is old news for some, but for those of you haven't tried it... I highly recommend having a computer display on or over the bench.
Web reference pictures, this forum, the build instructions, right there, in your face, and you can zoom in!

Scalemates seems to have just about every kit instructions I've ever looked for in .pdf file format.

That means you can view it in a PDF viewer: zoom in on tricky parts, or use the Search function to find where a numbered part on your sprue actually goes!

It will scroll the instructions to the right spot and highlight the part number.

2025-04-15_21-22-59.jpg
 
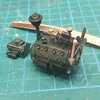
Had to paint the engine and gearbox before mounting to the frame.
Copper tape to the rescue again, for fan belt (hopefully paint tomorrow).

17447781929732319966062173253638.jpg
No wires or hoses this time, it will be concealed, but thought I should at least pay a little attention to the paint job.
 
I've broken all my .03 mm drill bits, two .04 mm recently.
0.03 mm would be really easy to break, yes … 0.3 mm should last longer ;)

I highly recommend having a computer display on or over the bench.
This is one reason why I usually take my iPad to my modelling room. (The other main reason is to take photos of the model I'm building.)

Another good use of a tablet (or computer) is that you can look up scale drawings and measure things in them. If you zoom in until the size on the screen is the size of the model, you won't need to do any conversions — though with a tablet, you will need to be careful not to touch the screen with your fingers when you're taking measurements.
 
Ha! You sure don't miss much, the hole I drilled above is roughly .6 mm or 1/16". But I guess the point is just how easy it is to break these little bits... and boy, is it easy!
Especially when you get into 1/32" range.
Just look at it sideways, and... d'oh!


Write your reply...

Latest posts

Back
Top