Filling problematic seams?

Ian

Member
Joined
Aug 29, 2012
Messages
910
Cross post from my current build page.

1. Filling seams?

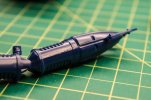
Didn't go so well this evening. After cleaning and sanding I applied some Vallejo Plastic Putty to the larger gaps, only to discover that this stuff can't really be sanded all that well even after drying. So I scraped it off and am looking for suggestions of what to use instead. Maybe just thick CA glue? It makes for difficult sanding when it dries.

I've heard mention of the Mr. Hobby products "Mr. Dissolved Putty" and "Mr Surfacer".

Gaps are similar to this one, and all over the kit.
8164393347_42e0d39850_c.jpg


2. Primer behavior?

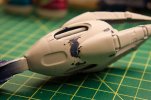
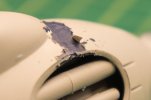
I also primed a hand, noticed a few gaps, filled them with putty, discovered the aforementioned issue and so attempted to take the putty OFF, only to then have the primer come off in strips! It's looking pretty bad now, and is going to be totally uneven if I re-prime.

- Is there a way to strip it BACK to the original plastic?

- Is this how primer usually behaves? It's like it's not even adhering to the surface all that well.
8165867331_5b4b959ac4_c.jpg

8165898362_c248834668_c.jpg
 
Unfortunately I can't help you too much with your problems :(

But I can put in a good word on Mr Dissolved putty. Used the stuff with great success. No idea how it compares with the Vallejo one since I never used it though.
 
I've never used Mr. Dissolved Putty, but I have used Mr. Surfacer to fill small gaps.

I'd recommend Tamiya putty to fill medium gaps and Mr. Surfacer to fill small gaps. Mr. Surfacer can also be used as a primer.

What primer did you use? Did you wash the plastic before applying it? How long has it had to dry? With the issue you're having I'm thinking that you may have used an acrylic primer. One of the biggest downsides of acrylics is that they don't feather when sanded and you end up having the issue that you appear to be having.
 
If its just seams you want to fill that have no big gaps I normally use correction fluid 'Tippex' ,sand down wet with fine paper ,it gives a great smooth finish .
For priming I always use an Automotive primer applied with the airbrush ,it sticks like brown stuff to a blanket and is sandable .

To remove the old paint I use either Mr Muscle oven cleaner or Fairy Power spray (not sure what they are called in the U.S ) But for both ,simply cover the model with it ,put it in a food bag or similar and seal the bag ,leave it for bout half an hour then wash off :)

Hope you get sorted ;)

Chris.
 
I've used the Vallejo putty Ian.

I like it for some applications, but you are right, it does not take vigorous sanding very well (I use a knife and very light sanding to get it to a rough shape). I often use it (the Vallejo putty) to fill in larger areas, but I put something harder and more sandable (like Mr. Dissovled Putty) over top. I use this technique, because I have had problems with Mr. Dissolved Putty shrinking alot and cracking/flaking as it dries, if applied too thick. Where as the Vallejo can be applied in relatively thick layers. Another technique that works with the Vallejo is after applying it to a recessed joint, I take and wipe the excess away with a moist cotton swab, that way there is not much sanding to contend with.

I mainly use the Vallejo, Mr. Dissovled, or Mr. Surfacer 500 to fill my seams, but have used Tamiya epoxy putty and the good old Squadron green in the past. Right now I like the Vallejo/Mr. Dissolved Putty combo the best - works well for me.

Sorry for the novella, but I hope this helps.
 
Awesome, thanks guys!

The primer I used is "Vallejo Surface Primer" â€"and I did wash the sprues before assemblyâ€" but obviously I need to give the built parts a wipe before painting. My hands were all over it and maybe there was oil transfer. It had been a good two hours before I started adding in putty but it looks like I was too hasty.

Time to strip it and give it another shot.
 
Vallejo surface primer is a polyurethane acrylic and won't sand well due to the fact that it is an acrylic and the paint is very cohesive to itself and will want to come off in chunks like what you're getting when sanding.
 
So maybe I lay down a light coat of another type of primer to start, fill gaps etc. then use the Vallejo after? I just bought a few different colors of this stuff!
 
You could do that, but if you did you wouldn't need the Vallejo primer. You could just move on to Vallejo paint or whatever paint you plan on using.
 
Realistically, unless you are going for an ultra gloss finish on the kit, putty and sand what seams need to be cleaned up, then primer. Shouldn't really be any need to sand the primer afterwards.
 
Here is what I have used for putty in the past and my thoughts on them:

Squadron putty the white not the green: Not very good, will shrink, and is too soft and crumbly. It is softer than the plastic which is good for sanding. Can be thinned with acetone based fingernail polish remover.

Bondo spot putty: Out of the tube it has a smooth consistency, doesn't shrink, and can be shaped and molded fairly well. Can be thinned with acetone based fingernail polish remover. It is a bit harder than the squadron, but not a lot. It is still softer than the plastic which is good for sanding, and it will stick to the plastic very well.

I have used this technique on both of the above: Lay down the putty and then take a q-tip that has been dipped in Acetone based fingernail polish remover to smooth it out and clean it up so it pretty much just fills the seams. For both of these curing time is within an hour.

The above two are good for small to medium gaps.

Mr. Dissolved putty: Cures harder than the above two, you paint it on with a brush. Will shrink up a bit, but since you are basically brushing it on, easy to apply. It thins with Lacquer thinner, so it bonds with plastic pretty well. I would not use it for large gaps, but mainly for small gaps. Since it cures up just a bit softer than the plastic, it can be hard to sand. I used it on project last week and it was a bear to sand down. While the Bondo putty did the job really good.

Mr. Surfacer 500 or 1000. It is basically a thick primer. Good for small gaps, voids and scratches. It will shrink down a bit, but if you apply a second coat before sanding you will fix that problem. It is thinned with lacquer thinner so it will bond to the plastic well.

for the above two they are lacquer based and will cure up pretty fast, within 20 minutes.

Aves Apoxie sculpt: A two part epoxy putty. Cures up harder than the plastic. It has a two hour working time and will be cured up overnight. Good for large gaps, holes, or to put behind structures for re-enforcing the structure. It is thinned with water which is good in the home environment. To use it as a seam filler I have kneaded together the two parts then rolled it out into a snake. Pressed the snake into the seam, and then used water to smooth out the surface leaving a pretty clean seam. I have done this before and had no sanding to do afterwards. Since it cures out harder than plastic, it can be a chore to sand it down without damaging the underlying plastic.

Each one of these has it's pluses and it minuses. Quite often I will use a combination of two or more. For example. I will start with the Bondo and then move to the Mr. Surfacer for the final finish.
 
A perfect opportunity to use this...

RVyP9.gif
 
Hi, Ian, I'm late to the party, but here's my mustard, as the Germans say.

For stripping paint, I'm using Super Clean de-greaser now, used to be made by Castrol, but I think someone else makes it. There is also Super Green, which is supposed to be environmentally friend, which works as well. I use a plastic container or a glass jar large enough for the piece, and pour enough SC into the container to cover the piece. It removes paint in minutes (it stripped the chrome off the chromed fret in the Red Baron hot rod kit in 2 minutes). It's relatively not so caustic, though the maker recommends gloves, and the best part is that you can re-use a batch of it over and over.

For fine seams such as those on your piece, I use Squadron white putty and acetone, applied in one of two ways:

Method #1: I will take a dab of putty and apply it to the seam. I use old knife blades as trowels, and I also have a dental tool used to apply resin putties to a tooth, which I use for this purpose. I use the blade to remove as much of the excess as possible, leaving it in the seam. Then I take a cotton swab, dip it in acetone, and wipe it across the seam to remove the remaining excess putty, leaving putty only in the seam. Once the putty has cured according to the label, I will sand the surface. Removing as much of the putty as possible when applying will reduce the amount of sanding.

Method #2: I take a dab of the putty and put it in a well in my palette. Any non-porous surface will do. I use an eye-dropper to add acetone, a drop at a time, till the blob of putty begins to dissolve. Then I use a toothpick to stir the mixture to a consistent thickness, and apply it to the seam with a paint brush. I call this my homemade Mr Surfacer, and I hit on this method after I tried Mr Surfacer and found that even the thickest grade was not thick enough for my tastes. My paste is probably similar to Mr Dissolved Putty, too, but I've never used it, so I can't say for sure.

Hope that helps!
Brad
 
Heh heh, Grendels, our methods are relatively similar. That tells me I've been on the right track ;)

I'll second, too, that these methods are good on fine seams, but when you get to a gap, putty's not the best solution, not by itself. I fill gaps with styrene and hit them with liquid cement, or resin chunks and CA, if it's a resin figure.
 
the Baron said:
Heh heh, Grendels, our methods are relatively similar. That tells me I've been on the right track ;)

I'll second, too, that these methods are good on fine seams, but when you get to a gap, putty's not the best solution, not by itself. I fill gaps with styrene and hit them with liquid cement, or resin chunks and CA, if it's a resin figure.

I have used both of your methods before to good effect.

I have also tried the shaved sprue method. Along with cutting styrene rods down and cementing them in the gap. I prefer putty because it is softer than the plastic. That way when sanding I don't damage the plastic at all. The putty gets removed first.
 
Stripping Vallejo polyurethane primer is not like stripping any other paint. Your best bet is to use the purest isopropyl alcohol you can get and give it a long soak and multiple scrubs. I've tired various other strippers such as Simple Green, Windex, and SuperClean and they barely touched it. I have not tried oven cleaner nor brake fluid, but I don't know why you would even want to mess with them.

You can also use denatured alcohol, but it is a mix of various alcohols and other solvents, one of which is acetone. Soaking plastic in denatured alcohol can melt the plastic, but will more likely result in softening it which won't be apparent until you try to scrub the paint off.
 
You can buy cheap hardware store primer, but I'd avoid it. If you want to use primer in a spray can, use Tamiya's Fine primers. They are expensive, but their performance for scale models cannot be beat. If you want to airbrush the primer on, I'd use Tamiya liquid surface primer or Mr. Surfacer, appropriately thinned.

I use Tamiya basic putty for medium size gaps, Tamiya epoxy putty for larger gaps, or Tamiya liquid surface primer or Mr. Surfacer for small gaps. I also sometimes use the spare styrene and liquid cement trick for some gaps.

You can use superglue to fill a gap, but it's very hard to sand or shape and you'll end up tearing up the soft plastic around the superglue before you make a dent in the superglue.
 
Ive heard that LA's Totally Awesome that you can buy at the Dollar General is very very good for stripping paint.
 
PharmPony said:
You can buy cheap hardware store primer, but I'd avoid it. If you want to use primer in a spray can, use Tamiya's Fine primers. They are expensive, but their performance for scale models cannot be beat. If you want to airbrush the primer on, I'd use Tamiya liquid surface primer or Mr. Surfacer, appropriately thinned.

I use Tamiya basic putty for medium size gaps, Tamiya epoxy putty for larger gaps, or Tamiya liquid surface primer or Mr. Surfacer for small gaps. I also sometimes use the spare styrene and liquid cement trick for some gaps.

You can use superglue to fill a gap, but it's very hard to sand or shape and you'll end up tearing up the soft plastic around the superglue before you make a dent in the superglue.

This is exactly why I will not use superglue to fill gaps.
 

Latest posts

Back
Top