M4A3E8 Medium 76mm HVSS W.I.P.

fblanton

New Member
Joined
Feb 18, 2011
Messages
289
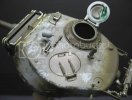
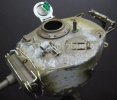
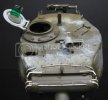
Just two pics of the Tasca M4A3E8 Medium I am slowly working on. I filched three periscope guards from a newer Dragon M4 Normandy kit. I replaced the .30 cal. M.G. in the bow with an RB item. Also I am using a Dragon comdrs. hatch as the periscope can be displayed in operation. The Tasca hatch does not give you the option. Kit tracks are slowly being assembled too. Paint so far is: Vallejo black primer on the lower hull with Tamiya Olive Drab and a few drops of Dark Yellow mixed in sprayed using Laq. Thinner. Grey primer again is the Vallejo product. Pigments are from Model Makerz along the lower hull and road wheels/track.

IMG_5192.jpg


IMG_5193.jpg


Thanks for looking.
Frank Blanton
 
ah..Frank...what are you doing?? ;)

Loooooking nice, can't wait to see at the next AMPS meeting!
 
FRANK,

Lookin' mighty Fetchin' & ya' know comin' from a German Armor Nutt .... ;D

I'm lookin' forward to seein' more !
 
Thanks guys for the kind words. Eric Rains Easy 8 has been an inspiration to me. His build is titled as "Battlewagon M4A3E8 ETO" Check it out. Very cool!

Frank Blanton
 
That's looking really nice, Frank. I just finished building one of these for a magazine review. It's an excellent kit. Did you use the main gun as supplied in the kit? I couldn't face trying to get rid of the seams on mine, so I replaced it with one from RB. I'm liking the pigment washes in the wheels and tracks - just right. Looking forward to seeing the finished thing.
 
Updated pics, M4A3E8 Medium 76mm HVSS W.I.P.

Yes I did use the kit supplied gun tube.
Too remove the seam I sanded with 800 then 1000 then 1200. I use automotive wet sanding sheets cut into small squares.

Here is a run down on what has been done so far: I am doing "A Paper Doll" M4A3E8 Medium from 6th Armd. Div. 68th Armd. Batt.

I used three strands of 0.10 solder wire for the tow cables. Formations tow cable clasp's. I filched the periscope guards from the DML M4"Normandy" Sherman kit as well as the extended spotlight on the turret roof. The commanders cupolla hatch is a DML item as the periscope mount is open. The Tasca hatch is molded closed. Fine Molds clear periscope added after painting Tamiya clear green. {O.D. will be painted over the body of the periscope} I have masked the viewing parts on the periscopes until the model is painted. P.E. chains on the water/fuel caps. small rivets punched from thin sheet plastic for the muzzel brake. The framing/attachment points for the mantlet dust cover were made from 0.20 styrene rod and 0.20 solder wire. Added to that are several small Grandt Line nuts with potruding bolts for the dust cover snaps. Archer Fine Transfers casting marks/numbers used on the face of the mantlet and on the right side of the turret.
Also because I am a Sherman Freak, [I am a regular Freak also] I made a "Build Board" with photos of various areas on an actual Easy 8 to aid in adding detail.

Here are some latest pics from this morning.

E8Hull.jpg


E8HullRear.jpg


E8Turretfront.jpg

E8topTurret.jpg

E8BuildBoard.jpg


Frank Blanton

E8TopTurret2.jpg
 
Vary nice work Frank can't wait to see it in person. Interesting idea about the poster. I've bee thinking of something similar but with a spiral note book printed at staples or some such.

One question and one comment

Question; What is the reasoning for the white/primer on the upper hull?...if there is any?

Comment; I noticed that there is what looks like a molding line just above the pistol port, unless of course its shown in your reference photos, then I didn't see anything.
 
Hi its me again! I'm like that annoying neighbor who runs over from his yard to talk to you when he sees you in the driveway....anyways ::)

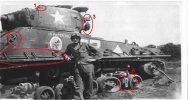
I thought that picture of Paper Doll look real familiar and sure enough I had a copy of it in my reference file. So I took few minutes to analyzed it like I did for my E8 project

Here are some items I noticed (I'm sure you saw the same stuff but in case not), use them as you like.

PD-001.jpg

1) It looks like smoke grenade launcher in the turret had the protective cap in stalled.
2) Note the tow cable clevis
3) Nap sack hung off the 50 cal stowage rail
4) The location of the bore cleaning rods for cleaning the gun tube (at least that what I think they are)
5) The real reason why I remembered this photo. The tie down bracket for shipping the tank either by ship or rail. The problem with this is that it looks like your done with that area so...

Hope that was helpful...ok I'll go back to my own yard now 8)
 
Re: M4A3E8 W.I.P.

Thanks guys for the compliments. I look at each of your postings and am always blown away with all of Ya'lls work.

To answer Eric's questions regarding "A Paper Doll",

I did do the towing clevis on the left front hull attached to the lifting point.

I did not notice the bore brush rods stowed along the front left side of the hull. Thanks mate!

There is Vallejo grey polyeurethane primer on the model here and there. I am just learning to use this excellent product recommended to me by Panzerace007 Erik Roberson.

There is a lot of variations in turrets on Shermans. Depends on the factory. Some have more pronounced edges/seams than others. Mine may have a seam around the pistol port. I must look again at ref. and the model. Thanks again Mate!

I need to find some of those tie down brackets for the bogie trucks. It seems four were used. Two in the front on each side, likewise the rear bogies. Got any spares? I will fashion some out of P.E. Scrap.

And finally you are always welcome in my yard Bro. In-fact everyone on the site is. Well except for that creepy dude lurking in the bushes with a Panzerfuast!

Frank Blanton
 

Latest posts

Back
Top