the Baron
Ich bin ja, Herr, in Deiner Macht
- Joined
- May 12, 2009
- Messages
- 2,144
Well, I'm calling this one finished, my first completed kit of 2016. This is Hasegawa's kit of the "Humanoid Unmanned Interceptor P.H.J 101 'Grosser Hund' ", from the Maschinen Krieger series. It's an armored combat chassis, with an artificial intelligence system. In the MaK storyline, this weapon was developed by the bad guys, the Strahl Democratic Republic, as an answer to the improved weapons and tactics used by the mercenaries fighting to free Earth.
Enough of the story, here's my finished piece....
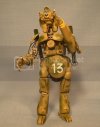
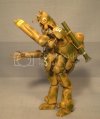
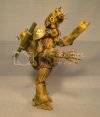
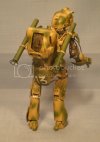
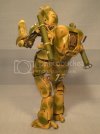
It wasn't a difficult build, but there were about 30 individual steps in the instructions, and you do need to review the instructions carefully, in order not to miss anything. For example, the plates protecting the robot's ankles are attached using holes you drill out a couple of steps before. It's also tricky to note the orientation of some of the armor plates. I also found it necessary to leave many of the smaller plates off, till I had applied my base colors (Tamiya flat acrylic Dark Yellow and Green). If I had installed them in the designated sequence, I wouldn't have been able to get paint under them.
The bare metal parts--the robot's torso chassis, for example--are painted with Vallejo gunmetal.
For the weathering, I used a couple of methods. I primed with Army Painter matte black, with acrylics for the top coats, then I used a 3M nylon scouring pad to scuff the acrylics and reveal the black underneath. This was my second attempt at this technique, this time, with the right paints (see my AFS build for the lesson, not to use enamels over the black primer), and while it worked better, I still think I can get as good a look by applying thinned black acrylic with a fine brush. Which is what I did for most of the chipping along seams or edges, on the bolt heads, etc. I also used AK's Fuel Stains wash on the metallic bits, just for the color of oil or grease as a filter over the metal.
The decals are of good quality, but with all of the curves and irregular surfaces, it was necessary to use several applications of Solvaset on them. The "13" on the codpiece and on the butt plate, for example, wrinkled over the curve of those plates. So did the unit insignia on the cheek plates. Those wrinkled badly, and if I hadn't known better, I'd have panicked that they wouldn't settle down. But Solvaset works wonders on them. I also used a sewing needle to poke tiny holes in the wrinkles and help the solution along. The toughest decals where the markings on the rocket tubes. They did not want to settle around the circumference of the tubes. For those, I used Future to get them to stick along the curves.
Oh, and I got to use my hex punch for the first time! The kit comes with bolt heads and bolt ends with hex nuts, molded on a plate on the one sprue. You're expected to slice those off, as needed. I tried it with a couple of them, but it was just too fiddly for me. It was far easier to pick a punch of the right size and just punch out a little pile of bolt heads. That punch set was worth the investment.
I'm happy with the way it turned out, though I'm nowhere near the level of the guys in the Maschinen Krieger forum or the Kow Yokoyama Facebook group. I do think that I will try painting the next MaK kit by hand, using lacquers, the way Kow and the veteran MaK builders do. They're able to blend colors, much the same way you do with oils, and it's nearly impossible to do that with an airbrush. We'll see. On the other hand, I'm developing my own style.
Oh, and, this is the kit I built for my club's February meeting, this Friday night. The monthly build theme is "Cats & Dogs", as I mentioned in another thread, and this is my entry, the "Big Dog". I'm betting that no one else would have thought of this, though there are a couple other MaK fans in the club. But I've only mentioned it here. So we'll see.
Anyway, thanks for looking, criticisms/comments are welcome, and get building yerselves!
YbiC
Brad
Enough of the story, here's my finished piece....


It wasn't a difficult build, but there were about 30 individual steps in the instructions, and you do need to review the instructions carefully, in order not to miss anything. For example, the plates protecting the robot's ankles are attached using holes you drill out a couple of steps before. It's also tricky to note the orientation of some of the armor plates. I also found it necessary to leave many of the smaller plates off, till I had applied my base colors (Tamiya flat acrylic Dark Yellow and Green). If I had installed them in the designated sequence, I wouldn't have been able to get paint under them.
The bare metal parts--the robot's torso chassis, for example--are painted with Vallejo gunmetal.
For the weathering, I used a couple of methods. I primed with Army Painter matte black, with acrylics for the top coats, then I used a 3M nylon scouring pad to scuff the acrylics and reveal the black underneath. This was my second attempt at this technique, this time, with the right paints (see my AFS build for the lesson, not to use enamels over the black primer), and while it worked better, I still think I can get as good a look by applying thinned black acrylic with a fine brush. Which is what I did for most of the chipping along seams or edges, on the bolt heads, etc. I also used AK's Fuel Stains wash on the metallic bits, just for the color of oil or grease as a filter over the metal.
The decals are of good quality, but with all of the curves and irregular surfaces, it was necessary to use several applications of Solvaset on them. The "13" on the codpiece and on the butt plate, for example, wrinkled over the curve of those plates. So did the unit insignia on the cheek plates. Those wrinkled badly, and if I hadn't known better, I'd have panicked that they wouldn't settle down. But Solvaset works wonders on them. I also used a sewing needle to poke tiny holes in the wrinkles and help the solution along. The toughest decals where the markings on the rocket tubes. They did not want to settle around the circumference of the tubes. For those, I used Future to get them to stick along the curves.
Oh, and I got to use my hex punch for the first time! The kit comes with bolt heads and bolt ends with hex nuts, molded on a plate on the one sprue. You're expected to slice those off, as needed. I tried it with a couple of them, but it was just too fiddly for me. It was far easier to pick a punch of the right size and just punch out a little pile of bolt heads. That punch set was worth the investment.
I'm happy with the way it turned out, though I'm nowhere near the level of the guys in the Maschinen Krieger forum or the Kow Yokoyama Facebook group. I do think that I will try painting the next MaK kit by hand, using lacquers, the way Kow and the veteran MaK builders do. They're able to blend colors, much the same way you do with oils, and it's nearly impossible to do that with an airbrush. We'll see. On the other hand, I'm developing my own style.
Oh, and, this is the kit I built for my club's February meeting, this Friday night. The monthly build theme is "Cats & Dogs", as I mentioned in another thread, and this is my entry, the "Big Dog". I'm betting that no one else would have thought of this, though there are a couple other MaK fans in the club. But I've only mentioned it here. So we'll see.
Anyway, thanks for looking, criticisms/comments are welcome, and get building yerselves!
YbiC
Brad
