TRM
New Member
- Joined
- Mar 18, 2011
- Messages
- 5,024
Hello all,
As the title suggests, "getting my feet wet", I am coming out of the gate building my 1st Modern IDF!! So, please be gentle!!! LOL!!! I will of course I will have to rely on what I see in pictures and some friends in the world of IDF.
In all all seriousness, this is a new path for me and I am willing to take on the challenge and learn what I can from you guys that are more versed in the modern world, along the way. I was going to wait on the construction of this, but could not control myself last night and started to clean and add some suspension parts.
For now, this is what I am working with.....
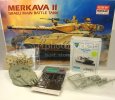
This is my kit. Not sure how old this is, but assuming a couple years anyway. I could not pass up this, as with everything seen her in the picture was $40USD at the last AMPS show I attended.
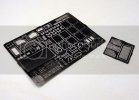
Eduard PE
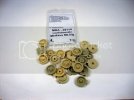
Cast resin wheels
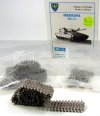
Fruils...of course I spent some time a couple weeks back assembling 80% of both tracks to not be bogged down in the build with this. I stopped well before the amount needed to complete these....was unclear on the amount of links needed yet!
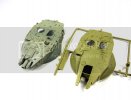
And of course this had a separate cast turret which, as you can see, has a tremendous amount of more detail added. From what I gathered already from some helpful folks, that this resin turret looks to be a MK II 2B conversion.
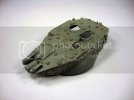
I have plans on purchasing an IDF Merkava MKII Turret Basket and Ball Armor set....thinking one from Legend for the moment, since the kit does not come with the ball armor that I wish to add....thes modern girls need their jewerly! Please, if there is another, better option I should be considering, speak up!!! LOL!!
What I guess I will try an accomplish will be to build her up and have a bunch of fun painting and weathering (which I love the most)...chipping, scratches, dirt dust and so on. Like I said, I don't know S**T about these things but willing to learn.
Here is where I stand at the moment....
I managed to get the suspension figured out along with filling some sinky things along the way. One of the bigger ones you can see here on the front lower plate. The hull identification numbers are placed here. The part given was thick and fit not so good in the hole. I filled the hole and have thinned the number plate down and will glue this on later!
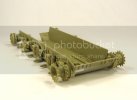
I was just about to add the rear plate and I found some things that needed some attention. The worst of which was the flaps on the fenders. The one on the right, I began to replace with some brass shim stock. These are rubbery and grey/black when painted, but, if you look at the one on the right, it's not hare to see why I had to chop.
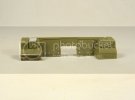
Also, I chose to fill in the pre-molded hole for the handle placement. After looking at the pieces I added the clean up factor, due to the mold seams with the chunkiness of the parts and I will replace these with some wire stock.
More to come soon. Tomorrow I am off to IMPS BayCon Show here in MA. and will be hanging with some good friends talking shop!!!
Thanks for stopping by!!!
As the title suggests, "getting my feet wet", I am coming out of the gate building my 1st Modern IDF!! So, please be gentle!!! LOL!!! I will of course I will have to rely on what I see in pictures and some friends in the world of IDF.
In all all seriousness, this is a new path for me and I am willing to take on the challenge and learn what I can from you guys that are more versed in the modern world, along the way. I was going to wait on the construction of this, but could not control myself last night and started to clean and add some suspension parts.
For now, this is what I am working with.....

This is my kit. Not sure how old this is, but assuming a couple years anyway. I could not pass up this, as with everything seen her in the picture was $40USD at the last AMPS show I attended.

Eduard PE

Cast resin wheels

Fruils...of course I spent some time a couple weeks back assembling 80% of both tracks to not be bogged down in the build with this. I stopped well before the amount needed to complete these....was unclear on the amount of links needed yet!

And of course this had a separate cast turret which, as you can see, has a tremendous amount of more detail added. From what I gathered already from some helpful folks, that this resin turret looks to be a MK II 2B conversion.

I have plans on purchasing an IDF Merkava MKII Turret Basket and Ball Armor set....thinking one from Legend for the moment, since the kit does not come with the ball armor that I wish to add....thes modern girls need their jewerly! Please, if there is another, better option I should be considering, speak up!!! LOL!!
What I guess I will try an accomplish will be to build her up and have a bunch of fun painting and weathering (which I love the most)...chipping, scratches, dirt dust and so on. Like I said, I don't know S**T about these things but willing to learn.
Here is where I stand at the moment....
I managed to get the suspension figured out along with filling some sinky things along the way. One of the bigger ones you can see here on the front lower plate. The hull identification numbers are placed here. The part given was thick and fit not so good in the hole. I filled the hole and have thinned the number plate down and will glue this on later!

I was just about to add the rear plate and I found some things that needed some attention. The worst of which was the flaps on the fenders. The one on the right, I began to replace with some brass shim stock. These are rubbery and grey/black when painted, but, if you look at the one on the right, it's not hare to see why I had to chop.

Also, I chose to fill in the pre-molded hole for the handle placement. After looking at the pieces I added the clean up factor, due to the mold seams with the chunkiness of the parts and I will replace these with some wire stock.
More to come soon. Tomorrow I am off to IMPS BayCon Show here in MA. and will be hanging with some good friends talking shop!!!
Thanks for stopping by!!!
