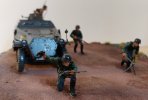
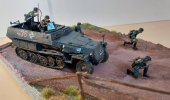
My first build

Pantherman

Well-Known Member
Joined
Feb 10, 2022
Messages
3,312
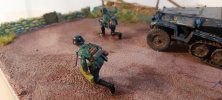
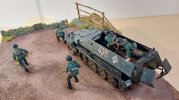
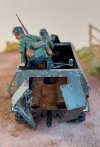
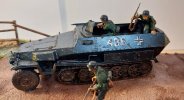
It's taken me 3 months but I'm happy with it. Have already learnt so much for the next one. Would welcome any comments, good or bad. Any tips for a beginner? Photos not great but hopefully good enough to see all the mistakes
 

Attachments

  • 20220327_172500.jpg
    20220327_172500.jpg
    239.3 KB · Views: 27
  • 20220327_172435.jpg
    20220327_172435.jpg
    288.8 KB · Views: 25
  • 20220327_172354.jpg
    20220327_172354.jpg
    242.3 KB · Views: 27
  • 20220327_172303.jpg
    20220327_172303.jpg
    255 KB · Views: 27
  • 20220327_172204.jpg
    20220327_172204.jpg
    178.9 KB · Views: 27
  • 20220327_172230.jpg
    20220327_172230.jpg
    280.4 KB · Views: 27
Looks great .
Only one recommendation is get yourself some matte clear so your troops aren't so shiny .
 
You are kidding about mistakes - right?! This is perfect! Although the shiny helmets are somewhat of a disappointment you can still use a little acrylic clear coat on a brush to fix it. I haven't put the rear gun on my half track yet and I don't think I'm going to. If you lost yours I'll let you have mine - I can ship it to you. I'm going mostly for the main overall look. Yours is perfect!!! I am very impressed. The quality is so much better. I didn't do such a good job on detailing their equipment belts as the brush I had was garbage and I wasn't so worried about perfection. I mixed the purple and it's not something you're going to get out of a bottle. I'll post photos as soon as I can get the wheels figured out. Those are still not fitting right for some reason. I've done armour before but I am more a girly car model type. I don't do any usually other than civilian vehicles and maybe a little sci-fi but not much any more. Thank you for posting this. Although my version won't be cannon it will still look decent and feminine. :)
 
Thanks for the offer of the rear gun. I have a set of german guns coming so I will fit one of those. Appreciate the help and comments. I think i will do some of the suggestions and post a new photo
 
Fantastic looking build.
Such a classic kit from Tamiya.
I think it has been in continuous production
since it's release in the early to mid-70's.
 
Fantastic looking build.
Such a classic kit from Tamiya.
I think it has been in continuous production
since it's release in the early to mid-70's.
Really enjoyed building it. Clear instructions and a good fit with just enough tricky bits to keep me interested. Also it was only £12 so great value for money. Thanks for your comments. Base was fairly easy as I'm a carpenter and able to get most of it from skips.
 
Thanks for the offer of the rear gun. I have a set of german guns coming so I will fit one of those. Appreciate the help and comments. I think i will do some of the suggestions and post a new photo
You really don't need to add the anti-aircraft MG to the rear as they were not always fitted. The reason for this is that each 251 came with 1 x MG34/42 and 2x MP 38/40 smg's and ammunition 7.92mm and 9mm. Normally this mean't that the MG was swopped from its forward mounting to the rear AA mount. This was the same with the AA cupola mounts on Panzers, where the Co-Axial MG was dismounted from inside the turret and moved to the AA mounting.
If a crew of an AFV could aquire a Spare MG, then both mounts could be used together. Of course this would deplete ammunition more rapidly.
I know that this is correct, from having discussions with German veterans, when acting as a volunteer at the Tank Museum in Bovington Camp, while I was in training as a Junior Leader in the Junior Leaders Regt. Royal Armoured Corps at 16/17 years of age in 1976/77, when given off duty time on Sundays. The museum was across the road from my Camp. This fitted in well with my established interest in AFV's and Modelling. It also allowed me the great opportunity of getting inside the exhibits like the Tiger 1 and others to have a great look about. If only Digital Cameras had been available then.........
Having had a few 'up' days, I will soon be in a position to post some in progress pictures of my 251/16 and actively take part in the forum. Hope everybody has a great weekend. John.
Wow, thanks for the info it's much appreciated. My next build is a tamiya panther so I think I will plan a trip to Bovington, with a camera and alot of memory cards. Irishvic
 
As a quick addition and further to my last, as long as a mounting component was being carried. On the APC version, the Infantry section gunner assigned to that vehicle, could mount the section gun in the AA mounting. However as the vehicle has no roof, with an aircraft attacking, only the very brave or dim would stay and mount the gun; Sensible soldiers would have dismounted in rapid order into the nearest ditch or cover.
John
 
I think it looks fantastic! The million dollar question is: did you have fun and enjoy the build? As a side note, speaking for myself I have been building models 55 years and even today when I finish a build I look at it and find something I feel I could have done better.
As long as we are improving our skills, enjoying the process & having fun then keep on building!
 
I want to finish my model but I somehow lost the turret cover from the machine gun sometime last week! Now I don't know what happened to it or even what I did with it. I have been looking forever. But in the meantime I'll put the rest of the wheels on and hope that they fit and I can figure out how to put the hinges on the body now that it's glued and has been glued together for some time. I also glued two of the figures arms on the wrong one (I followed the instructions) but they're backwards from the pictures. Now I have to get the back from wherever it got lost so I can put this on a board and do a diorama with it. Otherwise it's going to sit in the box another two years.
 
But in the meantime I'll put the rest of the wheels on and hope that they fit and I can figure out how to put the hinges on the body now that it's glued and has been glued together for some time.

What kind of glue did you use, If I may ask? Something might can be corrected? If not, it IS plastic and there isn't much you can't correct, or I should say, can't be corrected?

I also glued two of the figures arms on the wrong one (I followed the instructions) but they're backwards from the pictures. Now I have to get the back from wherever it got lost so I can put this on a board and do a diorama with it. Otherwise it's going to sit in the box another two years.

Ok, that's two things you've mentioned you glued on backwards from the same instructions... Flip those instructions over and see if it helps?

Just pullin' your leg of course. ;)
 
I think it looks fantastic! The million dollar question is: did you have fun and enjoy the build? As a side note, speaking for myself I have been building models 55 years and even today when I finish a build I look at it and find something I feel I could have done better.
As long as we are improving our skills, enjoying the process & having fun then keep on building!
I really did enjoy the build and did a fair bit of research as well. I think I have started down the modelling rabbit hole !
Irishvic
 
I want to finish my model but I somehow lost the turret cover from the machine gun sometime last week! Now I don't know what happened to it or even what I did with it. I have been looking forever. But in the meantime I'll put the rest of the wheels on and hope that they fit and I can figure out how to put the hinges on the body now that it's glued and has been glued together for some time. I also glued two of the figures arms on the wrong one (I followed the instructions) but they're backwards from the pictures. Now I have to get the back from wherever it got lost so I can put this on a board and do a diorama with it. Otherwise it's going to sit in the box another two years.
I found the wheels and rear doors the most challenging. Did alot of dry fitting but still got the wheels wrong but noticed my mistake before the glue set, just. All part of the fun and learning new skills.
 
What kind of glue did you use, If I may ask? Something might can be corrected? If not, it IS plastic and there isn't much you can't correct, or I should say, can't be corrected?


Ok, that's two things you've mentioned you glued on backwards from the same instructions... Flip those instructions over and see if it helps?

Just pullin' your leg of course. ;)
Sadly I HAVE thought of reverting the instructions! Not simply reversing them because it made this more confusing than helpful even with the pictures. Two things: I have glued it with SUPERGLUE and it's already painted and the one hinge is now shorter than the other (glued and removed one time) - what to do now? I guess that I can sand or strip away the internal hinges and glue them on and make new ones. The wheels so far are an absolute joke! they don't fit correctly. I have to do some re-thinking and fit them differently so that they can all fit onto the tank body and not be irregular in their appearance.
 

Latest posts

Back
Top