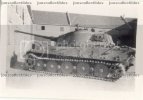
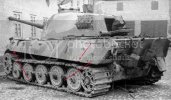
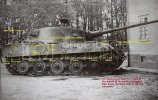
I decided to take a break from my Trumpeter 1/16 KT and take a stab at building a Final Production Tiger Ausf. B, using Hilary Doyle's outstanding 1/35 scale drawings found in T. Jentz's VK45.02.
The base kit is Dragon 6232 KINGTIGER LATE PRODUCTION w/NEW PATTERN TRACK. I also cannibalized Dragon 6303 KINGTIGER Henschel Turret w/Zimmerit for its PE. I also used Aber's 35K01 (Tiger I Deluxe Set) for additional PE detail parts.
After assembling the major components, I proceeded to detail the hull and turret. I added strands of .1mm styrene to better replicate the weld seams on the turret and hull roof. The strands were softened with Plastuct Plastic Weld; then, using a chisel blade, I was able to tuck and shape the strands into the crevises:
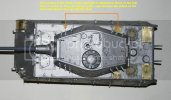
After adding some details, I decided to add some texture in order to simulate the imperfections found on rolled homogeneous steel plate. Instead of using the standard Mr. Surfacer method, I opted to use good ol' Model Master Steel Metalizer straight from the bottle. Less mess, tastes better . I used an old sable brush to apply the Metalizer, in fairly thick coats, onto the hull and turret. The lacquer in the Metalizer softens the plastic causing it to form small imperfections on the immediate surface. After the Metalizer dried, I used superfine steel wool to smooth out everything and polish the Metalizer, which is now embedded in the plastic:
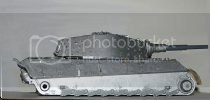
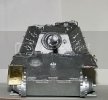
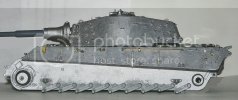
The effect is subtle and imparts a fairly realistic representation of rolled armor plate. This method can also be used to replicate the cast texture of the gun shield and the armored exhaust covers.
I like the fact that Dragon 6303 include OEM tools without molded-on tool clasps. This wonderful option permits me to experience full blown insanity, in all its glory, as I try to assemble those impossibly microscopic Aber tool clasps without becoming homicidal. The downside of the tools of Sprue TA is that the handles for the axe, shovel and sledgehammer are plastic. So, what to do about this? Simple! I obtained some logs

turned them on a lathe

did a little carving and ended up with
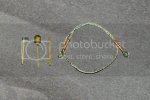
The tow cable on the far right was also carved out of a single toothpick.
Wood Eye lie to you?
Seriously though, I carved and sanded cocktail toothpicks (am I allowed to use that word?) to make wooden handles for the axe, sledge (not pictured. My cat got a hold of it after I dropped it prior to the photo being taken. Guess what's on the menu for Christmas dinner?) and shovel. The object to the right of the shovel, If you look closely, is a 1/35 scale 36" baseball bat. It even has a chipped knob. I know Louisville Sluggers weren't standard OEM in the Wehrmacht. The bat will figure prominently in a little (redundant) vignette I'm planning which will be titled "Three Reichs And Yer Out!"
This project is presently on hold because of a small discrepancy regarding the tracks for this vehicle. According to information available, the late and final production Tiger Bs were to be shod with Kgs 73/800/152 single link tracks. The problem I have encountered concerns whether or not this particular track used in March 1945 was asymmetrical or handed. Kit 6232 comes with handed Kgs 73/800/152 track links:
Part F 1, for the right track run and Part F 2, for the left.
Now, if you were to study the turret photos on pp.134-5 of VK45.02 and compare them with Doyle's drawings on pp.136-7, you will see that this tank had to use only asymmetrical tracks. The location/positioning of the studs between the hangers indicates that this is the case.
As I indicated in the photo below, I overlaid Doyle's drawing on top of my build:
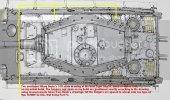
The turret hardware was placed in the exact positions as seen in Doyle's drawings and in the aforementioned photos of the turret.
This is a photo of the left side with the links, painted German Camouflage Orange for better visibility, (Part F 2) mounted on the hangers.

This is a photo of the right, with the F 2 links mounted except at the top front. This is an F 1 link, painted German Camo Green:
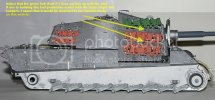
Looking at the inset, you'll notice tha the green F 1 link doesn't line up with the stud. The orange F 2 links do, though. So, what does that tell me? It tells me that the final production Tiger Bs were to be equipped with asymmetrical, and not handed, tracks. In other words, the track run, as represented by Part F 2, would be "flipped", as were the tracks on the Tiger I, when mounted on the right side. A photo, on p.131 in VK45.02, of a final production Tiger B being bulldozed of a road, VK45.02 shows that this indeed is the case. If there are doubts about this, I'll pose this question:
If the track runs on the last Tiger Bs were handed, why were the stud locations on both sides of the turret positioned to mount only track links which are represented by Part F 2? The German designers were anything but stupid. They had to have come to the conclusion that it would not only be logical, but economical, to use only asymmetrical track links. Sure, Doyle's drawings show handed tracks; but, the stud locations in those same drawings say otherwise. The photos of the last turret also bear this out.
So, what can I do about this track dilemma? Does anyone know if Friul ATL-37, or -92, are handed or not? Does anyone here know of a source for track links which are identical to the kit part F2? Any information would be appreciated. Unlike my Trumpy KT, I'd like to complete this build before my as-of-yet unborn great grandchildren celebrate their 30th birthdays.
The base kit is Dragon 6232 KINGTIGER LATE PRODUCTION w/NEW PATTERN TRACK. I also cannibalized Dragon 6303 KINGTIGER Henschel Turret w/Zimmerit for its PE. I also used Aber's 35K01 (Tiger I Deluxe Set) for additional PE detail parts.
After assembling the major components, I proceeded to detail the hull and turret. I added strands of .1mm styrene to better replicate the weld seams on the turret and hull roof. The strands were softened with Plastuct Plastic Weld; then, using a chisel blade, I was able to tuck and shape the strands into the crevises:

After adding some details, I decided to add some texture in order to simulate the imperfections found on rolled homogeneous steel plate. Instead of using the standard Mr. Surfacer method, I opted to use good ol' Model Master Steel Metalizer straight from the bottle. Less mess, tastes better


The effect is subtle and imparts a fairly realistic representation of rolled armor plate. This method can also be used to replicate the cast texture of the gun shield and the armored exhaust covers.
I like the fact that Dragon 6303 include OEM tools without molded-on tool clasps. This wonderful option permits me to experience full blown insanity, in all its glory, as I try to assemble those impossibly microscopic Aber tool clasps without becoming homicidal. The downside of the tools of Sprue TA is that the handles for the axe, shovel and sledgehammer are plastic. So, what to do about this? Simple! I obtained some logs

turned them on a lathe

did a little carving and ended up with

The tow cable on the far right was also carved out of a single toothpick.
Wood Eye lie to you?
Seriously though, I carved and sanded cocktail toothpicks (am I allowed to use that word?) to make wooden handles for the axe, sledge (not pictured. My cat got a hold of it after I dropped it prior to the photo being taken. Guess what's on the menu for Christmas dinner?) and shovel. The object to the right of the shovel, If you look closely, is a 1/35 scale 36" baseball bat. It even has a chipped knob. I know Louisville Sluggers weren't standard OEM in the Wehrmacht. The bat will figure prominently in a little (redundant) vignette I'm planning which will be titled "Three Reichs And Yer Out!"
This project is presently on hold because of a small discrepancy regarding the tracks for this vehicle. According to information available, the late and final production Tiger Bs were to be shod with Kgs 73/800/152 single link tracks. The problem I have encountered concerns whether or not this particular track used in March 1945 was asymmetrical or handed. Kit 6232 comes with handed Kgs 73/800/152 track links:
Part F 1, for the right track run and Part F 2, for the left.
Now, if you were to study the turret photos on pp.134-5 of VK45.02 and compare them with Doyle's drawings on pp.136-7, you will see that this tank had to use only asymmetrical tracks. The location/positioning of the studs between the hangers indicates that this is the case.
As I indicated in the photo below, I overlaid Doyle's drawing on top of my build:

The turret hardware was placed in the exact positions as seen in Doyle's drawings and in the aforementioned photos of the turret.
This is a photo of the left side with the links, painted German Camouflage Orange for better visibility, (Part F 2) mounted on the hangers.

This is a photo of the right, with the F 2 links mounted except at the top front. This is an F 1 link, painted German Camo Green:

Looking at the inset, you'll notice tha the green F 1 link doesn't line up with the stud. The orange F 2 links do, though. So, what does that tell me? It tells me that the final production Tiger Bs were to be equipped with asymmetrical, and not handed, tracks. In other words, the track run, as represented by Part F 2, would be "flipped", as were the tracks on the Tiger I, when mounted on the right side. A photo, on p.131 in VK45.02, of a final production Tiger B being bulldozed of a road, VK45.02 shows that this indeed is the case. If there are doubts about this, I'll pose this question:
If the track runs on the last Tiger Bs were handed, why were the stud locations on both sides of the turret positioned to mount only track links which are represented by Part F 2? The German designers were anything but stupid. They had to have come to the conclusion that it would not only be logical, but economical, to use only asymmetrical track links. Sure, Doyle's drawings show handed tracks; but, the stud locations in those same drawings say otherwise. The photos of the last turret also bear this out.
So, what can I do about this track dilemma? Does anyone know if Friul ATL-37, or -92, are handed or not? Does anyone here know of a source for track links which are identical to the kit part F2? Any information would be appreciated. Unlike my Trumpy KT, I'd like to complete this build before my as-of-yet unborn great grandchildren celebrate their 30th birthdays.

