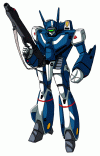
VF-1J blue version, Max Jenius, 1/72 Imai

YOULI

That which does not kill us makes us stronger !
Joined
Nov 28, 2011
Messages
947
I'm building an Imai vintage kit from Macross, the Valkyrie VF-1J, the blue one piloted by Maximilian Jenius.
This kit is 1/72, transformable, but since I want it with the Red VF-1J I've already done 12 years ago, it will be "limited" to the Battloid mode.
The kit was already done for some parts...

Box art (great painting, I love it !)


What lies in it, half done, badly glued and painted...


That's what I began with, a few months ago, sanding, painting black some details...


The hands are "as is". Not bad back in the days but I have other options.


Those are option parts, hands for the Rick Dias from Gundam.
And other kit parts... Evangelion, Gun-cannon...


The missiles were untouched. This will be fun to paint, let me tell you...


This is the VF-1J I've done years ago. The goal is to obtain a blue version as good as this kit.

 
I'm really pleased with the result with the "eye" of the VF-1J head.
I used the original head, even though I had the choice to use Hasegawa's heads. I want this kit to be identical, for the most part, to the red version.
I used a jewelery, with stickers, cut here and there to obtain the mirror part like a triangle. It was "clear" so I used a Gundam marker first then a green ink from Citadel.


Though something is missing. Let's take a look to the illustration on the box. Yeah, here we are... It has no chin.


I used a missile support part, cut a edge and glue it on the head.


Here is the result with the "laser antennae". Thos will be painted blue and silver later...


Now I want an articulated head, and some details for the neck.

 
Thanks Grendel ! :)

Here we go (I worked on it for one month now with many other things so I just uploaded the pictures and story about it... :) ).

I painted whit and blue here and there. With precaution since I can't remove the parts and glue them alltogether. Here the yellow circle and the blue on the leg are painted panels to panels, since the white parts are consolidated with plasticard (glue and putty won't be enough here... VIntage 80's kit fellaws !)


The new washes from citadel are not good enough for my goal here. Usually the pigments go directly in the recess, but here the black "oil" stay on the white surface, doing this mess for the time being. Fortunatly I intend to paint in white and blue all of it it was just to "see" the panel lines.
The painting scheme will be slightly different than on the red VF-1J. So I documented myself in order to do it right.

For instance, the paint scheme should look like this.

vf-1j-styled-max-battroid.gif


Though it's not bad on the leg on the air entry.


We can't see anything but I assure you that I glued on a photo-etch grill on the chest. The Air entry...


I transformed the Battloid to some kind of weird fighter to gain access to the interior parts and paint them in an easier manner. I need some blue, white, black, silver, steel, bronze...


That's not the fighter mode cockpit, it's the Battloid mode cockpit. I retired this part in order to paint it properly, and will do it again to apply the old decals. I hope the white strips will be good.
My painting skills are limited. I really hate painting straight lines and white paint don't help at all. OH BTW the all painting work is done with brushes. I inteded to use a spraygun but my girl friend let it to rust and the compressor need oil.

 
Thanks but that's really not that good... It should have been better with a spray-can, or an air-brush but I had only a white that died in my hands, and the airbrush here is out of mineral oil (and the airbrush is rusted).

So, I managed to work with my brushes, the good old manner ! :D
 
The feet has not all the parts. Who cares, who will notice it ? Me. I will use some T plasticard to replace the missing parts.


really happy with the Gunpod, and the red thingy. It's red with some orange and fluorescent color. With the naked eye, it looks like it glows. Once I'll apply the UN SPACY decal and other details, like the strip you can see in the show, I'll apply some good old weathering...


While cuting the wrist of the hand, silly me, I broke an important part that made this stay in place. So I replace it with a "pixel", a rubber tube in color made to do images on a pin vice caneva, and it works.


Somewhat a waste of time since I really want to replace the original hands by resin ones from the Rick Dias...

 
They are round, a lot of details, articulations and stuff... ANd the right size.

They sell new hands, in plastic, in Japan. Seen it on HLJ but since I can't order anything for a while... A pity since this kind of Option Parts sell like crazy. THere is so much OP not available these days from Wave or Kotobukiya.
Quite happy to have a LOT of them. Not enough for all my projects but, hey, even if I work on several of them at once, can't do EVERYTHING right now right.

Plus, like I said, there is new hands available now. In the future they can be even better, cheaper, mine to own. :)

http://www.hlj.com/product/BAN977921
http://www.hlj.com/product/BAN976497

THere is ton of OP material to deal with too... :)
http://www.hlj.com/scripts/hljlist?rel=nav&GenreCode=Gun&MacroType=DetAcc&DisplayMode=images&Dis=2&Sort=std&qid=O1DGI7RBWM25H&set=1&Page=2
 
Thanks Quaralane, I have a number of details to share with you guys.

And then I will resume the building.
I stopped because a friend of mine send me a Gundam head, 1/48 scale and I built it, and detailed it, and painted it in only two days (a few hours actually). It's not completely finished since I want to add decals and dry transfers, and certainly have to paint again some surfaces, but it's good to an exhibition I have in two weeks.

I have some problem with photobucket (new presentation, new way of dealing with the links, silly them, can't even find the thumbnails, only big size images, plus I can only link the entire album or ONE pictures at a time... What the... ?) so if you want to see what it is, here is a link to my Facebook album.


http://www.facebook.com/photo.php?fbid=10151194393401473&set=a.10151191661041473.467748.580936472&type=1&permPage=1#!/photo.php?fbid=10151194395151473&set=a.10151191661041473.467748.580936472&type=1&permPage=1
 
Painting blue the biceps was not easy. The parts were already glued, dislocated them would not be pretty, kits of this age are not like the modern ones. THough I added some plastic card to dissimulate the gaps and ameliorate the articulations. Glued in place, sanded and then painted with "Enchanted Blue" a Citadel's color that no longer exist I think.


Shoulder's lights
I wanted to use other parts taken from a VF-1D, and duplicate those later but finally I tried some ideas of mine. Some really good result, and you'll see why.


I have also the lights on the wings to replace. it's a bit more complicated (would imply a lot of sanding, some clear coat application...) so that will be done with the original parts taken on a 1/72 Imai VF-1D. But I've got several other ideas for the future :) maybe a vacuuform solution...


What are the participants in this contest ? Some plastic forks, an old CD box...


With some of the fork's teeth I obtain some parts with the right size for the lights, but it's smooth. Clear but smooth.


That has to fit in here. The mirror stickers I placed previously were painted orange...


Eventually, the CD box was fairly easy to cut than the plastic forks, and the strips on it are like the original piece (more or less), so that will be our winner in this contest ! :)
And I'm really happy with the result.


It looks really good !

 
Thanks. Looking for option is a thrilling activity. Obtain satisfaction in the end is exciting. :)
 
The missiles were not easy to do.
Note that the box illustration is partially wrong.


I had to use internet to provide some color and painting direction. My books are not with me right now. I painted one before my computer (very risky) and painted the others in the same pattern. The red part was easy, the dark strips were more complicated. Didn't like it so use a black wash from citadel...


And then what ?

In the forearms, there is kind of black square with a red light. On this kit it's only available with decals. I could use it but I think I can use some plane windows to scratch it, and use a dremel to glue it.


The red thingie near the air entry on the legs are hollow, but with this kit it's not. Will certainly use the dremel and then add a straw or anything to look better.


Latest posts

Back
Top