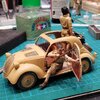
German / Italian Topolino 2025-01
Jakko
Well-Known Member
- Joined
- Oct 9, 2024
- Messages
- 782
If you find yourself needing to make small discs a lot, you may want to invest in a punch-and-die set. They're not cheap, but if you buy approximately two kits less, you can easily afford one. As a further tip, if you also want to make domed rivets, buy a regular punch-and-die set plus separate (replacement) domed punches for use in the die from the first one, which will be much cheaper than getting a second complete set of domed punches and the associated die.
- Joined
- Sep 4, 2022
- Messages
- 1,573
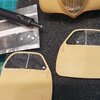
I did get a small inexpensive set, that's how made these discs for the side windows. I also have an assortment of resin domed rivets, which I use from time to time.punch
I've seen other guys completely replace all the rivets on armour... not sure I'll ever go there, but with some poor castings, that might be an option!
Jakko
Well-Known Member
- Joined
- Oct 9, 2024
- Messages
- 782
What you have is a punch, but a modeller's punch-and-die set looks like this:
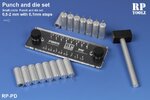
You place the sheet (plastic, pewter, decal sheet, whatever) between the clear and the steel plates, tighten the screws at least somewhat, insert a punch into the appropriate hole, and tap it with the hammer to create a neat little disc.
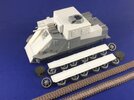
It's a tedious job, and glueing a bunch of those discs or rivets onto a model is often even more tedious, but depending on what you build, it can be alife sanity saver  Like when you find yourself having the brilliant idea to build something like this:

You place the sheet (plastic, pewter, decal sheet, whatever) between the clear and the steel plates, tighten the screws at least somewhat, insert a punch into the appropriate hole, and tap it with the hammer to create a neat little disc.
It's a tedious job, and glueing a bunch of those discs or rivets onto a model is often even more tedious, but depending on what you build, it can be a

- Joined
- Sep 4, 2022
- Messages
- 1,573
... aptly named for military modelers!punch-and-die
Here is another one: necessity is an excuse to spend more money!
All kidding aside, that's one serious looking piece of kit!
Maybe if I'm a reaaallly good boy, and eat all my vegetables!
Jakko
Well-Known Member
- Joined
- Oct 9, 2024
- Messages
- 782
Like I said, they're not cheap. Some years ago I paid around €80 for the type shown in the photo, and checking just now, I see it costs closer to a hundred now. So definitely not something most modellers really need, but for the kind of modelling I do, it's a good investment because it will save a lot of work and aggravation trying to make little discs in other ways. If you only need the occasional one, your punch will be quite sufficient, or for example cutting discs from plastic rod.
- Joined
- Sep 4, 2022
- Messages
- 1,573
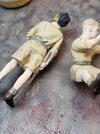
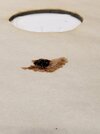
... so I'm putting down some base colours on my figures, sitting at a different spot, the light hits it differently and I spot the San Andreas fault running up his leg to his waist!
I'd spent so much time tweaking the seated chap that I never noticed...
FIAB: Fix It Again Brian
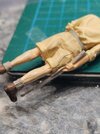
And the rifle and fingers too!
I'd spent so much time tweaking the seated chap that I never noticed...
FIAB: Fix It Again Brian

And the rifle and fingers too!
My thoughts exactly!Impressive!
locomotive
Active Member
- Joined
- Mar 2, 2025
- Messages
- 77
Yeah but hang on… who's going to see unless they're up this close and peering all over it to find fault?... so I'm putting down some base colours on my figures, sitting at a different spot, the light hits it differently and I spot the San Andreas fault running up his leg to his waist!
I'd spent so much time tweaking the seated chap that I never noticed...
FIAB: Fix It Again Brian
View attachment 141964
And the rifle and fingers too!
If the finished article pleases you, then don't give yourself work. Because that's what it is. It's passed being fun when you go back and do it again.
It's looks totally acceptable to me.
- Joined
- Sep 4, 2022
- Messages
- 1,573
True.totally acceptable
Strange fellow that I am though, I just happen to like the process: iterating, refining, enjoying little challenges that pop up to keep me sharp.
And probably no one will notice the fix either, if I do it right.
I can't help but think that practicing on the back of his leg will save my bacon, somewhere down the line, when it really does matter!
Besides, can't have him sporting what reminds me of these now, can I?

- Joined
- Sep 4, 2022
- Messages
- 1,573
First daub of oil since 1982!
Burnt umber. From Umbria.
Fitting, as I attempt to finish up my Italian figures.
This could take a while.
And thankfully, I have my Italian horde to practice on!
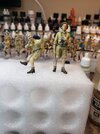
Burnt umber. From Umbria.
Fitting, as I attempt to finish up my Italian figures.
This could take a while.
And thankfully, I have my Italian horde to practice on!


- Joined
- Sep 4, 2022
- Messages
- 1,573
For the next little while, will be posting figure painting progress along with the rest of the Italian mob (no pun intended).
Once they are complete, back here for reunion with little mouse and other accessories.
Cheers
Once they are complete, back here for reunion with little mouse and other accessories.
Cheers
- Joined
- Sep 4, 2022
- Messages
- 1,573
Yup, a tough one. I may have to settle with this one pose...slipping from his grasp
I had also noticed in the photo that he seems to be tossing it through the air, not quite in control.
I could always claim that it's the result of the freeze frame action pose!
Will have to think some about it.
How to visibly tighten his grip or make the gun look more stable...?
It is already a bit of a stretch, getting him and his weapon out of little mouse in a hurry...
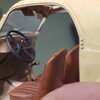
Rotating his body, ducking below the door frame, lunging from the seat, getting the first leg out out and about to transfer his weight to it, getting that awkward gun past the steering wheel, pushing the door open at the spot of the open window with the other hand and extended arm, all while yelling at his buddy to get out, because a DAF Kittyhawk has spotted them and started to bank around!
Similar threads
- Replies
- 100
- Views
- 3K

