Diorama WIP

Jim62

Well-Known Member
Joined
Oct 26, 2020
Messages
753
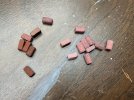
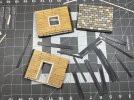
Getting started on my next diorama and I thought I'd try doing a WIP post. I had a sudden thought pop in my head to do a continuation of the Sniper Dio for some reason so I'm giving it a go. So far I have a partial form of a building and hundreds of little foam bricks to paint. I won't get into description of what the scene is at this point, because it would be too much like telling how a movie ends before you see it. So here we go. Never done this before, so please bear with me.

I decided I'd keep it the same size as the part one since it's a sequel diorama. Here I have a partial structure and an unknown number of little foam bricks to paint. Now it's on to painting and attaching the bricks. Oh the horror...LOL This may take me a while.
IMG_1121.JPG
 
Great start, Jim! Where did you source the bricks? I didn't know there were any made of foam.
 
Great start, Jim! Where did you source the bricks? I didn't know there were any made of foam.
Thanks and I cut the bricks myself with a hot wire cutter. I gotta say when I got done I was surprised how many I had. It should be more than enough. Always nice to have extras to use later. I'm doing the building as a cutaway minus the front wall and roof since they would only hide the scene inside. It's going to be interesting to see if I can get it to work the way it does in my head.
 
Thanks and I cut the bricks myself with a hot wire cutter...
Ah, OK! Cool! I wondered if they were commercially produced, like Verlinden's bags of bricks, or from Hansa Systems. Yours look really good and I look forward to seeing them installed and painted.
 
Ah, OK! Cool! I wondered if they were commercially produced, like Verlinden's bags of bricks, or from Hansa Systems. Yours look really good and I look forward to seeing them installed and painted.
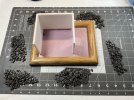
Thanks what really makes a difference is after you cut them, put them in a container with some rocks and shake away and you get a pretty darned good texture. I believe I ended up with around 6 or 7 hundred of them. I counted one pile at 125 and they all are close to the same size piles. I can't bring myself to sit and count them all. The big thing to remember if you ever do this, is to not lay them out in front of you like in my picture. The slightest amount of breath sends them flying everywhere. I dropped my knife and let out an expletive and poof there they went, lesson learned. :oops:
 
What exactly is that foam from ?
Food packaging , like those trays you get steaks and other meat on that's overwrapped with clear plastic ?
 
Could you please count the remaining bricks?
I am following very closely.
Most excellent. Brought a chair. I'm in.

Jim, when you use the wire cutter, it changes the surface on the cut side. Does this cause any reaction with paint adhesion? Is it less resistant to the stone and foil texturing?
 
Could you please count the remaining bricks?
I am following very closely.
Most excellent. Brought a chair. I'm in.

Jim, when you use the wire cutter, it changes the surface on the cut side. Does this cause any reaction with paint adhesion? Is it less resistant to the stone and foil texturing?
Well I've started painting them so I'll give it a count. I've painted a few already so I'll get a pic of a painted one so you can see what the cut side looks like painted. The cut side will be between the rows of bricks so not visible when completed, and no the paint does not adhere to those areas as well because they are more porous.
 
Could you please count the remaining bricks?
I am following very closely.
Most excellent. Brought a chair. I'm in.

Jim, when you use the wire cutter, it changes the surface on the cut side. Does this cause any reaction with paint adhesion? Is it less resistant to the stone and foil texturing?
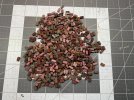
Well I was a bit curious myself to know how many bricks I got, just too lazy to count them but the number is 727 little tiny bricks. Here's a couple pics I took and I'll put a description below.IMG_1125.JPG
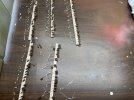
Well now you can see how the paint works on these. the spongy looking sides are where the cuts were made and you can see that doesn't look like a brick at all so of course it will not be visible. The other two sides look like bricks. The darker bricks were primed first with red brown stynylrez and then sprayed with Tamiya flat red. The pinkish ones were not primed. I can't really see it in the pics but the primed ones look better to me so I will continue priming them and repaint the lighter ones and use the paint on them as the primer. I don't really need to paint the whole brick and I could easily attach them unpainted and paint them later with a brush but I know there will be spares to hold onto for debris on another build and I'd rather spray them than brush them later. The next pic is the technique I use to paint them. Stick em with a pin, then hold them and spray them. Tedious but easy. The pin holes will not be visible when I am done. Something I forgot to ensure doing on a previous build. Hope this helps answer your questions.IMG_1129.JPG
 
y9biijT.jpg
 
Well I've started painting them so I'll give it a count. I've painted a few already so I'll get a pic of a painted one so you can see what the cut side looks like painted. The cut side will be between the rows of bricks so not visible when completed, and no the paint does not adhere to those areas as well because they are more porous.
Nah, Jim I was just playing about the count.
You'll get to know me. I shouldn't be left to my own devices and certainly not let alone with open flames.
I do like this though. Keep bringing it.
 
Nah, Jim I was just playing about the count.
You'll get to know me. I shouldn't be left to my own devices and certainly not let alone with open flames.
I do like this though. Keep bringing it.
No problem it just got me to satisfy my own curiosity.
 
Well it took a while but I finally got all the bricks painted and or accounted for. It is quite the monumental task. Now it's on to figuring out how I'm gonna turn the building into the picture I have in my head. It will take a while to muddle through it since I've never done this before. IMG_1133.JPG
 
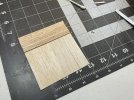
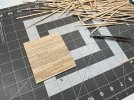
Sorry it's been a while but life got in the way for a bit. I decided to do the floor first and build the building around it. I got a kick out of making this floor. I just glued balsa strips on top of a thin piece of balsa with Elmer's. Still have clean up to do on the edges and have to decide on paint or staining with washes. Perhaps a combination of the two. I can tell you after gluing all the boards down I realize just how tedious the bricks will be when I get to them. :eek: But get to them I will.
IMG_1153.JPG
IMG_1154.JPG
 
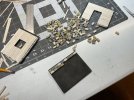
A bit more progress has been made. I got the interior covering for the 3 foam walls on, still need paint and finishing touches of course. After I covered two of the walls with balsa wood strips I looked at the third wall and decided the interior of that wall needed to be different. So a thought came to me about using stones similar to the ones on the surrounding wall which was part of Sniper part 1. Hopefully it will all fit together properly in the end. So now I better go watch some vids on painting wood since that is my next step.
IMG_1156.JPG
I took this before I finished putting on all the stones but they are all on now. Man doing the small bricks on the outside of the building is going to be mind numbing.
 
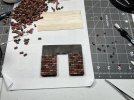
Well the gluing of the small bricks has started. Luckily for this first time doing this I only have to cover two walls, but I think I am obligated to pay the brick layers union after this. :) I got the first couple rows a bit close to each other just hoping my grout gets in between those bricks. If it all comes together at the end then I'm a happy camper no matter what.
IMG_1163.JPG
 
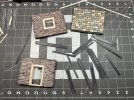
Got a little more done. I intend to use balsa as a framework for the building to clean up the edges and stained it with a faded wood stain. I think I got it a little to dark but I'm gonna let it ride and see how it works. I also framed the door and window that still need staining inside and out, something I am hoping to get done before the weekend but we'll see. Once I'm done with that and a little more work on the inside then I can at least assemble the building and get on with the rest of the build. Between the bricks I used a white sanded grout that was a bit to white for me so I gave it a light gray wash to tone it down. While I'm at it, Merry Christmas to all.
IMG_1180.JPG
IMG_1181.JPG
 

Latest posts

Back
Top