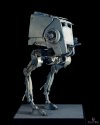
1/48 AT-ST

Unreality

or Jonathan if you prefer
Joined
Dec 19, 2012
Messages
332
No, I haven't got any pics yet, as I don't have the kit on hand yet. It's currently on route. But I want to make a placeholder for the upcoming build, which I cannot wait to begin.

Curious, does anyone have any 1/48 Snowtroopers? Or does anyone know where one might get a 1/48 Snowtrooper?

(That last statement was completely unrelated to the AT-ST build. I mean, it must be unrelated. Snowtroopers in a Scout Walker. Can't be......right?)
 
Well, I finally got mine in. Slower shipping sucks, but everything evened out to $18 for the walker. Considering the quality, I'm more than happy.

DSC_8243_zps7bjbuhze.jpg~original


Now, Scott is doing a great job on the build, so I'm just going to point out a few little things:

First, part C1 36 is optional. It obscures detail underneath and isn't shown in any other pics in the instructions. You can see the rectangular hole here (the one with the semi-circle). BTW: you can technically add it after the other construction, but you couldn't remove it without removing other parts.
DSC_8246_zpsrgllp8ff.jpg~original


The other concern is how to make the legs fully articulated. Now, they do articulate quite a bit, but it isn't hard to alter them to be fully poseable. Here are the parts that have areas you need to remove (highlighted in red). I also added some arrows so you can more easily see the small nubs that need to be removed.

DSC_8249_zps4zaqosbv.jpg~original


You should be left with something that can do this. The tension strip at the back of the shin is made of a vinyl-plastic, so it can withstand being moved around.

DSC_8245_zps9ktk5yjo.jpg~original
 
Oh, and here are the parts I modified:

A20 (A20)
A3 (A4)
A1 (A2)
D1 13 (D2 12)
D1 12 (D2 13)
B4 (B3)
A5 (A11)
A11 (A11)
 
nicholassagan said:
Sweet! Where'd you get the little troopers?

Those are Wizards of the Coast Miniatures. They are all about 1/48...perfect for what I want.


Looking back at what I did, it would have been more accurate if I had cut the "loop" off the tensioner strip instead of the 2 tabs. You can see in the below pic, which matches the studio models, that the bar extends below the ankle joint.

atst_ss_01.jpg

However, considering the vinyl plastic, it may work better the way I modded it. I may try replacing the bar with brass before I paint it. It would also give me a chance to try AKs PE burnishing fluid.
 
Spent some more time today on it. Honestly, you could build this in one day, but I'm trying to delay the joy of this build. I noticed a few more options.

First off, you can position the hatch to open on the side or in the back. Chewie only works with the rear opening hatch, but some of the models had a side opening hatch...so you can choose.

DSC_8255_zpsyxp9v5ov.jpg~original


DSC_8256_zpszeuz12vc.jpg~original


There's also a lot of detail hidden by the rear radiator thingy. That little piece fits over all that detail at the back of the cabin roof. But I've seen no photos that show the walker without that piece there.

DSC_8257_zps0n3c2ipr.jpg~original


And finally, you have a choice of joints for the upper legs. The larger piece locks the joints together. Now, unless you are dropping in nose weights :p , the snap pieces are strong enough to hold whatever position you put the legs in. I may look at modifying the larger piece to add more strength to the joint, but it's mostly unnecessary.

DSC_8259_zpsfqmzappe.jpg~original
 
Great work, I'm learning tons about this kit - and I'm building it, lol. Sweet.
 
Scott Girvan said:
Great work, I'm learning tons about this kit - and I'm building it, lol. Sweet.

It's funny how multiple people can build the same kit and each person add something new or discover a new way of doing _____. Man, I love this hobby.

Thanks for the comments.

I plan on detailing the cockpit a little bit (I know, the cockpit is already insanely detailed). My ONLY complaint so far is that the seats are molded in AND they have the attachment point for the figures. If you wanted to leave a seat empty, you would need to do some delicate surgery at an awkward angle.
 
Totally, several of these builds going on around the interwebs and theyre all fun to watch.

The detail in the cockpit is awesome but at the end of the day we wont see a bit of it. Not sure if ill bother with more than a basecoat and a wash.
 
Thanks for the comments guys. I took a little more time tonight to work on it. Granted, most of these modifications are unnecessary. But I do like adding the detail.

First up was replacing the molded-on hoses with styrene rod. Adding these was easy, but cutting out the molded bits was a pain.
wip-at-st8_zpsbrpphvlo.jpg~original


Next up: replacing the vinyl-plastic tension bars with brass strip. I haven't added the bend yet, but I will. I'm also pointing out some seams that you may need to fill. The upper two seams were easily fixed with a little Tamiya extra thin. The seam on the feet is a little more pronounced.
wip-at-st9_zpsmgwnunxq.jpg~original


Lastly, I added a throttle to replace the molded on one in the cockpit. Honestly, I can't think of any other detail to add in the cockpit. Even comparing the Incredible Cross-Sections drawings, this kit has it all there. Also, I drilled out some of the rivets on the model, particularly the ones around the side weapons. A .4 mm drill bit was perfect at adding a little more depth.
wip-at-st10_zpsnw9ccb8q.jpg~original


Finally, here is the inspiration for my build. I love the top gun, the kill markings, and the little triangular sensors on the lower front.
Walker_Assault.jpg
 

Latest posts

Back
Top