Bad Kitty!! - Completed!
- Thread starter TRM
- Start date
schweinhund227
New Member
- Joined
- Jun 24, 2009
- Messages
- 2,511
Re: Bad Kitty!!
Are those Dragon Quick Tracks ??? Looks great !
Are those Dragon Quick Tracks ??? Looks great !
S
ScaleModelMadman
Guest
Re: Bad Kitty!!
Workable tracks.
Nice.
;D
Workable tracks.
Nice.
;D
schweinhund227
New Member
- Joined
- Jun 24, 2009
- Messages
- 2,511
Re: Bad Kitty!!
Really good deal on those ! WOW ! that's a Steal ! Too bad I have already bought my replacement tracks for my Berge Panther from Fruil I would have like a set of those !!!
Keep up the good work ! that Kat is looking great !
Really good deal on those ! WOW ! that's a Steal ! Too bad I have already bought my replacement tracks for my Berge Panther from Fruil I would have like a set of those !!!
Keep up the good work ! that Kat is looking great !
TRM
New Member
- Joined
- Mar 18, 2011
- Messages
- 5,024
Re: Bad Kitty!!
Thanks again Norm! Hiya Ken!!
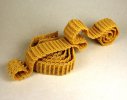
Took about 1/2 hour to remove the pieces from the tree and clean them up, probably another 1/2 hr to 45 min to snap em together ( Not rushing either) . Did them in small sections first, 4-6 and then snapped those together. Had around 5 or 6 out of 172 that the little nub (fake track pins) that locks the tracks together, removed itself as they snap together. A little Tamiya thin did the trick and 99.5% is working great. Next time I might have to stock pile some of these when I see them!! ;D
longlance67
cry havoc and let slip the dogs of war -shakespear
- Joined
- Sep 21, 2011
- Messages
- 656
Re: Bad Kitty!!
Howdie
sorry for not dropping by sooner, but i must say this build is really cool, great rust effects
keep up the great work
shane
Howdie
sorry for not dropping by sooner, but i must say this build is really cool, great rust effects
keep up the great work
shane
TRM
New Member
- Joined
- Mar 18, 2011
- Messages
- 5,024
Re: Bad Kitty!!
Hey there Shane!! Thanks for the compliment!!
Back again!!! I think I mentioned earlier shooting some color on the kitty last night. Just the first of many stages, but some of the chipping from this part will invariably show through at some point.
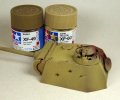
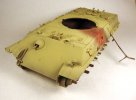
With that out of the way and knowing I will be chipping for a while, I decided to get a start on them tracks. When I got home today, I shot down my Red Oxide/rust primer base.
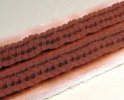
Then I applied something new here. I received a small Badger Weathering set from the SMA contest and I figured I would have a go at one of them. Thin enough to shoot straight, no cutting, and not smelly at all. I like it! I chose this Weathered black because it appeared to have a slight bluish quality to it similar to steel and then I dusted a bit with some flat black to bring up some tonal highlights.
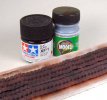
I am thinking that a little filter and washes will blend this altogether nicely. ;D
Back down to punch out some of that preliminary chipping so I can prepare to screw-up…I meant, shoot some camo…LOL !!!! I STILL HAVE NO IDEA WHAT SCHEME I WILL USE!!! ???
Thanks for checking up on me!!
Hey there Shane!! Thanks for the compliment!!
Back again!!! I think I mentioned earlier shooting some color on the kitty last night. Just the first of many stages, but some of the chipping from this part will invariably show through at some point.


With that out of the way and knowing I will be chipping for a while, I decided to get a start on them tracks. When I got home today, I shot down my Red Oxide/rust primer base.

Then I applied something new here. I received a small Badger Weathering set from the SMA contest and I figured I would have a go at one of them. Thin enough to shoot straight, no cutting, and not smelly at all. I like it! I chose this Weathered black because it appeared to have a slight bluish quality to it similar to steel and then I dusted a bit with some flat black to bring up some tonal highlights.

I am thinking that a little filter and washes will blend this altogether nicely. ;D
Back down to punch out some of that preliminary chipping so I can prepare to screw-up…I meant, shoot some camo…LOL !!!! I STILL HAVE NO IDEA WHAT SCHEME I WILL USE!!! ???
Thanks for checking up on me!!
Re: Bad Kitty!!
Todd, you can use your Panther for contest here
text is in Russian, but all you need is to send your final images and some in progress to their email.
Rob (scratchmod) is in the jury there
http://ost-front.ru/2011/10/05/contest2/
Todd, you can use your Panther for contest here
text is in Russian, but all you need is to send your final images and some in progress to their email.
Rob (scratchmod) is in the jury there
http://ost-front.ru/2011/10/05/contest2/
RocketSilo
New Member
- Joined
- Jan 22, 2011
- Messages
- 392
Re: Bad Kitty!!
good stuff TRM,
you know,after watching a few builds ,I'm convinced into getting some tank models ... It seems like they are so easy and worry free .
simply assemble the whole thing(maybe add some photoetch) , spray it in one or two settings... dabble on some weathering .done.
cars and planes are far more aggravating much the time for me.... this seems so much more relaxing, simple and relatively quicker..It would be a good break from the norm for me and I like painting/weathering
TRM
New Member
- Joined
- Mar 18, 2011
- Messages
- 5,024
Re: Bad Kitty!!
Thank you Andy!! Go for it buddy!! They are fun and they can be rather quick too. Since they are inherently working vehicles, there is no worries about a shinny finish...however, careful...they can be just as addicting I think!! :
 Once you get a kit with a nice motor or interior, you'll find yourself right back in the same boat!! ;D
Hello gents!!
Here is a bit of an update. I finished…preliminary…chipping. So to bring things up to speed, step #8 hair spray, #9 base color, #10 was chipping and now 11..more clear coat. Tomorrow I will begin stages to shift some color and possibly add some camo (not a huge camo guy, so stick around for me to F something up). Blah Blah Blah…
Here is some of that preliminary chipping. As I go through some of the other paint stages, this will be better, hopefully, explained to why I am going this root
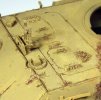
The chipping seems a bit erratic, heavy and choppy at the moment. After the next few coats go on, I will be able to bring back some of this chipping, but it will be more controlled.
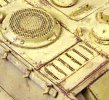
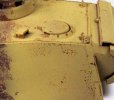
I had one little set back, not too big of a deal. I noticed a bit of the barrel seam. I sanded it down already and base coated it again. With any luck the barrel will catch up with the rest of this tomorrow.
Thanks for coming along and please watch your step as you exit the bus!!
Thank you Andy!!
Hello gents!!
Here is a bit of an update. I finished…preliminary…chipping. So to bring things up to speed, step #8 hair spray, #9 base color, #10 was chipping and now 11..more clear coat. Tomorrow I will begin stages to shift some color and possibly add some camo (not a huge camo guy, so stick around for me to F something up). Blah Blah Blah…
Here is some of that preliminary chipping. As I go through some of the other paint stages, this will be better, hopefully, explained to why I am going this root

The chipping seems a bit erratic, heavy and choppy at the moment. After the next few coats go on, I will be able to bring back some of this chipping, but it will be more controlled.


I had one little set back, not too big of a deal. I noticed a bit of the barrel seam. I sanded it down already and base coated it again. With any luck the barrel will catch up with the rest of this tomorrow.
Thanks for coming along and please watch your step as you exit the bus!!

