You are using an out of date browser. It may not display this or other websites correctly.
You should upgrade or use an alternative browser.
You should upgrade or use an alternative browser.
Blackout Windows
- Thread starter TJBegin
- Start date
urumomo
Well-Known Member
- Joined
- Mar 18, 2013
- Messages
- 6,818
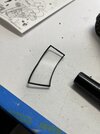
I would use liquid mask to protect the clear portion and airbrush it with a light coat of black acrylic . , a transparent black if it's not supposed to be completely opaque .
Any overspray that might get on the front side remove with a swab wetted with isopropyl alcohol .
Any overspray that might get on the front side remove with a swab wetted with isopropyl alcohol .
urumomo
Well-Known Member
- Joined
- Mar 18, 2013
- Messages
- 6,818
Brand of which ?
Liquid mask ?
I've been using the Abteilung the last couple of years and like it : https://www.scalehobbyist.com/catag...-mask/ABT00000115/product.php?s=3&t=2&u=2,3,4
Liquid mask ?
I've been using the Abteilung the last couple of years and like it : https://www.scalehobbyist.com/catag...-mask/ABT00000115/product.php?s=3&t=2&u=2,3,4
blakeh1
Well-Known Member
- Joined
- Oct 26, 2011
- Messages
- 925
I've used Tamiya X-19 as well to tint windows. Just be careful and go in thin coats. Do not try to rush it by covering it all up at once with one thick one. It best to build up in several layers and letting it dry a bit in between if you have curved surfaces. Otherwise it might just pool up in the low spots if you have to much paint thinner as well
- Joined
- Mar 6, 2023
- Messages
- 1,710
AgreedI've used Tamiya X-19 as well to tint windows. Just be careful and go in thin coats. Do not try to rush it by covering it all up at once with one thick one. It best to build up in several layers and letting it dry a bit in between if you have curved surfaces. Otherwise it might just pool up in the low spots if you have to much paint thinner as well
urumomo
Well-Known Member
- Joined
- Mar 18, 2013
- Messages
- 6,818
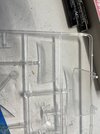
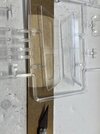
Cut it loose far away from the part at the start of the gate ,
the " gate " is the short , flat portion ,
then carefully remove the remainder of the gate with a sharp blade and sandpaper for the very last portion of it .
Use a sanding stick for the entire thing if you need to -- slightly slower but safer .
the " gate " is the short , flat portion ,
then carefully remove the remainder of the gate with a sharp blade and sandpaper for the very last portion of it .
Use a sanding stick for the entire thing if you need to -- slightly slower but safer .
BlackSheepTwoOneFour
Well-Known Member
- Joined
- Jun 9, 2013
- Messages
- 1,026
I've used liquid mask and I honestly do not like them - especially when doing liquid mask on aircraft canopies. Bought a bottle of one at a LHS - Vallejo brand since it was the only brand they had in stock. I now rarely use it. I prefer using Yellow Frog Painter Tape. Same tackiness as Tamiya tape but more economical. I also use their green painter tape and regular blue painter tape.
Similar threads
Latest posts
-
-
-
-
-
-
ready to throw away the testors "orange tube"
- Latest: scalebuilderchad
-
-


