Brushes for modelism

Plastic Pilot

Member
Joined
May 25, 2024
Messages
52
Hello,

I have a few brushes in my workshop/office, but the vast majority are for miniature painting and are useless for modeling, and I'm wondering what brushes to buy for static modelism.

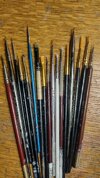
I searched the web and found a big variety of sizes and materials, but I don't know what purpose has each of them, I guess the flat ones are for big areas, the angled are for corners and places hard to reach and the round ones are for detailing. The only brushes suited for modelism that I have, are the ones in the picture, I have another ones that are disposable ore something, the typical brush that comes with a starter kit and I's a pain to work with them.

Please, if you will, give me some advice on what to buy and what dose the brush do, I refer to the purpose of the brush: for base coating, details, dry brush, weathering and other effects.

Thanks and have a nice day.
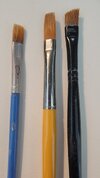
Flat brushes.jpeg
 
Those would be good for painting walls in a diorama...I have seen some beautiful car bodies painted with a brush, but not many,..most of us ( and I speak only for myself) use spray cans or airbrush. Small detail brushes such as those pictured are good for detailing.
IMG_20250112_201020443_HDR.jpg
 
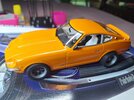
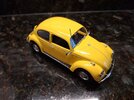
Yes, I know, I gotta get me an airbrush, but I'm always doubting about it. Till next month I have to stick to hand brushes, I've seen a lot of videos on the net that show that you can get a fair result with brushes as well, but not that good as with an airbrush or a spray can.

Here, you can see what I've manage to achieve with one of the brushes from above, the yellow one to be more exact.

Thanx for shearing your brush collection.
 
Last edited:
Dunno about planes, they can have such big expanses of relatively featureless surfaces (they need to be aerodynamic after all) - compared to armour and military vehicles, which I think lend themselves better to the brush.

After all, can't be too picky about a halftrack that the crew has just lathered with a mixture of gasoline and mud using a broom!

I have started experimenting with drybrushing, and also with thin layers of paints, and washes.

Either way there is a learning curve:

Adapt your painting skills and learn new techniques for the brush that you feel comfortable with
OR
Learn how to use a new tool that by it's nature might more easily help you achieve some of the results you desire (i.e. plane surfaces)
ELSE
Do it all!
 
I refer to the purpose of the brush: for base coating, details, dry brush, weathering and other effects.
I'm hoping other more experienced brush artists will chip in, but here are my two cents (it is after all, a very personal thing, what I use and feels right to me):
The list is far from exhaustive, hope you find it useful.

Primer
I gather there can be some controversy here, with some folks saying that it is or isn't necessary.
If you opt to do it, and with a brush, my advice would be very much like for base coating below.
However, I have been converted, and now use a rattle can primer for vehicles and figures. With a fine mist spray, I can get consistantly good results that would take much more time with a brush.
There are primers in white, black grey, tan, green, and rust, to name a few.

Base and primary coat
Not knowing where to start, I tried different sizes and styles of brushes when I got back into this hobby.
I think about it in terms of what the base coat is meant to achieve: a uniform surface that will accept the paint, and fill very minor surface imperfections without ruining detail.
So, a brush large enough to hold enough paint, soft enough that it doesn't leave stroke marks, round and tapered enough so that it naturally blends the paint into the previous stroke.
My favorite wasn't particularly expensive, but had the qualities above.
I found that if I did one panel at a time, between raised or recessed detail, I had an edge to work with and the detail would run interference and hide any slight colour variations from panel to panel.

Notice that we haven't talked about the paint itself:
I assume we're talking acrylics.
We want the paint to be thin enough to cover easily, but gradually. I tried the 'one coat and you're done' approach, you don't wanna go there.
So thinner can help with that, and an extender to give you more working time to avoid the perennial issue with acrylics drying too fast, making blending difficult.
I like choosing the colour for the base coat that would be the colour you'd expect to see if you squinted your eyes. From there you have a starting point to go darker for shadows, lighter for highlights.
Some guys like the base colour to be the darkest.
It might depend on if the overall colour is darker or lighter...

Details
The range that @Belugawrx showed above should serve you well. I try to select a brush that fits the part I'm about to paint.

Blending
I tried the 'fan' and 'comb' style brushes, as well as wide square tips, but I think the real key is slower drying time, and thinned application. My fave is now drybrush (below)

Pin wash
Supposedly with a pin. I'll stick with a tiny brush that holds just enough wash and accurately transfer it along a raised or recessed detail

Weathering
Saving a few brushes from the bin for an exciting career in post-production! Stiff ones that look like 'toque head' are great for stipple effects, or removing paint to reveal underpaint for chipping effects. Disposable makeup and eyeliner foam applicators have their place too (much cheaper than Tamiya applicators!

Drybrushing
The new darlings of my paint rack.
Learning to apply highlights and subtle shadows to add depth, and blended tonal variations

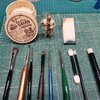
The cast (left to right)
Base(primary), med 3/0 and fine 6/0 detail, comb, pinwash, stubble head, weathering applicators, medium drybrush
I have others, bigger and smaller, chose these for illustration purposes.

17367470438218884447696196386193.jpg
 
Last edited:

Latest posts

Back
Top