Earth Effects

wjbrandel

Well-Known Member
Joined
Mar 4, 2021
Messages
705
I have been working on a base for the 109 I built, and have come to the conclusion I dislike VMS Smart Mud. As an alternative does anyone have any suggestions?
I do have a friend of mine who plays with trains and she uses Vallejo Earth Effects(? not sure if that is the name) and she loves the product, Opinions please.
 
Not sure what end result you're looking for, but I've never used commercial ground work products to produce a large area, only small bits. I'm old school that way. Most of what you want can be whipped up yourself using the old school techniques. Sorry if this isn't what you may have wanted to hear, but it's pretty much foolproof once you know what you're doing.

Cheers, Ski.
I appreciate the reply, but unfortunately my skills are somewhat lacking because I haven't done bases for models a lot until recently so I have no idea how to old school it:(.
 
Roger that. Try this link, check several vids and work with what you feel comfortable with. there's a boat load of vid on YT to get you started. Much, if not all, can be done on a low budget with easily obtainable items from your local hardware store or even Wally-world (wal-mart), Michaels, Hobby Lobby, etc., craft stores.
https://www.youtube.com/results?search_query=how+to+do+diorama+ground+work

Old School tech comes from the older books from Verlinden, Shep Paine, etc., but you can see a lot of it on YT as well. Hope that helps.
Thanks for the link and the info. I'll be checking them out.
 
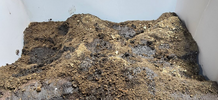
wjbrandel-not sure what look you are going for. I am working on a diorama (but have had to pause momentarily) and have used pink insulation foam, craft paint, elmers glue, and sifted dirt. Here is an early version of what I've done so far.
View attachment 138632
Looks good, Something like that, just not a rough and mountainous as that:). I mainly do flat scenery and bases for my models. I do use a lot of foam as well.

Thanks for all the replies and advice. I do appreciate it.
 
as a kid I covered a 4x8 sheet of plywood that held my slot car track with papier mache mountains, cliffs, fields, and tunnels; from newsprint, water and flour.
Oh, do tell.
Was it heavy? Did it sag the plywood?
How long to dry?
Details, ese. Don't leave us hanging.
 
Haha, I was all of 11 or 12.

The racing set had been a Christmas present, and I augmented it with months' worth of allowance, a few pieces at a time, then some nicer cars, slicks and mags!

My dad and I built a shallow box, probably 6-8 inches deep, with a plywood base.

We may even have seen a cartoon mock up in Popular Science or Mechanics or Science Digest magazines; we added hinges at the back so it could be lifted and stored against a wall, out of the way! The heaviest part was the plywood, likely 1/2 or 5/8 inch.

I had set up the track, with some tight loops, slopes, and straight aways, some stretches elevated, traced its outline, then removed it to be re-attached later and screwed down. The trellises and supports for the elevated portions were left to work around.

I remember mixing the flour and water and pulling endless strips of newspaper through the mixture, laid over an armature of cut shoe boxes, balloons and crumpled newspaper held down with masking tape. I must have tacked it in several places to keep it from lifting when in the upright position.

I also remember how black my hands got from the ink, and the smelly mold that formed on the rim of the bowl as I wasn't that careful to clean it after every session! So it took a few weeks or more, a couple of layers at a time, always waiting for it to dry before the next layers.

Haha, now I also remember using my mom's hair dryer, in those days a big unit with a hose that fed into a 'tent' ladies would put on their heads!

Not being plaster, it weighed relatively little.

Then I used a combination of 'grass', 'sand' and 'gravel' from the hobby shop along with pebbles, stones, twigs, dried moss and lichen from the field behind my house, all glued down with white glue and painted cliff sides. At some point I must have put the track back down, and was as careful as a twelve year-old can be reaching across to install landscape.

I had also found scale figures and animals, which I painted and glued down. Wish we had thought to take a picture of it!

Then hours of fun with my younger brother and friends, racing our cars round and round, with criss-cross lanes, cobble track and rubbery gard rails that had been so hard to put on. We were delighted with some spectacular crashes to boot!

Cheers!
 
Back
Top