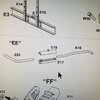
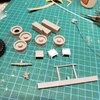
F15A Ford w/Breda in Italian service

BarleyBop

Well-Known Member
Glue Member
Joined
Sep 4, 2022
Messages
1,281
While I finish the figures for little Topolino, might be time to start on this! Collected parts over the years... one more for Il Duce!
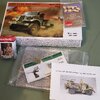
17428453858827856997186382817230.jpg

I had hoped to build (mostly paint) the Pavesi artillery tractor (I reported 'new in my stash'), but despite the box art, my order and instructions in the box, the 3D printed kit parts are clearly 1:72. So alerted the distributor and they said they will sort it out. I hope!
 
Sprues washed, dried. Had to cut some to fit in bath. Found a set of Dunlop tires & wheels which seem to match my collected North Africa reference photos of this vehicle better. (Tread and size, for CMP trucks).

1743204788238643715228028790946.jpg

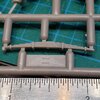
Mirror kits not as clean as Tamiya, with seams and a relatively soft plastic. Parts require care and time removing from sprues, as the manufacturer seems to favour multiple, thick attachment points. See bellow, a relatively sturdy 1" leafspring with 5 attachment points!

17432051797181881541782485259499.jpg
I like Mirror for their selection of CMP Chevy and Ford trucks. The Morris Quad beetleback was my first.

This is my second Mirror build.

So far, I've built vehicle kits from:
Tamiya
Revell
Meng
Bronco
Heller
WESPE
Accurate Armour
Dragon
ICM
ResiCast
Italeri
plusModel
IBG

In the stash, other manufacturers include:
MiniArt
Gecko
Thunder
Mirage
Smartkit
MK
AFV
SpecialArmour
Trumpeter
I♡Kit
HobbyBoss
Roden
High-Tech Model
Triglav

... and on order:
MODEL 3D INT (more cool Italian vehicles)
 
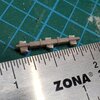
Ha, very next piece in instructions, have to rough cut, then clean up. 6 attachment points! And they aren't even on the edge... :rolleyes:

17432083702375342527187688447782.jpg

"Luceeee, you've got a whole lot of cleanup to do!"
 
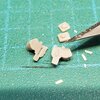
K, last (probably not) exposé: only the 6th sub-assembly, and tiny, with a male thingy that should register with the female thingy.
Only it doesn't, and I either have to sand the one down, or expand the other. This probably gives a good indication of how the rest of the build is going to go. (Sigh).

17432131954134917709536027357417.jpg
#11 blade tip for scale.
 
Looks like you're off to a good start. My fingers and hands have lost a lot of their dexterity and feeling to work on smaller assemblies like that.
 
Sprues washed, dried. Had to cut some to fit in bath. Found a set of Dunlop tires & wheels which seem to match my collected North Africa reference photos of this vehicle better. (Tread and size, for CMP trucks).

View attachment 142206

Mirror kits not as clean as Tamiya, with seams and a relatively soft plastic. Parts require care and time removing from sprues, as the manufacturer seems to favour multiple, thick attachment points. See bellow, a relatively sturdy 1" leafspring with 5 attachment points!

View attachment 142207
I like Mirror for their selection of CMP Chevy and Ford trucks. The Morris Quad beetleback was my first.

This is my second Mirror build.

So far, I've built vehicle kits from:
Tamiya
Revell
Meng
Bronco
Heller
WESPE
Accurate Armour
Dragon
ICM
ResiCast
Italeri
plusModel
IBG

In the stash, other manufacturers include:
MiniArt
Gecko
Thunder
Mirage
Smartkit
MK
AFV
SpecialArmour
Trumpeter
I♡Kit
HobbyBoss
Roden
High-Tech Model
Triglav

... and on order:
MODEL 3D INT (more cool Italian vehicles)
A Buddy and myself were pawing through the sprues of a kit someone brought in. What it was escapes me now, but, I happened to mention, there are so many manufacturers now and the amount of subjects they are releasing, I can not keep up. The armor class has just exploded.
Stuff that was a picture in a 'World At War' magazine is this years kit of the year.
It's awesome.
 
Last edited:
a picture in a 'World At War' magazine
Ha, yup, do enough surfing on a particular subject, and every now and again you find the 'source' photo for a kit, or the box art.

3D printing and smaller resin and plastic manufacturers, along with a more demanding market audience, have really upped the ante!

But there is still something to be said for the 'classics', especially for those among us who were around when they were first released!

Cheers
 
Now if this were my first rodeo, I'd happily be gluing up this muffler tail pipe assembly, along with the other subassemblies; only, with parts that have no registration marks or divots, how am I to know the exact position of the pipes relative to the muffler?
Think I'll wait until its time to actually install it. :rolleyes:
20250331_214247.jpg
 
"I got them sub-assem-blues!"

.... so, there are two F sprues. I locate a part on the first, cut it off. I pick up the second sprue, the part is Missing!
Look everywhere, floor, garbage, sprue bath, pans... no part.
So I have to build it, but so that they are similar, I'll have to build two.
Styrene, lead wire.
Done.
(I'll try flatening the wire later)

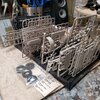
Subassemblies so far:

17434782057715055237854503017044.jpg
 
how am I to know the exact position of the pipes relative to the muffler?
I would suggest building the muffler and leaving the two pipes separate until you can put all three of them against the engine and chassis, so you can work out where each is to sit, exactly.

Dragon's Sd.Kfz. 7 has a similarly stupid exhaust: they mould half of the muffler to the front and the other half to the rear of the pipe, then want you to put them into the chassis subframe separately and then glue them together. Great for painting … not. I cut off the pipe on one side and added a pin there, so I could fit both parts after painting.
 
Back
Top