You are using an out of date browser. It may not display this or other websites correctly.
You should upgrade or use an alternative browser.
You should upgrade or use an alternative browser.
Genius display idea!
- Thread starter Edbert
- Start date
Jakko
Well-Known Member
- Joined
- Oct 9, 2024
- Messages
- 532
I've seen a couple like that on Scalemates, and the idea is quite nice, IMHO — though at the same time, I wouldn't build it myself like that  It shows off the interior well, but I think it distracts from the actual model and any realism that has been achieved with it.
Jakko
Well-Known Member
- Joined
- Oct 9, 2024
- Messages
- 532
Not quite, unfortunatelydefinitely one of a kind.
Edbert
Well-Known Member
- Joined
- May 16, 2024
- Messages
- 829
I found this while looking for tips on the RFM Late Sherman workable plastic tracks. Clearly this short did not help 
The tracks for the kit (Firefly and Easy Eight) are over 900 parts, yes, just the tracks. But the instructions are simply wrong.
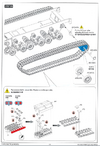
F1 & F7 are just jigs, thrown away when finished. F-2 through F-6 clearly indicate no glue. but without glue it falls apart. I've only even tried the tracks, but hoping this is not an omen of things to come.
I do enjoy doing these things like an assembly line while (sorta) watching TV.
The tracks for the kit (Firefly and Easy Eight) are over 900 parts, yes, just the tracks. But the instructions are simply wrong.

F1 & F7 are just jigs, thrown away when finished. F-2 through F-6 clearly indicate no glue. but without glue it falls apart. I've only even tried the tracks, but hoping this is not an omen of things to come.
I do enjoy doing these things like an assembly line while (sorta) watching TV.
Jakko
Well-Known Member
- Joined
- Oct 9, 2024
- Messages
- 532
Oh, I agree — this one looks better than the others, IMHO, because of the diorama base.Regardless, that's an awesome display idea
Jakko
Well-Known Member
- Joined
- Oct 9, 2024
- Messages
- 532
There's a better way to build them anyway. The pins (F2) come in sets of seven that you can remove from the sprue as a set, so first of all do that — but leave them as sets of seven. Glue a guide horn (F5) every pair of pins.The tracks for the kit (Firefly and Easy Eight) are over 900 parts, yes, just the tracks. But the instructions are simply wrong.
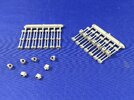
Use only the bottom jig (F1) to assemble one set of six links around a set of seven pins-with-horns.
While the glue on that dries, take two bottom jigs (F1) and cut the round bits off the ends. Join them by glueing a piece of plastic card underneath, and before that dries, use the assembled length of track to make sure the spacing between the two jigs is correct. Let the glue on the jig dry.
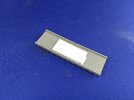
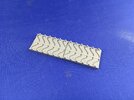
Now you can put a set of seven "outside" blocks (F3 and F4) in the jig, place the assembled track onto the end, put a set of seven pins on top of the blocks and glue the "inner" blocks (F6) to the outer. Cut off the sprue from the pins. Repeat.
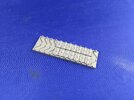
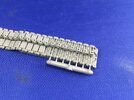
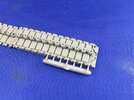
Also beware that there is a lot of stretch in these tracks:


That is: 34.5 cm long when fully stretched out, 32.5 cm when pushed all the way in, for a set that fits an M4A3 (HVSS) model.
Edbert
Well-Known Member
- Joined
- May 16, 2024
- Messages
- 829
Neat idea Jakko!
So you're not using the other part of the jig at all, the horns prevent that, just attaching the inner pads and pressing with fingers?
I'd been putting the horns on after everything else was done. I've only finished two sections, will try this way too.
So you're not using the other part of the jig at all, the horns prevent that, just attaching the inner pads and pressing with fingers?
I'd been putting the horns on after everything else was done. I've only finished two sections, will try this way too.
Jakko
Well-Known Member
- Joined
- Oct 9, 2024
- Messages
- 532
The upper part of the jig appears to serve to press the two halves of the blocks together, and to align the guide horns. I found the horns would stick inside the upper half and you can just press down the block halves with your fingers anyway. Plus, if you assemble the tracks as instructed, you will end up with a whole bunch of sections of six that you then have to join. With my way, you just keep extending the track by seven links at a time, which is less fiddly.
Last edited:
Edbert
Well-Known Member
- Joined
- May 16, 2024
- Messages
- 829
Clearly too late for you, but maybe others will come accross this thread.
I found an easy way to clean the remains of the sprue off of the horns by leaving them partially attached. If you take off the bits in-between each horn only, there's just enough room between them to insert a sanding stick.
I found cleaning them while holding them between fingers (and I do not have sausage fingers) was a bit fiddly. This is much easier.
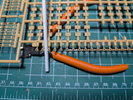
For the life of me I did not expect to see US armor cast in panzer-yellow plastic though.
I found an easy way to clean the remains of the sprue off of the horns by leaving them partially attached. If you take off the bits in-between each horn only, there's just enough room between them to insert a sanding stick.
I found cleaning them while holding them between fingers (and I do not have sausage fingers) was a bit fiddly. This is much easier.

For the life of me I did not expect to see US armor cast in panzer-yellow plastic though.
Belugawrx
Well-Known Member
- Joined
- Jul 22, 2013
- Messages
- 661
Looks like something Dr. Manhattan would do....
<iframe width="1006" height="567" src="" title="Dr Manhattan's Power" frameborder="0" allow="accelerometer; autoplay; clipboard-write; encrypted-media; gyroscope; picture-in-picture; web-share" referrerpolicy="strict-origin-when-cross-origin" allowfullscreen></iframe>
<iframe width="1006" height="567" src="" title="Dr Manhattan's Power" frameborder="0" allow="accelerometer; autoplay; clipboard-write; encrypted-media; gyroscope; picture-in-picture; web-share" referrerpolicy="strict-origin-when-cross-origin" allowfullscreen></iframe>
Similar threads
- Replies
- 6
- Views
- 647
