Scratchbuilder
Well-Known Member
- Joined
- Sep 30, 2024
- Messages
- 98
I started this build about a month ago....
The idea is to display my Tiger 1 on a base where it is crossing a French railway line around Normandy 1944....
The first job was to get the railway line, and here I came across the MiniArt product. The sleepers (ties) were first given a coat of grey primer, followed by Tamiya Buff (XF-57). They were then masked to allow the rail plates to be given a coat of dark rust as were the rails who had first been given a coat of chrome silver!!! The tops of the rails were masked to allow the rust to be applied and then the masking removed and a polish of Gunmetal brought the shine down to an acceptable level.
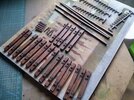
Meanwhile the sleepers were given a coat of W&N Burnt Umber oil paint, with care not to get any on the plates. This was left for about 1 hour, and then using a soft sponge, bits were used to remove the excess oil...
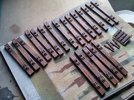
Happy with the result I now moved onto the Tiger... The last one I built was in 1980, the 'Zimmerit' in real life would have been about 4 inches thick, and the scheme totally fiction, and the kit was Tamiya....
Today, with the plethora of kits available I settled on the RFM offering (5015) a late version and correct for the period.... Bison Decals #35091 are providing the markings for a Tiger 1 of Abtellung 101, tank number 334.
The tracks are going to come from Masterbox, and the Zimmerit I have taken out of my hands and will be using a set designed for this model by ATAK Model which includes two different gun mantlets.
The base will be built from MDF board with a foam base and encased in Balsa sheet....
So to work, the main hull and turret were selected and built up to the state where I could start adding the Zimmerit... But before this I did notice that RFM failed to include the air filter/radiators set each side of the engine bay. I managed to locate someone on Ebay who was selling off spares and obtained the items I needed plus the etch brass fan covers.... No triming was required except to take off the two locating pins from the underside...
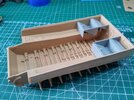
Also added were the torsion bar suspension with the front and rear corner ones cemented into a fixed position and the rest left to move freely.
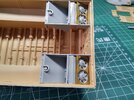
And so to the Zimmerit... This comes as a thin sheet of resin, with the pattern printed into it, and a word of warning - be carefull with it as it will bend easily...
ATAK reccomend that you use a two park epoxy cement, but I found that c/a (superglue) will work. I first sanded the rear face with some 240 wet n dry paper as well as the mating face on the model. the section was removed and checked for fit and really there was no problem except I opened up the holes for the bolt locations and cut the side lengthways to aid fitting, but again this was my choice. Then using a small makeup sponge applied c/a to the surface of the model enough so that I could move the Zimmerit a little. Once in place I used a tissue to pat down the Zimmerit in place and to remove any excess c/a....
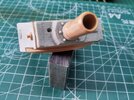
The mantlet...
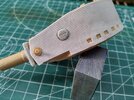
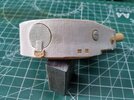
The rear escape hatch and the vision slit are also supplied by ATAK...
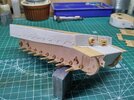
The hull side with small squares of plastic strip to build up the mudskirts...
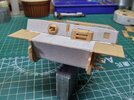
The hull front....
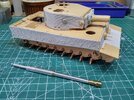
And where I am today - the barrel is from Aber....
More later
Mike.
The idea is to display my Tiger 1 on a base where it is crossing a French railway line around Normandy 1944....
The first job was to get the railway line, and here I came across the MiniArt product. The sleepers (ties) were first given a coat of grey primer, followed by Tamiya Buff (XF-57). They were then masked to allow the rail plates to be given a coat of dark rust as were the rails who had first been given a coat of chrome silver!!! The tops of the rails were masked to allow the rust to be applied and then the masking removed and a polish of Gunmetal brought the shine down to an acceptable level.

Meanwhile the sleepers were given a coat of W&N Burnt Umber oil paint, with care not to get any on the plates. This was left for about 1 hour, and then using a soft sponge, bits were used to remove the excess oil...

Happy with the result I now moved onto the Tiger... The last one I built was in 1980, the 'Zimmerit' in real life would have been about 4 inches thick, and the scheme totally fiction, and the kit was Tamiya....
Today, with the plethora of kits available I settled on the RFM offering (5015) a late version and correct for the period.... Bison Decals #35091 are providing the markings for a Tiger 1 of Abtellung 101, tank number 334.
The tracks are going to come from Masterbox, and the Zimmerit I have taken out of my hands and will be using a set designed for this model by ATAK Model which includes two different gun mantlets.
The base will be built from MDF board with a foam base and encased in Balsa sheet....
So to work, the main hull and turret were selected and built up to the state where I could start adding the Zimmerit... But before this I did notice that RFM failed to include the air filter/radiators set each side of the engine bay. I managed to locate someone on Ebay who was selling off spares and obtained the items I needed plus the etch brass fan covers.... No triming was required except to take off the two locating pins from the underside...

Also added were the torsion bar suspension with the front and rear corner ones cemented into a fixed position and the rest left to move freely.

And so to the Zimmerit... This comes as a thin sheet of resin, with the pattern printed into it, and a word of warning - be carefull with it as it will bend easily...
ATAK reccomend that you use a two park epoxy cement, but I found that c/a (superglue) will work. I first sanded the rear face with some 240 wet n dry paper as well as the mating face on the model. the section was removed and checked for fit and really there was no problem except I opened up the holes for the bolt locations and cut the side lengthways to aid fitting, but again this was my choice. Then using a small makeup sponge applied c/a to the surface of the model enough so that I could move the Zimmerit a little. Once in place I used a tissue to pat down the Zimmerit in place and to remove any excess c/a....

The mantlet...


The rear escape hatch and the vision slit are also supplied by ATAK...

The hull side with small squares of plastic strip to build up the mudskirts...

The hull front....

And where I am today - the barrel is from Aber....
More later
Mike.
