Meng War Toons Kelly's Heroes

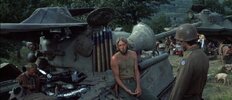
The speaker is on the right side of a turret in the very first scene of Oddball's tanks.
There are no mirrored scenes.

You can follow Oddball's tank by watching for the blue watering can.
Something I have already added to my model.
Untitled-2_1024x442.jpg


I already said (twice in this thread) I am well aware that this model is not the same type of M4.
It doesn't matter since it's the only version available, it's a toon, and I am not going for super accuracy.

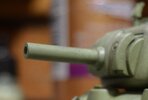
The pipe over the barrel will/might be a last thought...haven't got there yet.
One of the first things I considered.
The toon model already looks like it has a thick barrel...short, but thicker than it should be.
So I may just leave it alone.
DSC_2436_800x542.jpg
 
Last edited:
I have fulfilled the "back to basics" requirement by building the toon models "out of box"
and I will create a base of some sort...
I am still experimenting with paint, so that's an ongoing trial.

As for accessories, as per the rules, I'm allowed to use sprues and left over bits of plastic
as well as from items found..
Starting with this watering can. Made entirely from some sprue bits.
It ended up being very small. I dropped it on the floor and lost it twice!


file


file


.....
For the "megaphone speaker" I looked around for anything that might work, and inches away I found this tube of papercraft tacky glue.
The lid looked perfect...but I didn't want to leave my glue without a lid.
A few days later I found another cheapo glue (in a Dollar store) with the exact same tube and cap.


file


I don't mind throwing away this cheaper glue, just so I can use the cap.
Cut the cap in two places and I've got the outer part and the inner part of my speaker.

file


I only need to add a base part (also cut from a sprue) and paint it, and there is my megaphone speaker!
Oh and I made the (hidden) mount from flat areas of the trash sprues.

file


file
 
Before I realized there was already a machine gun mount in front of the hatch,
I decided to add an MG at the rear (like where Clint Eastwood grabs it to shoot the Tiger).
Its just a couple of small wood blocks, cut from a popsicle stick, and a toothpick, and some paper sides.

I know it's not very good, I was going for toon, not realism.

file

file


I also did some printed paper details...
like the rear mud flaps as seen in the film
and a couple of leaflets stuck to the side of the tank.
I think they're ads for plays or stage shows.
I studied my movie screencaps and mocked up the leaflets in CorelDraw.

file

file
 
I mixed up a blend of aluminium and some transparent black.
Created a sort of gun metal colour and dry brushed the rubber tracks.

View attachment 142184


.........................
For paint, I started with a gray green faded colour, much like what the Sherman's in the movie are.
I've done some dry brushing of a faded white on upper surfaces,
and black on lower surfaces.
I also did a bit of spattering with the black.
Before I stenciled the stars, I used a pre-cut "random spatter" stencil to apply some slightly darker green colour here and there on the hull.
I'm trying to recreate the varied staining seen on the tanks.
I'll keep working at it.

Let me show you the Tiger assembly next.

View attachment 142190
I like it. Pantherman
 
Well I think my paint work is all done.
I've still got some finishing touches, and I'm completing the base for the models.

For the Tiger tank, I painted the entire tank black (as I think I mentioned).
Then I hand painted some green camo, sort of like what I can see in my movie screencaps.
Since it's a different version of Tiger, and a 'toon', not everything lines up the in the same place.

After that I did panel accent wash, and some dry brushing of dirty white.
I also added a bit more silver dry brush, and then sealed it all with dullcote.
(Unfortunately the dull cote made the black a bit satiny, but I'm living with it.)

I handpainted the cables with some silver and I stenciled the Key logo onto the turret rear and front panel.
Very small - I handcut a stencil using some sticky labels, and airbrushed white.
The German insignia are small decals that came in the kit.

I followed the same approach for the '113' on the turret.
I cut two separate stencils for white and red (four in total). Difficult since the number is only about 7mm across.
It was also hard to align the stencils when spraying.
I airbrushed the colours...the left side turned out good, but the right is a bit off (registration).

To finish I mixed up some sandy mud colour and stippled it all over the place similar to the movie tank.
From a distance (the other side of the room) it looks like a dirty tank, which is what I was going for.

Enough with the negative waves.

file

file

file


Write your reply...
Back
Top