You are using an out of date browser. It may not display this or other websites correctly.
You should upgrade or use an alternative browser.
You should upgrade or use an alternative browser.
Messerschmitt Bf 109 G-14 (Zoukei-Mura 1:32)
- Thread starter Edbert
- Start date
BlackSheepTwoOneFour
Well-Known Member
- Joined
- Jun 9, 2013
- Messages
- 1,026
Zoukei-Mira is known to be one of the higher end kits out there. Expensive too and well engineered. Expensive too. I'm assuming it's your first Zoukei-Mura kit.
I highly doubt you'll find fit issues or lack of detailing.
I highly doubt you'll find fit issues or lack of detailing.
Edbert
Well-Known Member
- Joined
- May 16, 2024
- Messages
- 896
Edbert
Well-Known Member
- Joined
- May 16, 2024
- Messages
- 896
At my age, with failing eyesight, I have no time to spend fighting with fit, more than what should always be expected. If that means spending more money, so be it, but this kit cost less than or no more than the 1/32 Corsair and 1/48 F-4B from Tamiya.Zoukei-Mira is known to be one of the higher end kits out there. Expensive too and well engineered.
I'm hoping this complexity with so many details and the large assembly manual will help me slow down.
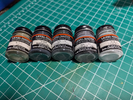
My decision for now is...do I use my old RLM colors in enamel with the acrylic wash?
JOHN R
Well-Known Member
- Joined
- Sep 30, 2024
- Messages
- 205
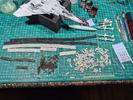
Me too, I hate those link and length, either fall apart when attempting to fit on or get so much glue on them .This...
View attachment 126880
...needs to be finished. As posted elsewhere, I'm almost ready to say I love rubber-band-tracks.
Jakko
Well-Known Member
- Joined
- Oct 9, 2024
- Messages
- 615
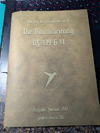
Eh, it's simple enough: Are you in the service? Because if not, then you're not allowed to use the instructions, which would make it hard to build the model63 pages of goodness!
(…)
I know if I open them I'll have to start.
(Also, I wonder who they got to write their German for them, because there's a superfluous "Die" there that isn't grammatically wrong but would not appear on a real German set of instructions.)
Edbert
Well-Known Member
- Joined
- May 16, 2024
- Messages
- 896
These arrived in the mail....
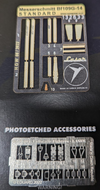
Cloth belts and metal buckles/hardware. I'm taking it as a green light
This is my first experience with the manufacturer, I'm amazed! The 'Bauanleitung' (I had to look it up, just means instructions) is 65 pages which was awesome but also a bit intimidating. Upon closer inspection, and actually starting the build it quickly becomes obvious that they are just very thorough, it is not an indication that the complexity is off the charts. See the example below.

These two pages, all of the wording and illustrations and photographs represent a small number of parts. In this case there are 8 parts on the left-hand page and 5 on the right. Each separate part number is circled in green. They just provide the builder with maximum information.

The mold quality is off the charts (with my limited experience), and this figure shows what I mean. Those belts!

I've started assembly. Above it looks like two halves of the engine, which is basically right. But who knew or would have thought that it would include pistons and connecting rods?

Which is kind of interesting considering no crankshaft, right? Guess those Nazis were better engineers than I thought. But of course none will be visible within the next page or so of the instructions.
One of my biggest problems with modelling is making myself slow down. I'm hoping to use this kit's inherent complexity to try and force myself to do just that. There's a looong way to go, and many parts will have to be painted more than one color prior to assembly and then again after partial assembly prior to full, it is a marathon not a sprint....a marathon not a sprint.

Cloth belts and metal buckles/hardware. I'm taking it as a green light
This is my first experience with the manufacturer, I'm amazed! The 'Bauanleitung' (I had to look it up, just means instructions) is 65 pages which was awesome but also a bit intimidating. Upon closer inspection, and actually starting the build it quickly becomes obvious that they are just very thorough, it is not an indication that the complexity is off the charts. See the example below.

These two pages, all of the wording and illustrations and photographs represent a small number of parts. In this case there are 8 parts on the left-hand page and 5 on the right. Each separate part number is circled in green. They just provide the builder with maximum information.

The mold quality is off the charts (with my limited experience), and this figure shows what I mean. Those belts!

I've started assembly. Above it looks like two halves of the engine, which is basically right. But who knew or would have thought that it would include pistons and connecting rods?

Which is kind of interesting considering no crankshaft, right? Guess those Nazis were better engineers than I thought. But of course none will be visible within the next page or so of the instructions.
One of my biggest problems with modelling is making myself slow down. I'm hoping to use this kit's inherent complexity to try and force myself to do just that. There's a looong way to go, and many parts will have to be painted more than one color prior to assembly and then again after partial assembly prior to full, it is a marathon not a sprint....a marathon not a sprint.
Last edited:
Edbert
Well-Known Member
- Joined
- May 16, 2024
- Messages
- 896
Engine block, heads, valve covers, water pump, and some other stuff assembled. Notice the different sized and aligned squares, the triangle, and the keyed circle. It is a great way to assist the modeler and ensure proper alignment. This is the point where I think I need to paint.
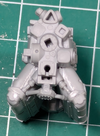
I can tell already that a time sink will be the multiple stopping points needed to paint, then assemble, then paint, then assemble, etc.
I think this is the kind of thing that I try to cut corners and save time (which is a weak way to say hurry up), so I am trying to embrace that. Also, since I have such a selection of the RLM colors and Tamiya-XF paints do not match well...I'm going old school here and using my Testors Model Masters paints. Will have to do water-washes I know, hope I do not regret this. But using a brush is so much nicer with those enamels than XF acrylics. With the airbrush there's not a lot of difference other than drying time.
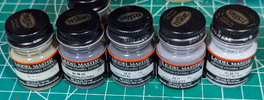
This is one of those stopping points.
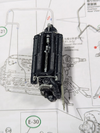

I can tell already that a time sink will be the multiple stopping points needed to paint, then assemble, then paint, then assemble, etc.
I think this is the kind of thing that I try to cut corners and save time (which is a weak way to say hurry up), so I am trying to embrace that. Also, since I have such a selection of the RLM colors and Tamiya-XF paints do not match well...I'm going old school here and using my Testors Model Masters paints. Will have to do water-washes I know, hope I do not regret this. But using a brush is so much nicer with those enamels than XF acrylics. With the airbrush there's not a lot of difference other than drying time.

This is one of those stopping points.

Jakko
Well-Known Member
- Joined
- Oct 9, 2024
- Messages
- 615
That engine is looking pretty good. Those paints were quite good too, as I recall, but I haven't been able to buy them around here for over twenty years or so. I do remember the lids are the worst, though — tore open my fingers more than once 
Edbert
Well-Known Member
- Joined
- May 16, 2024
- Messages
- 896
I like the contrast.
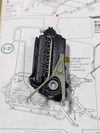
RLM02 out of the bottle, and I am using three different silvers just to make it more interesting. But instead of "black" I am using the Model Masters "Gunmetal" which is very dark and slightly metallic.
I've been blessed today by being able to spend almost 10 hours at the bench. Well, there and the garage where I spray, and all the back and forth, old dudes have to get their steps in!
But I am stopping now, have to remember these enamels need to to cure.
Edbert
Well-Known Member
- Joined
- May 16, 2024
- Messages
- 896
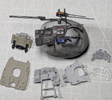
I have to decide; use the opaque gray dashboard and paint the instruments, or apply each individual gauge decal into position. Which one must assume requires a blob of gloss on top to represent glass.
Or...
Use the clear version, mask the front side, paint it RLM66, apply decal to back side, remove mask.
I've no way to know which looks best, so one must attempt both I think. Then decide.
Andy the Sheep
Active Member
- Joined
- Oct 7, 2024
- Messages
- 38
Must follow your build, Edbert. Zoukei Mura kits are too nice and well detailed not to take pleasure in admiring someone else building them... 

But sooner or later I'll buy one, me too!
But sooner or later I'll buy one, me too!
Edbert
Well-Known Member
- Joined
- May 16, 2024
- Messages
- 896
I took a side-road, and worked on the belts. This is my 1st try with "HGW" and overall I am very happy with the result.
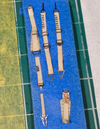
I've decided for now to not install the decal belts in my Lightning, not convinced I want to try HGW in 1/48 either. This project in 1/32 is about my limit, or the limit of my eyes. Which only means I better get moving on the WWI trio!

I've decided for now to not install the decal belts in my Lightning, not convinced I want to try HGW in 1/48 either. This project in 1/32 is about my limit, or the limit of my eyes. Which only means I better get moving on the WWI trio!

