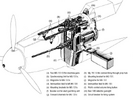
Messerschmitt Bf 109 G-14 (Zoukei-Mura 1:32)

Wow! That is an insane amount of detail. I don't know if I could get through a kit that detailed. I must say I am very impressed with your patience and tenacity in that build. I would have been frustrated trying to get it all together and making it look as good as you have.
I'm using it as means of forcing myself to slow down. It is a character-flaw that extends to everything not just models.

There are many parts of my modeling "game" that need attention, I could be wrong, but I think learning to be slower and more patient will help solve several of them.

1732672265264.png
It did hurt to seal up so much detail. I had to take great care in assembly, but not so much painting for things that no human will ever see.
 
things that no human will ever see
I generally leave out everything that will never be seen. A Zoukei-Mura kit would not be great for me, I suspect I would need to get a new spares box for plane parts if I ever did build one :)
 
The peculiarity of ZM kits is that you build what probably is the nearest approximation possible of the real thing. The troblesome wing, landing gear and fuselage junction described a few days ago is, as far as I know, almost the same designed by Willy Messerschmitt and his team. I find this very fascinating, but I understand Jakko point.
 
I'm ready to move to the next step, a clear coat prior to decals.

But...

I'm worried this is too dark. So I changed the dark gray shown initially to the correct dark green (dunkelgrun or something like that), the ZM instructions had it printed correctly in the text, but the color printing of the camo showed two different grays. Well, that issue averted, yikes!

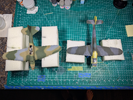
So I know it is hard to see a picture alone and know what the actual color is, as in if present. So I put another kit (WIP) next to it for reference, and I think it shows how relatively dark the upper camo is.

1733965950580.png

Kinda funny how the scale difference makes these two enemies look the same size. But both aircraft show a bare uncoated layer of XF acrylics.
 
I talked myself out of the mistake I talked myself into. The dark green was too green despite what is shown in Squadron-Signal according to most people.

So back to a dark grey albeit with a hint of green.
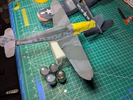
1734725383000.png

Those 4 little jars are there to show the dark green next to the dark gray, the light blue and medium grey just for reference.

The Corsair is back on the bench because I broke the wing off moving it around...grrr.

I did finish that Sturmovik as well. Not worth it's own thread so I'll hijack my own. I'm, pretty unhappy with "Accurate Miniatures" overall, but I'd stop short of saying they suck. I was not familiar with the brand (been out of the hobby for almost 30 years) but I picked it up at the local model show for $10. Overall fit was good with a few really bad gaps, so I'd say average as a final score on fit. The instructions had lots of words, almost conversational advice in some places, but the instructions were the worst part zero indication how some parts fit, and in some places there was no provision to mount the part, so even with the words it was a guess. Plus some parts were left over ands there was no floor for the rear gunner. Still looks okay on the shelf and from a distance.
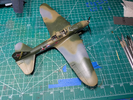
1734726149428.png
I made a rear-floor out of paper (a post-it note actually) and painted it. Notice there's no glass over the rear gunner?
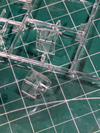
1734726232518.png
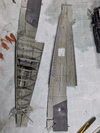
It must be some kind of manufacturing defect, both rear sections (2 variants) had similar damage on them. I thought it was supposed to be some sort of camo net, but that's ridiculous. The parts were sealed in the bags, and none of the other three parts had this issue. I read that crews would often remove the rear section during summer months, so I went with that and left it off.
1734726386539.png
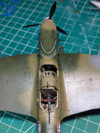
There was nice detail on the front cockpit, just hard to see in there.
1734726447479.png
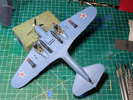
I think my blue is a bit on the bright side, but only a little.
 
Holy smoke, it took me longer to read through the thread than it does some kits I've built.

Amazing work!

Now that I'm caught up, can't wait to see what's next!

Cheers!
 
I like the contrast.

View attachment 128949

RLM02 out of the bottle, and I am using three different silvers just to make it more interesting. But instead of "black" I am using the Model Masters "Gunmetal" which is very dark and slightly metallic.

I've been blessed today by being able to spend almost 10 hours at the bench. Well, there and the garage where I spray, and all the back and forth, old dudes have to get their steps in!

But I am stopping now, have to remember these enamels need to to cure.
I gotta get my self one of these, thanks for sharing
 
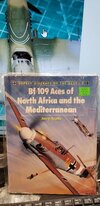
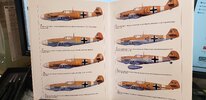
As you may know, I am mesmerized by the North African/Mediterranean theater... found this on a back shelf at the hobby shop this summer:

1734991088532452989084171581285.jpg

... very interesting read. Most of my research has been about the view from the ground, scattering from convoy vehicles as one of these sets up for a pass!
 
Nice find! I want to do a North Africa P40 too, unsure if the Brit version will scratch the right itch though.

Those F-trops in North Africa are what made Hans-Joachim Marseille famous.
 
Well guys, I broke it.

Quite literally dropped it onto a concrete floor.

I was heading to the garage to apply a quick clear coat to preserve the paint and prepare for insignias, lost it while closing the door behind me.

Damage is bad but could be worse...
  • Engine broke loose from 3 of the 4 mounts
  • Oil tank broke off
  • Rudder broken off
  • My puttied seams at wing roots opened up
  • Both machine guns and their mounts broken off
All of the above can be repaired, I have not the heart to check the paint, but two items I consider more serious are two parts that broke off and I cannot find, the antenna that mounts to the hinged canopy and one of the machinegun mounts. To find them I used my shop-vac, but stuck a piece of panty-hose into the hose to act as a filter, after a few passes all I picked up were metal shavings saw dust and some dead bugs. Guess I'll have to move my hotrod out to the driveway and relocate my stack of lumber and keep trying, but it doesn't look good. Maybe I'll get lucky, they did not vaporize so they are there somewhere.

I put all the parts back into the box, wrapped the main assembly in a towel and stashed it in the closet. I'll decide what to do after the emotions fade a bit.
 
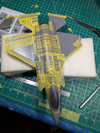
Think I'll work on this as a change of pace.

1735058440180.png


I purchased the mask set from "Galaxy", it said they fit the Meng F-35, which I cannot dispute. But they are not completely accurate for the F-35-I, so I'll have to go old-school on some of this RAM.
 
Last edited:
Oh my, what a change, and a good one too!

Bummer about the hard landing, Edbert. Just so you're not alone, I had that happen to my 1/9th scale Italeri Harley. I had a lot of time invested in to it, and it just flopped right between my legs, down to the floor and broke to pieces. I was so PO'd I finished it off with my boot.

No worries, I pulled my spare off the shelf and commenced to do it again, which was completed in more detail and I was happy with that. Lesson learned; pay attention when handling delicate items. HA!

When you do get back to it you should be able to fabricate any missing parts, right?
 

Latest posts

Back
Top