N.S.E.A Protector
- Thread starter Grendels
- Start date
Grendels
Active Member
- Joined
- Nov 24, 2009
- Messages
- 9,092
She's glued together....
Here is a further update. In my last photos, I did not have the wings sealed up all the way, the front engine vents were not glued on. I have done so, and it looks a lot better now:
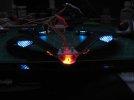
I had a lot of problems with the wings. I stated earlier that Pegasus models used a mix of styrene and ABS plastic in this model. WARNING: Do not use Tamiya extra thin cement on it. (The directions say that it is safe for use on this model, but I have had nothing but trouble with the extra thin. :'( ) I used this to glue together the wings, and as I was moving the wings around getting ready for final assembly of the main model, they started to come apart. I switched to plain old Tamiya cement, and that works just fine. So does good old CA.
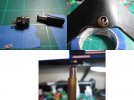
Before I could put the ship together, I had to address how I was going to provide power for the model. I decided to make the model removable from the stand by using a DC power plug. I found a plug that was just a tiny bit larger than the original plug for the stand that came with the model. After a bit of filing, it fit perfectly. There is no glue holding it in. It is pressed in with a pair of pliers. I also have a brass tube that fits the male end of the plug perfectly:
In the next photo, I was starting up on this final assembly. I had to trim down the wires a whole lot. This is not a large model, and it does not have a lot of room in the body for wires to fit.
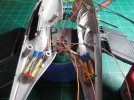
It took a lot of wiggling to get the body to assembly correctly but I got it there. The wires added a lot of stress to assembly. Unfortunately, I do not have any photos of the assembled model. I forgot to take them.
I have been working on filling the seams, and when done with that, light block and masking for paint. I hope to have her ready for primer by next weekend.
There are some nasty seams where the wings join the main body of the ship. I did test fit the parts together before adding the wires, the electrical and the fiber optics. The parts fit together just fine without these additions. Also, most of the seams fall on panel lines, or are at places where they really wouldn't show. This is a well engineered model.
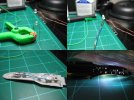
I have also done some work on the command ship. I probably shouldn't have tried to make it removable. This little thing has been a pain in the nether regions. First 3mm LED's will not fit in the ship with the magnets glued in. Also, the magnets grab hold of the LED's making them hard to place and keep where you want. (These are strong little magnets.) In addition I had to chop out the front registry pin between the top half and the bottom half.
So I decided to give the LED's a diet if you will. Chopped them down in half. They now fit, and I am pretty sure I can pull this thing off. The photo shows before and after shots of the LED's along with a lighting test.
With the ship almost done, and the command ship at the point where it needs paint to proceed. I turn my attention to the base. Now you armor people have the right ideas for bases. Basically a mini diorama. But the Sci Fi people don't. They usually spend months building this beautiful, and amazing ship, and then they stick it on a base that is scrap wood, with a really ugly switch attached to it. I cannot tell you how many times I have seen photos of this. Here was my first thought for the base:
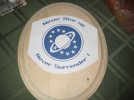
I was going to take that printout, print it on decal paper and put it on the wood base. When I started thinking about switches, I was stumped until I looked in my parts bin.
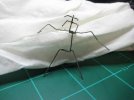
This was about 4 weeks ago, and I scrapped that idea for a new one. I have been working on the base for 2 weeks now, but I don't want to show it off just yet. I will however leave you with a teaser if you will:
Here is a further update. In my last photos, I did not have the wings sealed up all the way, the front engine vents were not glued on. I have done so, and it looks a lot better now:

I had a lot of problems with the wings. I stated earlier that Pegasus models used a mix of styrene and ABS plastic in this model. WARNING: Do not use Tamiya extra thin cement on it. (The directions say that it is safe for use on this model, but I have had nothing but trouble with the extra thin. :'( ) I used this to glue together the wings, and as I was moving the wings around getting ready for final assembly of the main model, they started to come apart. I switched to plain old Tamiya cement, and that works just fine. So does good old CA.
Before I could put the ship together, I had to address how I was going to provide power for the model. I decided to make the model removable from the stand by using a DC power plug. I found a plug that was just a tiny bit larger than the original plug for the stand that came with the model. After a bit of filing, it fit perfectly. There is no glue holding it in. It is pressed in with a pair of pliers. I also have a brass tube that fits the male end of the plug perfectly:

In the next photo, I was starting up on this final assembly. I had to trim down the wires a whole lot. This is not a large model, and it does not have a lot of room in the body for wires to fit.

It took a lot of wiggling to get the body to assembly correctly but I got it there. The wires added a lot of stress to assembly. Unfortunately, I do not have any photos of the assembled model. I forgot to take them.
I have been working on filling the seams, and when done with that, light block and masking for paint. I hope to have her ready for primer by next weekend.
There are some nasty seams where the wings join the main body of the ship. I did test fit the parts together before adding the wires, the electrical and the fiber optics. The parts fit together just fine without these additions. Also, most of the seams fall on panel lines, or are at places where they really wouldn't show. This is a well engineered model.
I have also done some work on the command ship. I probably shouldn't have tried to make it removable. This little thing has been a pain in the nether regions. First 3mm LED's will not fit in the ship with the magnets glued in. Also, the magnets grab hold of the LED's making them hard to place and keep where you want. (These are strong little magnets.) In addition I had to chop out the front registry pin between the top half and the bottom half.
So I decided to give the LED's a diet if you will. Chopped them down in half. They now fit, and I am pretty sure I can pull this thing off. The photo shows before and after shots of the LED's along with a lighting test.

With the ship almost done, and the command ship at the point where it needs paint to proceed. I turn my attention to the base. Now you armor people have the right ideas for bases. Basically a mini diorama. But the Sci Fi people don't. They usually spend months building this beautiful, and amazing ship, and then they stick it on a base that is scrap wood, with a really ugly switch attached to it. I cannot tell you how many times I have seen photos of this. Here was my first thought for the base:

I was going to take that printout, print it on decal paper and put it on the wood base. When I started thinking about switches, I was stumped until I looked in my parts bin.
This was about 4 weeks ago, and I scrapped that idea for a new one. I have been working on the base for 2 weeks now, but I don't want to show it off just yet. I will however leave you with a teaser if you will:

Grendels
Active Member
- Joined
- Nov 24, 2009
- Messages
- 9,092
It's the switch for the lights.
In my last post, I talked about star ship model bases. Most builders do not take any time to make a base to match the work they put into the model. Which in my opinion, takes away from the model. So after thought, I had an idea, spurred on by some of military modelers, and Scott's videos, I decided to make a diorama from the model as my base. The last photo I posted was of an armature. With some sculpey, I turned it into Gorignak, the rock monster from the movie.
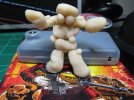
This little guy will act as the switch to turn on and off the lights. He has a rare earth magnet embedded in his back. When you place him near a magnetic reed switch, it will activate the lights.
For the location of the switch I wanted to place this in a rock wall. So I got a few molds of rocks from my local mega hobby store. (No local hobby shops, only the big box stores. :'( ) I also got some plaster, and made a few rocks. This is a photo of the rock that has the reed switch embedded in it:
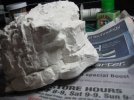
This is a large piece of plaster and it took a week to cure. One problem I had is that the bottom of it was not flat, so I had to sand it down so it would sit on the base correctly.
This is a photo of the layout for the rocks on the base:
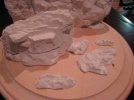
After getting them arranged correctly, I drew a rough sketch of the rocks on the board, and then, the layout of the wiring for the model. Once that was done, I took it out to the garage and started drilling holes for wires and the brass tube that will support the model.
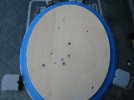
I also used a router to carve a channel for the wires in the bottom of the board. Once the wiring is done, I will fill this in with epoxy to keep the wires in place and from getting accidentally pulled out. I am placing the batter box on the top of the base because the plaster will make the base heavy, and I don't want to turn the base over each time I have to replace the batteries. They will be hidden under some rock textured paint. I will post photos of this when I have the base done.
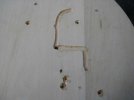
The rocks will be attached to the board with dry wall screws. For the back wall, I attached that piece of plaster to a board first and then I will attach this to the base.
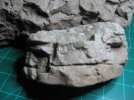
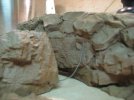
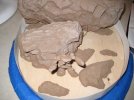
I spent most of the last few days painting the rocks. Here are a few photos, but they don't show the paint job well. I am not using the good camera and the lighting is horrible. I will try to fix this in the next day or two.
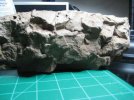
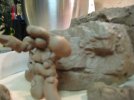
Sorry that last photo is a bit fuzzy.
I am still working on seam filling on the protector itself No photos of this, all of you have seen that before, but I will say this, the tricky part to the seams is at the wings. I should have all the seams taken care of this weekend as well as the primer coat of paint. As for the base, I will start laying my ground work on Saturday, and it should be ready for varnish (For the wood part of the base) on Sunday.
In my last post, I talked about star ship model bases. Most builders do not take any time to make a base to match the work they put into the model. Which in my opinion, takes away from the model. So after thought, I had an idea, spurred on by some of military modelers, and Scott's videos, I decided to make a diorama from the model as my base. The last photo I posted was of an armature. With some sculpey, I turned it into Gorignak, the rock monster from the movie.

This little guy will act as the switch to turn on and off the lights. He has a rare earth magnet embedded in his back. When you place him near a magnetic reed switch, it will activate the lights.
For the location of the switch I wanted to place this in a rock wall. So I got a few molds of rocks from my local mega hobby store. (No local hobby shops, only the big box stores. :'( ) I also got some plaster, and made a few rocks. This is a photo of the rock that has the reed switch embedded in it:

This is a large piece of plaster and it took a week to cure. One problem I had is that the bottom of it was not flat, so I had to sand it down so it would sit on the base correctly.
This is a photo of the layout for the rocks on the base:

After getting them arranged correctly, I drew a rough sketch of the rocks on the board, and then, the layout of the wiring for the model. Once that was done, I took it out to the garage and started drilling holes for wires and the brass tube that will support the model.

I also used a router to carve a channel for the wires in the bottom of the board. Once the wiring is done, I will fill this in with epoxy to keep the wires in place and from getting accidentally pulled out. I am placing the batter box on the top of the base because the plaster will make the base heavy, and I don't want to turn the base over each time I have to replace the batteries. They will be hidden under some rock textured paint. I will post photos of this when I have the base done.

The rocks will be attached to the board with dry wall screws. For the back wall, I attached that piece of plaster to a board first and then I will attach this to the base.
I spent most of the last few days painting the rocks. Here are a few photos, but they don't show the paint job well. I am not using the good camera and the lighting is horrible. I will try to fix this in the next day or two.


Sorry that last photo is a bit fuzzy.
I am still working on seam filling on the protector itself No photos of this, all of you have seen that before, but I will say this, the tricky part to the seams is at the wings. I should have all the seams taken care of this weekend as well as the primer coat of paint. As for the base, I will start laying my ground work on Saturday, and it should be ready for varnish (For the wood part of the base) on Sunday.
DreamKnight
Active Member
- Joined
- Dec 8, 2009
- Messages
- 1,160
HAHA! My favorite scene even! I love it!
S
ScaleModelMadman
Guest
Cool base!
I love the Gorignak, 8)
I love the Gorignak, 8)
Grendels
Active Member
- Joined
- Nov 24, 2009
- Messages
- 9,092
Thank you all!!
I haven't done much work on the model since Wednesday, work has tied me down, but I have a three day weekend, so I will get a lot done by Sunday.
Scott, you would probably have better luck on Ebay for the movie, and it might even be cheaper than a rental. I would loan you my well used copy, but I think you are a bit far away to do that.
If I had more time, I would track downs some little blue people and a Tim Allen to finish up the scene. But with the time I have left, I don't think I can find anything. No local hobby shop, just big box stores. So I can't order anything that way, I might look on ebay tomorrow.
java
No disintegrations
- Joined
- May 15, 2010
- Messages
- 909
The rocks look really nice and i gotta agree with what ScaleModelMadman said
It looks spot on. ;DI love the Gorignak
Grendels
Active Member
- Joined
- Nov 24, 2009
- Messages
- 9,092
AKE said:They're miners, not minors!
What scale is Gorignak? I got some spare 1/144th scale German Han Solos if you need some!
LOL: German Han Solos, that is just what my build needs!!! Thanks for the offer but from my calculations he is about 1/50 which makes him o scale for trains. I was at my local big box hobby shop today and my luck must have been with me, they had a bunch of train figures and armor models on clearance. I picked up some of each. I have a few o scale figures so I can make a Tim Allen, and some figures in other scale sizes to make little blue people. I may not do this if I think it is cluttering up the base too much. I don't want it too busy. Now time to get to work, too many of you are finishing up your builds and I still have seams to fill.....
Grendels
Active Member
- Joined
- Nov 24, 2009
- Messages
- 9,092
New Update!
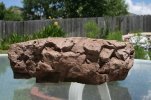
First I want to post a better photo of one of the rock walls:
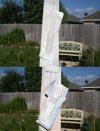
I have also finished up the seam filling, and started in on a primer coat:
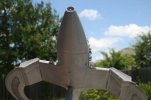
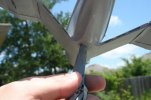
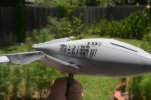
Some of you may have noticed that the paint is a bit rough. I used an automotive primer which required sanding before you add the next coat. I grabbed the wrong rattle can out of the garage. It happens but that paint does act as a minor filler, so any small scratches are now filled in. I did have to re-score some of the panel lines though. The primer filled them in.
She has her first white coat on her, and will need another. I didn't want to go too heavy with the paint. Don't need runs...
One thing, living here in Texas does have one advantage. Heat, it is 120 in my garage, so paint cures up fast. Kind of like having your own paint baking room. I will have the second coat on her Monday afternoon.
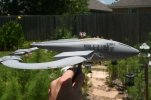
I have also put paint on the command ship:
This is a small model, and probably won't need that second coat. I will make that determination tomorrow. If it doesn't need paint, I just have to get the wires for the lights in their channels, and glue it up. After that, a few little touches here and there.
Now to the base, I first put in the battery box:
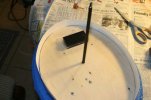
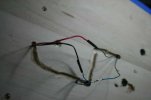
Then added one of the rocks, the one with the magnetic reed switch, turned it over and started soldering:
Once that was done, I decided to add the other rock. This rock was attached to a piece of board with dry wall screws, and I planned on attaching that to the base with a few large wood screws. I grabbed 3 inch wood screws. (I alway over engineer these things. You should see the stand I made for my aquarium. It would support 10,000 lbs.) The wood that would hold the rock came from a remodel of the student center at the local college. It is some sort of hard wood, and very dense. I had pre-drilled out the holes for the screws but didn't measure correctly, the holes were not large enough in diameter, nor were they deep enough. I had to drill them out. Well, of course something would have to go wrong. (Doesn't it always. I think more than one of you has posted something that went wrong with your builds, I am no exception.) The drill bit broke. I was not using a hand drill but a drill press:
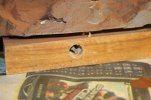
This was a new drill bit too. I drilled out the hole a little larger, got some pliers into it and twisted it out. I could not just replace the board. The rocks are made out of plaster, and pulling the screws out that hold the rock to the board was not an option. The holes would never have recovered from it. I am happy that this one came out OK, or I would have been re-casting that rock.
Once that was done, I started in on the base:
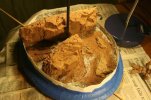
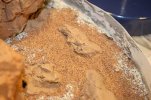
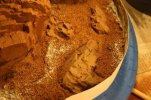
That should take a few days to dry. I used a mixture of white glue water and celluclay. I have never worked with that stuff before, and my test batch came out perfect. This batch was a little too thick. But it got the job done. Once it is dry I will add some paint and a little bit more details.
I have to watch the movie one more time to get ideas on how to paint my figures.... That is about all I have left, other than a few details. (The ship needs one more coat, other colors added, decals, and final light check. The base just needs details and paint. With a little bit of work around the battery box.)
;D ;D
I will be happy when this one is done!!!
First I want to post a better photo of one of the rock walls:

I have also finished up the seam filling, and started in on a primer coat:


Some of you may have noticed that the paint is a bit rough. I used an automotive primer which required sanding before you add the next coat. I grabbed the wrong rattle can out of the garage. It happens but that paint does act as a minor filler, so any small scratches are now filled in. I did have to re-score some of the panel lines though. The primer filled them in.
She has her first white coat on her, and will need another. I didn't want to go too heavy with the paint. Don't need runs...
One thing, living here in Texas does have one advantage. Heat, it is 120 in my garage, so paint cures up fast. Kind of like having your own paint baking room. I will have the second coat on her Monday afternoon.
I have also put paint on the command ship:

This is a small model, and probably won't need that second coat. I will make that determination tomorrow. If it doesn't need paint, I just have to get the wires for the lights in their channels, and glue it up. After that, a few little touches here and there.
Now to the base, I first put in the battery box:

Then added one of the rocks, the one with the magnetic reed switch, turned it over and started soldering:

Once that was done, I decided to add the other rock. This rock was attached to a piece of board with dry wall screws, and I planned on attaching that to the base with a few large wood screws. I grabbed 3 inch wood screws. (I alway over engineer these things. You should see the stand I made for my aquarium. It would support 10,000 lbs.) The wood that would hold the rock came from a remodel of the student center at the local college. It is some sort of hard wood, and very dense. I had pre-drilled out the holes for the screws but didn't measure correctly, the holes were not large enough in diameter, nor were they deep enough. I had to drill them out. Well, of course something would have to go wrong. (Doesn't it always. I think more than one of you has posted something that went wrong with your builds, I am no exception.) The drill bit broke. I was not using a hand drill but a drill press:

This was a new drill bit too. I drilled out the hole a little larger, got some pliers into it and twisted it out. I could not just replace the board. The rocks are made out of plaster, and pulling the screws out that hold the rock to the board was not an option. The holes would never have recovered from it. I am happy that this one came out OK, or I would have been re-casting that rock.
Once that was done, I started in on the base:


That should take a few days to dry. I used a mixture of white glue water and celluclay. I have never worked with that stuff before, and my test batch came out perfect. This batch was a little too thick. But it got the job done. Once it is dry I will add some paint and a little bit more details.
I have to watch the movie one more time to get ideas on how to paint my figures.... That is about all I have left, other than a few details. (The ship needs one more coat, other colors added, decals, and final light check. The base just needs details and paint. With a little bit of work around the battery box.)
;D ;D
I will be happy when this one is done!!!
