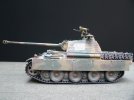
Panther G Early Version

pingvuiini

Member
Joined
Dec 8, 2012
Messages
123
Just finished my latest crusty over-weathered project, A Tamiya Panther G Early Version. The kit came with Eduard Zimmerit, but I elected not to use that so I could have fun with the crust.

I think on every model I've built I've managed to screw up something like gluing a piece on backward, in the wrong place or breaking something. But in most cases I've been able to catch and rectify the error right away through various means. I got all the way to the initial painting on this Panther before I noticed an egregious build error that was way past fixing. So I post few photos and submit myself to the ridicule of the board. :)^D

Can you spot it?

PantherGv1Frt01Web.jpg


PantherGv1Frt02Web.jpg


PantherGPaintFrt01Web.jpg


PantherGPaintFrt02Web.jpg
 
Wonderful crust on it and the tarp looks great . hmm the build error ...is it the broken track ?
 
Fredrik64 said:
Wonderful crust on it and the tarp looks great . hmm the build error ...is it the broken track ?

I just saw the broken track (third photo), but that isn't the big boo boo. I had to disassemble the whole thing after photographing the whitewash so I could weather it, so the tracks were not glued at that time. As a side note, I snagged the individual track links from a Hobby Boss kit for this model, but I can never assemble those things perfectly straight. The Hobby Boss tracks also make you assemble the teeth on each track shoe, so it gets really tedious and somewhat irritating. But if I can finally get the sections together satisfactorily then I start feel a perverse sense of achievement.

I will wait for a few more guesses. If no one catches it then perhaps the boo boo not such a big deal after all from a visual standpoint and maybe I can live with it.


bdr65 said:
Iam impressed by your build rate. :eek: haha. 8)

Hee! I must admit it is fun to be working on 3-5 kits simultaneously. When something is drying or gets boring you can rotate to another kit. The past several weeks I have been venturing into a new area: cars. I have a bunch of muscle car buddies who are into barn finds and so I have applied my armor weathering techniques to get that junkyard appearance. The only drawback is that all these cars are eating into my armor time.
RevellCudaFrt01Web.jpg


Vette427Weather04Web.jpg


ChallengerTATopRear02eBay.jpg


Roadrunnerv1Frt01Web.jpg
 
Very impressive how you did the rust effects for the Panther and the muscle cars. What did you use to get the crusty rust effects? As far as the error is it the gun mantlet that is reversed?
 
Tanker52 said:
Very impressive how you did the rust effects for the Panther and the muscle cars. What did you use to get the crusty rust effects? As far as the error is it the gun mantlet that is reversed?
Thanks for all the crust and build rate compliments! :)^D

Re error - The mantlet is ok. Luckily if it were reversed I haven't yet glued it permanently to the turret so I can flip it around. Three or four more guesses from the board and then I will reveal.

Re effects - I used my usual combination of artists oils w/ stinky mineral spirits and acrylics w/ water to achieve the weathering on both the armor and cars. Here are some more photos:

PantherGv1Side02Web.jpg


PantherGv1TopFrt01Web.jpg


PantherGv1Detail11Web.jpg


PantherGv1Detail07Web.jpg


PantherGv1Detail02Web.jpg
 
myhobbyroom said:
Awesome build, the weathering is very realistic.
Highlander242 said:
Very cool work. Could you explain how you achieve the effect?

Joe

Thanks for the compliments! I mostly use oils with mineral spirits. I cake on the darker colors to give it the crusty look and add washes of rusty tones over it. Disadvantages of this technique include some long drying times and plastic parts that are under stress (i.e. sprocket & idler wheels used with rubber tracks) tend to weaken and break after repeated washes. Lately I have been trying to use acrylics with water to replace the oils because they're less smelly and don't affect the plastic, but the oils seem to achieve a better overall effect.


winterfritz said:
It looks to me like the tracks are upside down..........

The tracks are in the right direction. I will go ahead and spill the beans: I errantly glued all the wheel arms at the wrong angle so the suspension is riding *way* too high. The bottom of the side skirts should be about 3/8 of an inch lower, covering the top of the tracks and the very top of the road wheels. Buffoonery of the highest order. :)^(

Here is a photo I found off the net for comparison and the glitch is quite apparent:

m56-440.jpg

PantherGv1Side02Web.jpg


I think what saves my Panther is the side skirts which hide the huge gap between the hull and the track and wheels. I had intended to have the two missing skirts but noticed the big gap and had to cover up those areas with camouflage netting and tarps. From the sides it doesn't look too bad, but the 3/4 views really show the distorted tall look and overall goofy proportions:

PantherGv1Frt07Web.jpg


PantherGv1Frt06Web.jpg
 
To be perfectly honest I like the look of your running gear more, it may be less accurate but it sure exaggerates the hang of the track from the drive sprocket to the first road wheel. funnily enough, anyone who builds 1/6th vehicles may be familiar with the problem because before you mount the R/C innards (motors, batteries, speakers etc...) the tank sits really high on its suspension, because there isn't enough weight in it for gravity to do its job.

With my tangent finished... really nice work on this one! she looks like she's battled through some seriously rough conditions! great weathering effects.

Cheers,
Jonny.
 
Thanks for the compliments guys!

Re error - As time goes by I think the problem bothers me less and less. It has been encouraging that nobody here was able to spot it. I'll probably post this model on eBay and be done with it.

Funny thing: the photo I posted to illustrate the suspension error has its skirts mounted incorrectly. The skirt with the two rectangular holes at top should be at the front of the tank. At first I thought I screwed up again, but I checked the instructions to verify. Now I don't feel so bad! :)^D
 

Latest posts

Back
Top