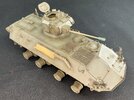
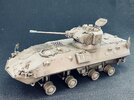
Piranha PWI-GR
- Thread starter Jakko
- Start date
Rimmer
Well-Known Member
- Joined
- Oct 3, 2024
- Messages
- 292
You'll love the model I intend to start after this one, then
oooh - intriguing!
Jakko
Well-Known Member
- Joined
- Oct 9, 2024
- Messages
- 1,110
For the headlights, I took a look at the Canadian Piranha, the AVGP. I had some lights left from a Hobby Boss Leopard 2, and scratchbuilt the mounting from some plastic card and punched discs:
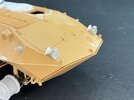
They're not 100% accurate, but they look good enough, if you ask me. Maybe I'll add more detail later, we'll see. The lights should actually "float" above the armour, but because I made the backing plate from 0.25 mm plastic card, I doubt they would survive for very long if I had replicated that, so I glued them to the armour instead.
On the back, I added the hinges for the hatches:
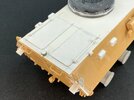
I wanted to make the hinges from plastic strip at first, but eventually went for sawing a slot in a piece of 2 mm square rod, using a small hacksaw because the blade of those is much wider than of modelling saws. I then filed the top to be half-round and sawed off the finished hinge. After glueing them in place, all it took was adding a piece of rod between them and some strip cut at an angle for the part of the hinge attached to the hatch.
The filler cap is just some scrap of plastic that happened to be 3.5 mm diameter with a 3 mm disc on top, and some more strip etc. for the hinge and lock. The pieces of tube on the rear plate are for the lights, but those aren't in them yet.

They're not 100% accurate, but they look good enough, if you ask me. Maybe I'll add more detail later, we'll see. The lights should actually "float" above the armour, but because I made the backing plate from 0.25 mm plastic card, I doubt they would survive for very long if I had replicated that, so I glued them to the armour instead.
On the back, I added the hinges for the hatches:

I wanted to make the hinges from plastic strip at first, but eventually went for sawing a slot in a piece of 2 mm square rod, using a small hacksaw because the blade of those is much wider than of modelling saws. I then filed the top to be half-round and sawed off the finished hinge. After glueing them in place, all it took was adding a piece of rod between them and some strip cut at an angle for the part of the hinge attached to the hatch.
The filler cap is just some scrap of plastic that happened to be 3.5 mm diameter with a 3 mm disc on top, and some more strip etc. for the hinge and lock. The pieces of tube on the rear plate are for the lights, but those aren't in them yet.
Jakko
Well-Known Member
- Joined
- Oct 9, 2024
- Messages
- 1,110
Thanks. I'm still looking for a good way to make a slightly conical ventilator to go between the hatches, though I did find a solution to making the circular firing port covers — it's just that I have to wait until Wednesday for it to be delivered 
Jakko
Well-Known Member
- Joined
- Oct 9, 2024
- Messages
- 1,110
At the back, I added the typical antenna tuning box used by Dutch Army vehicle radios from the 1970s on:
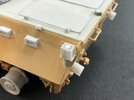
It still needs the antenna added on top, but I'll only add that after painting. The dimensions come from the parts in the AFV Club YPR kit, and I had actually made two, but one came out crooked so I decided to only put an antenna on this side instead of on both.
At the front, I completed the hull hatches:
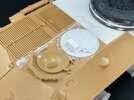
The commander's hatch is really just a copy of the Grizzly's hatch based on Trumpeter's instructions

It still needs the antenna added on top, but I'll only add that after painting. The dimensions come from the parts in the AFV Club YPR kit, and I had actually made two, but one came out crooked so I decided to only put an antenna on this side instead of on both.
At the front, I completed the hull hatches:

The commander's hatch is really just a copy of the Grizzly's hatch based on Trumpeter's instructions
Jakko
Well-Known Member
- Joined
- Oct 9, 2024
- Messages
- 1,110
I'm partly making this up as I go along  All there was IRL was one vehicle converted for trials in 1981, so what I'm doing here is pretty much just looking at other Piranha variants (mainly the Canadian AVGP) and extrapolating what the Dutch Army might have wanted from it. Currently, what's occupying me there is the location of the smoke grenade launchers — there were none on the trials vehicle, but an in-service version would certainly have had those. Trouble is, there is no really good place to put them where they wouldn't be in the way. I suspect they will probably end up on the sides of the nose, for want of a better location.
Jakko
Well-Known Member
- Joined
- Oct 9, 2024
- Messages
- 1,110
Thanks, I'm almost there now 
I've been using my new tool:
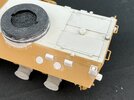
6 mm discs of 0.25 mm plate for the covers over the firing ports, with a much smaller disc on it (made with my RP Tools set) for the hinge — on both sides and the rear. On the sides, their tops are about level with the bottoms of the vision blocks, and all are about 2 mm to the left of the blocks (when viewed). At the back, they are about 6 mm below the tops of the doors and 3 mm from its left edge. On real Piranhas, the hinges can be either at the bottom or at the right, and as you can see, I chose to put them at the bottom because that seems to be the older style.
The ventilator on the roof, between the hatches, was also made with my new tool: first a 4 mm disc of 0.75 mm card as a spacer, with a 6 mm disc of 1.5 mm card on top of that, of which I filed the edges at an angle to make a truncated cone. That I had to do that anyway was a stroke of luck, because I found that the 1.5 mm plate is too thick to punch well with this set — it's fine if you want a hole in a plate, but not if you want the disc, because its edges will be ragged. That is to say: the two sides were nicely 6 mm and round, but the thickness of the plate between them was ragged and smaller in diameter than the rest of the disc. Anyway, after filing and glueing it in place, I added four bits of 0.88 mm rod around it, because something like that is visible in Trumpeter's instructions, too.
I've been using my new tool:

6 mm discs of 0.25 mm plate for the covers over the firing ports, with a much smaller disc on it (made with my RP Tools set) for the hinge — on both sides and the rear. On the sides, their tops are about level with the bottoms of the vision blocks, and all are about 2 mm to the left of the blocks (when viewed). At the back, they are about 6 mm below the tops of the doors and 3 mm from its left edge. On real Piranhas, the hinges can be either at the bottom or at the right, and as you can see, I chose to put them at the bottom because that seems to be the older style.
The ventilator on the roof, between the hatches, was also made with my new tool: first a 4 mm disc of 0.75 mm card as a spacer, with a 6 mm disc of 1.5 mm card on top of that, of which I filed the edges at an angle to make a truncated cone. That I had to do that anyway was a stroke of luck, because I found that the 1.5 mm plate is too thick to punch well with this set — it's fine if you want a hole in a plate, but not if you want the disc, because its edges will be ragged. That is to say: the two sides were nicely 6 mm and round, but the thickness of the plate between them was ragged and smaller in diameter than the rest of the disc. Anyway, after filing and glueing it in place, I added four bits of 0.88 mm rod around it, because something like that is visible in Trumpeter's instructions, too.
Jakko
Well-Known Member
- Joined
- Oct 9, 2024
- Messages
- 1,110
I spent a good deal of time today scratchbuilding smoke grenade launchers on the hull front:
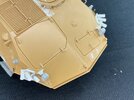
The base is plastic card and strip, which took a fair degree of tinkering to get it to look reasonable despite only being five pieces. The launch tubes are 2 mm plastic rod with some very thin plastic card wrapped around the rear, because of the peculiar construction of the unique Dutch Army type of launchers: the whole tube is expendable, and clicks onto the base with a bayonet fitting. I want to add a brush guard over it, but I'm not sure yet whether to make that horizontal or vertical.
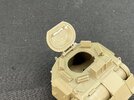
I also added some details to the turret hatch that AFV Club missed:

Jakko
Well-Known Member
- Joined
- Oct 9, 2024
- Messages
- 1,110
It ended up as a mainly horizontal brushguard with a smaller vertical part 
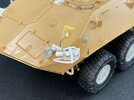
The mirrors are from the Mowag Piranha 4×4 by Verlinden (that includes four, I think, because I had two of them left) on supports from brass wire and plastic — the trickiest job in all of this model, and now my biggest hope is that they'll stay on
After also building a rack on the side for two jerrycans from AFV Club's YPR kit, I'm done building this thing:
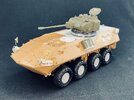
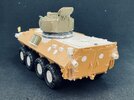
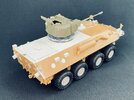
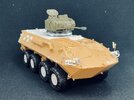
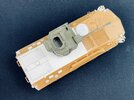
A few things I didn't mention yet are the tubes for convoy flags on the front corners of the hull (brass tube glued into holes I drilled) and the tail lights (leftover parts from an Airfix 1:76 Churchill and thin plastic rod). I could add a great deal of detail that Italeri left out, but I would need better references than the Tankograd book about the Piranha (tip: leave that in the shop, it's basically a glorified Mowag advertisement) and, more importantly, much more motivation to actually add all of them

The mirrors are from the Mowag Piranha 4×4 by Verlinden (that includes four, I think, because I had two of them left) on supports from brass wire and plastic — the trickiest job in all of this model, and now my biggest hope is that they'll stay on
After also building a rack on the side for two jerrycans from AFV Club's YPR kit, I'm done building this thing:


A few things I didn't mention yet are the tubes for convoy flags on the front corners of the hull (brass tube glued into holes I drilled) and the tail lights (leftover parts from an Airfix 1:76 Churchill and thin plastic rod). I could add a great deal of detail that Italeri left out, but I would need better references than the Tankograd book about the Piranha (tip: leave that in the shop, it's basically a glorified Mowag advertisement) and, more importantly, much more motivation to actually add all of them
Jakko
Well-Known Member
- Joined
- Oct 9, 2024
- Messages
- 1,110
One more build photo to go before that, though  Somebody pointed out that it would have had a cable reel and connecting points for field telephone wire on the back, so I really had to add those too. The AFV Club YPR kit includes a reel, so that was easy, but I had no idea what the phone connectors look like. Luckily, though, I happen to own the 1983 edition of the YPR 765's technical manual, and that includes a section about them:
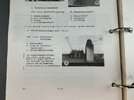
They're really just three sheet metal covers over two connectors each (telefoonaansluitingen means "telephone connectors"), and once I knew that, I could look at the parts in the YPR kit I've been using for the turret and some other bits, and found the ones that represent these things. I measured them up and then just cuts three bits of plastic strip to the right size, without bothering to add any more details because those would be on the underside to keep them out of the rain. On the YPR those are sort of visible because they're on a sloping armour plate, but on my Piranha they would be on the backward-sloping rear plate, so I didn't see a need to add the connectors. Also, I put a back plate on the AFV Club cable reel holder so it fits above the right tail light:
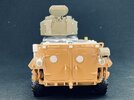
And with that I'm really done building this vehicle Tomorrow, I'll be going to a modelling show/meet at a local museum, and will of course be taking this one along.

They're really just three sheet metal covers over two connectors each (telefoonaansluitingen means "telephone connectors"), and once I knew that, I could look at the parts in the YPR kit I've been using for the turret and some other bits, and found the ones that represent these things. I measured them up and then just cuts three bits of plastic strip to the right size, without bothering to add any more details because those would be on the underside to keep them out of the rain. On the YPR those are sort of visible because they're on a sloping armour plate, but on my Piranha they would be on the backward-sloping rear plate, so I didn't see a need to add the connectors. Also, I put a back plate on the AFV Club cable reel holder so it fits above the right tail light:

And with that I'm really done building this vehicle
Jakko
Well-Known Member
- Joined
- Oct 9, 2024
- Messages
- 1,110
On the advice of someone more knowledgeable about Dutch armoured vehicles than I am, I added mesh over the grilles on the engine deck, because this was a feature of all Dutch troop carriers. I used mesh from Tamiya kits I built in times of yore:
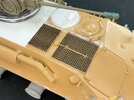
It may appear that they're a bit wavy, but that's an optical illusion caused by interference between the lines of the grilles and the grid of the mesh.
When that had dried, I sprayed the whole model Mr. Aqueous H78 Olive Drab (1), which is a near-perfect match for RAL 6014 with which the Dutch Army painted its vehicles:
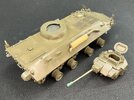
The paint is still a bit wet in this picture, and maybe a little thin on the roof because the airbrush was running on fumes by the time I was done, but I'll fix that later where it needs to be. It has reminded me why I prefer tracked to wheeled vehicles, though Getting paint into all the nooks and crannies of the suspension was a lot of work.

It may appear that they're a bit wavy, but that's an optical illusion caused by interference between the lines of the grilles and the grid of the mesh.
When that had dried, I sprayed the whole model Mr. Aqueous H78 Olive Drab (1), which is a near-perfect match for RAL 6014 with which the Dutch Army painted its vehicles:

The paint is still a bit wet in this picture, and maybe a little thin on the roof because the airbrush was running on fumes by the time I was done, but I'll fix that later where it needs to be. It has reminded me why I prefer tracked to wheeled vehicles, though
Steve Jones SMS
Active Member
- Joined
- Oct 9, 2024
- Messages
- 63
A fantastic build Jakko. You really have done a terrific conversion on this kit. Good luck with the rest of the wet stuff
Jakko
Well-Known Member
- Joined
- Oct 9, 2024
- Messages
- 1,110
Jakko
Well-Known Member
- Joined
- Oct 9, 2024
- Messages
- 1,110
It took another fair while, but I finally had some decals printed, which arrived last week. I put them on the model yesterday evening:
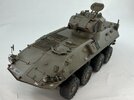
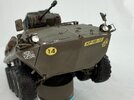
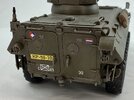
Vehicle No. 30 of C Company, 43 Armoured Infantry Battalion (43 pantserinfanteriebataljon, "43 painfbat" in Dutch Army jargon), "Chassé" infantry regiment. These markings are pretty much entirely fictitious, but taken from YP 408 APCs that this battalion was equipped with in the 1970s–80s. The registration, KP-58-10, is also entirely made up from whole cloth, as the KP series was never used, but it's plausible seeing as how many YPR 765s were numbered in the KY series, so I figured KP might have been chosen for Piranhas.
For in the turret hatch, I got a figure from Sylly's Mini Models a few months back, though I had to saw off his legs to get him to fit in the hatch:
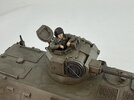
I think I will only add a small amount of dirt to represent a Piranha PWI on exercise somewhere in Germany in the late 80s.


Vehicle No. 30 of C Company, 43 Armoured Infantry Battalion (43 pantserinfanteriebataljon, "43 painfbat" in Dutch Army jargon), "Chassé" infantry regiment. These markings are pretty much entirely fictitious, but taken from YP 408 APCs that this battalion was equipped with in the 1970s–80s. The registration, KP-58-10, is also entirely made up from whole cloth, as the KP series was never used, but it's plausible seeing as how many YPR 765s were numbered in the KY series, so I figured KP might have been chosen for Piranhas.
For in the turret hatch, I got a figure from Sylly's Mini Models a few months back, though I had to saw off his legs to get him to fit in the hatch:

I think I will only add a small amount of dirt to represent a Piranha PWI on exercise somewhere in Germany in the late 80s.
Similar threads
- Replies
- 14
- Views
- 511

