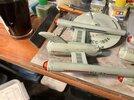
Polar Lights TOS USS Enterprise 1/1000 scale decals

93SFBG

New Member
Joined
Feb 13, 2025
Messages
11
HELP!
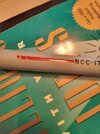
I'm looking for anyone who has successfully applied the Polar Lights decals for the TOS Enterprise 1/1000 scale with any success. I've had ZERO success getting these decals to work with MicroSet and MicroSol to get that painted on look. This is what the damn things do EVERY TIME I use them:
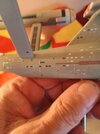
IMG_20250211_161019_HDR.jpg
I've been looking for good replacements. I found PNT decals from Federation Models, but these seem to be unavailable. The Federation Models website hasn't been updated in two years. If anyone out there has had success with these Polar Lights decals in getting them to look painted on with no edge curls, shine, etc. please let me know how this was accomplished.
 
Subscribed because I'm interested, but I have no answers.
I'm afraid there isn't a good answer other than AFTER MARKET! All the great modelers I have access to all say the same thing: do something other than the PL decals.
 
UPDATE: I have found a builder on YouTube that built the most exact replica of the production Enterprise I've ever seen. He used Polar Lights decals on this and I'm shocked to see how well his turned out. I'm wondering if my gloss coat isn't heavy enough so I have built one nacelle out of the box of spare parts I've built up now. I seam puttied and sanded and painted the nacelle. I put four coats of clearcote on. I used the collection of extra PL decals I have and put the nacelle registry number and stripe on to see how it goes.

So far, I'm on like coat 10 of Micro Sol and the entire upper edge of the decal where NCC-1701 is curling away from the model surface more and more severely the more MicroSol I apply.

The builder in the video indicated in his decal application video that it took a lot of work to get the decals to look good but did not give any info as to how many coats etc. does the trick. So I'm going to keep coating this thing until it dissolves if necessary to find out.

Regardless, this is RIDICULOUS that these decals are so hard to work with. It's the damn film. It's as thick as plastic wrap. In comparison, the decals from PNT Models at Federation.com are much much thinner and react IMMEDIATELY to MicroSet/Sol treatments.

More to follow....
 
17:42 CST. Okay. I've spent the WHOLE DAY saturation bombing this decal experiment with MicroSol and Walthers Solvaset while using a damp paper towel to constantly press these decals into the surface of the nacelle. I don't know how many coats I've applied now - 20 at least and here are the results:
IMG_20250217_174033_HDR.jpg
So that's as good as I could get it. And that isn't good enough.
 
And that isn't good enough.
I don't know brother, if the decal is down as far as it can go, and it looks like it is, that is all you can expect. How is this impacting the lights? Am I just not getting it? Would not be the first or the last time!
 
It's not as far as it can go. The very edge along the top and bottom, whole length the edge is slightly raised and won't relax. Here is a picture of the decals I used that are aftermarket:
IMG_20250216_222025_HDR.jpgThese are the aftermarket decals made in house by Federation Models. No comparison. These do what they're suppose to do with setting solution and I didn't spend a whole day just getting one decal to look marginal at best.
 
Oh and that out of alignment window...it tore in the application and I repositioned it but slipped out of alignment before I noticed it. I'm going to paint over it, use my window drilling templates to sketch out a new one and paint it in.
 
Skip the micro set and micro sol. Use a clear paint to hold it down. These super thin decals look great when they stay put, but once disturbed, they're toast.

Also, other manufacturers have different types of decal solutions. Someone has one that basically holds the decal in place til it dries. I can't remember who makes it though. I have Ammo, Tamiya, Humbrol and Gunze brands and each does the job a little differently.
Hi, I appreciate the input. Are you commenting on the window situation or the overall Polar lights decal debacle? Since you've joined the discussion here I want to ask you: have you built this kit and used the decals that come with the kit successfully?
 
Hi, I appreciate the input. Are you commenting on the window situation or the overall Polar lights decal debacle? Since you've joined the discussion here I want to ask you: have you built this kit and used the decals that come with the kit successfully?
I've built four so far. I have used the kit decals with success. I'm working on four kitbashed ships. I have not had issues with any of the kit windows.

Another method that came to mind is using future floor polish for applications of decals. You literally just apply the future to the area and put the decal on top. Add more future to cover the decal and smooth it out.

If your looking for different TOS decals, Dannon March makes great ones.

https://www.etsy.com/listing/102680...214989afd3cbabe3663ccbb9d86ad9c6e7:1026808486

https://www.ebay.com/sch/i.html?_tr...&_trksid=p3542580.m47492.l71970&_ssn=yogurt80

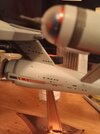
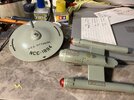
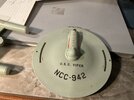
Here's my current project. These are custom decals but I don't have the makers contact info.

IMG_1714.jpeg

IMG_1715.jpeg

IMG_1716.jpeg
 
Last edited:
Wow. That's awesome. So you don't use any setting solution at all? I'd like to get insight in how you modify kits like that. I'm retired now, I've got lots of model kits still in the box I've been lugging around for twenty years and now I'm getting back into the hobby again. Are those the standard 1/1000 nacelles? They look like they came from a bigger scale kit-the AMT maybe? Also, this style you are building looks very much like the New Jersey class heavy battlecruiser from Star Fleet Battles. That is definitely something on my punch list. Making a New Jersey class out of a Constitution class.

I'd also love to see an authentic Phase II Enterprise. That ship is much cooler than the refit they ended up with in the movies IMO.

Thank you for the updates and tips! And thanks for the decal links. I did find the Etsy decals in a search and bookmarked it. Good to know they're top notch. I'll be ordering several sets soon. It looks like you're using a gray-green shade of paint. I've been using AS-29 Gray Green cans. It's too dark so my next step is to cut it with white 50/50. That should lighten the green down to the subtle shade it was on the shooting miniature. The second pilot I just did I painted blue gray because the first two pilot ships were blue gray, the production went to gray green.
 
Last edited:
Throwing out a technique question for any and all to pipe in on: What is your preferred method for masking the Bridge dome to get a perfect circle? I'm using a good one hole punch used in scrapbooking on metal HVAC tape used to seal airducts. It does a really good job. This is good for painting the dome directly with white paint. The video I shared above, the guy is painting the inside of the bridge module with gloss white and masking the dome surface to keep the clear plastic surface paint free.

Anyone going this route, please share what you are doing to keep the bridge dome perfect and the edge of the circle perfect. Thanks in advance.
 
Wow. That's awesome. So you don't use any setting solution at all? I'd like to get insight in how you modify kits like that. I'm retired now, I've got lots of model kits still in the box I've been lugging around for twenty years and now I'm getting back into the hobby again. Are those the standard 1/1000 nacelles? They look like they came from a bigger scale kit-the AMT maybe? Also, this style you are building looks very much like the New Jersey class heavy battlecruiser from Star Fleet Battles. That is definitely something on my punch list. Making a New Jersey class out of a Constitution class.

I'd also love to see an authentic Phase II Enterprise. That ship is much cooler than the refit they ended up with in the movies IMO.

Thank you for the updates and tips! And thanks for the decal links. I did find the Etsy decals in a search and bookmarked it. Good to know they're top notch. I'll be ordering several sets soon. It looks like you're using a gray-green shade of paint. I've been using AS-29 Gray Green cans. It's too dark so my next step is to cut it with white 50/50. That should lighten the green down to the subtle shade it was on the shooting miniature. The second pilot I just did I painted blue gray because the first two pilot ships were blue gray, the production went to gray green.
The modifications were made using parts from here, http://www.modular-models.com/

I use setting solutions. Most of the time I use good ol' micro sol and micro set. It all depends on the subject and the decals. Most thinner decals lay great, while thicker or older ones need lots of help. I'm also leaving more excess carrier film when trimming super thin decals. These don't leave much room for play and edge curl is an issue.

For those builds, they are very much based on WWII US naval classes. I also went by the class names used by Modular models for his designs and picked names that for these categories.
 
For the bridge dome, I just masked. I've used liquid masking and thin tape. I think I've had better results with the liquid masking. That and a sharp blade to trim the edges.
 
Okay, I'll try that now, see how I do. I'm going to test the Future floor wax trick. To be clear on that: I put Future on the model instead of water/MicroSet mix. Then place the decal. I assume dab it down good with a paper towel then add more Future. Let dry. Is that what is involved?
 

Latest posts

Back
Top