Recycled Rat

Chris S

Its a bit like being handcuffed to a lunatic !
Joined
Feb 14, 2011
Messages
4,573
Hi folks :)

A few people have been having a bit of fun lately on a certain social network with pics of Ratrods and the like ,The instagator of which shall remain unnamed to protect his/her identity ;D ...Right T ;)
One such picture really struck a chord with me and I have been toying with the idea for a few days .But seeing as I havent done any serious chop /cut /rebuilds lately I thought ....what the heck !!! I need a bit of a fun build blow out :)

Im sure a lot of folk have a build hiding in a cupboard or under the bench that they have never really been happy with ..right ? Well ,I've got one such build ,Its Revell's 1941 Chevy pickup . To be honest it was built a few years back ....4yrs maybe ? ,I done it as a quick out of the box build just for a bit of fun ,but was never happy with the finish so it has lay in a corner ,bits getting broke off etc .....until now ;D .I very seldom throw an old kit out knowing that one day I might just use it or parts of it for another build ...especially the cars .
So with that in mind here's the plan ................

Im going to take this ........
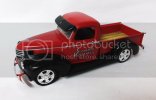
DSCF1535.jpg


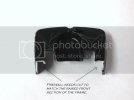
Take it apart , 'z' the frame , shorten the bed , chop the roof ,section the front of the bonnet /Hood ,rework the front guards and stick a huuge donkey in it ;D ;D ;D

Basically Im doing this ...... ;D
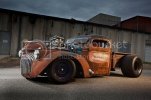
40rat.jpg

Hope you'll join me for this one ,should be a right larf ;)

Thanks for looking .

Chris.
 
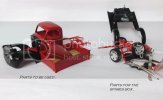
Well ....The pickup has been stripped :) Im left with two piles of bits ,some will be used and some will be used another time .

DSCF1536.jpg

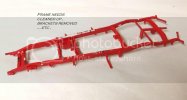
Next thing to do is clean up the frame ,which includes removing all the un needed brackets and things ,basically smooth it out and make it pretty ... ish before cutting it up ;D

DSCF1537.jpg

Thanks for looking .

Chris.
 
Thanks guys :) ....just a bit of fun ;D ;)

Chris.
 
It was only a matter of time there Chris!!! Wicked!!! Grabbing my comfy chair right now!!!
 
Thanks Scott ,nice to have you along :)

T ....Had to wait for the right inspiration ;D ;D

Chris.
 
Looking forward to this one CS. I my self stay away from the social networks anymore 8)
 
Alrighty ....Here we go ;D

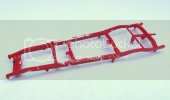
I have cleaned up the frame ...ie removed all the unwanted brackets etc ,there maybe more coming off but we'll see later on .Basically at this point Im just trying to smooth out the frame for a cleaner look .

DSCF1540.jpg

Now . Before any cutting is done there are a number of things to consider ! All of which will determine the final ride height and stance of the car .The old saying measure twice ... cut once really does apply here along with some logical thinking .
The first thing you need to do is decide what parts are to be used . Engine & tranny , wheels , and all the suspension /drive parts .
What Im aiming for here is to get the car sitting lower than a snakes belly with gravel rash ;D To do that I will need to 'Z' the frame and also channel the body down over the frame to drop it even more .The engine & Tranny are really important factors here because once I push the front of the frame up and drop the body down the tranny will be sitting higher inside the cab ! ,this will probably mean making at least a new tunnel for the tranny ...possibly a whole new floor ,but we'll get to that later ;)

DSCF1538.jpg

You can see I've already decided on my engine ;D its one I had from an old build lying in the parts box ,but suits this one nicely ,also it has the right type of headers which I can modify a bit to exit through the front guards like in the pic :) It also has a short transmission which doesnt protrude to far into the cab .

Once all the parts have been decided and the ride height has been determined you need to work out where the frame will be cut .At the front the cut is always at the firewall ,this way the step is not really intruding on the floor inside . At the rear ,because this is a pickup the cut will be right behind the cab as per the pic below .

DSCF1539.jpg
(click on the pic to expand if you cannot read the text ;) )

Now I have determined where I want to cut and how much I want to drop the car I can move on and 'Z' the frame ;D
That will be the next update ;)

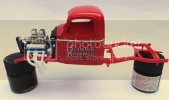
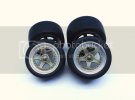
Oh ...Im thinking of changing things a little ,Im going to add some racing slicks ,just to give the car a bit of a Drag racing twist :)

DSCF1541.jpg

Thanks for looking .

Chris.
 
Looking awesome Chris, you may have me doing one of these after all your FB links lol
 
Nice going so far Chris. If you stuck some older style wheels on this you'd have a period 60's Altered drag truck. But I know that is not what your doing. Should be a cool build. Thats an Olds motor isn't it? Nice one.
 
Thanks guys :)

John ;D go on go on go on ;D ;D

Scott ,I'll do my best ;)

Matt ,I think you're right it could be an Olds ,it was originally in a Ford Pop Gasser I built loooong time ago ,just seems suited to this build :)

Chris.
 
Man, this this is (as they would say in California) "bitchin!" (Hope I don't offend anybody) It is afterall a CA truck. Chris are you going to keep the name on there?
 
Ill watch you do your choping and channeling so I know what I'm doing on mine, lol

Come on John, join the fun!
 
Hey Adam ,thanks for looking in mate ;) ...I'll probably put some different writing on the doors , but we'll see :)

John ,no worries mate , I'll try to show as much as I possibly can ,if I dont explain things to well ,please ask ;)

Ok chaps :)

Time to start a little hacking ;D ....But just before I do ,I want to talk a bit more about 'ride height ' , I know Im probably teaching a lot of you to suck eggs ,but there maybe a few that dont know this stuff and could help make a difference to their next build ,or maybe encourage some one to have a go and not be scared to cut up a perfectly good kit ;D ;D

OK , so lets take a look at the front end for now .
When it comes to stting the ride height for the front ,there are a few difference choices that will make Big changes to the look and the height .
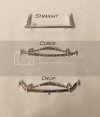
If you want to use a 'Tube ' or 'Beam ' axle (like I will be ) then there are three choices ,You have Straight ,which as it suggests is just a straight beam/tube . Next is the curve which will drop the height a bit because of the 'curve' in the axle ,and last there is the 'Drop ' Beam/tube .
I have shown all three below .....

DSCF1549.jpg

Its obvious how much the drop beam will lower the front of the car compared to the other two ! And that is my choice for this build :)

Right then ,nuff said about ride height ,lets do some cutting .
As I mentioned earlier ,you need to work out where your cuts are going ....again measure twice /cut once ;) So ,I marked my frame and made the four cuts ;D

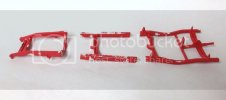
DSCF1542.jpg

As you can see there is a cross member in the frame where I made the cuts for the front ,I chose to keep the step behind the crossmember for two reasons ,first I can use it for mounting the tranny on ,and secondly ...Looks ,it looks better if the step up in the frame is close to the firewall ...just my choice :)

Having already decided that Im using the Drop beam axle coupled with the fact I will be channeling the body down over the frame I knew I didnt need too much of a 'Z' in the front section of the frame .In fact I only needed to lift the front by the depth of the frame as shown in the pic below .
To do that ,all that is needed is a couple of Triangular gussets . I simply cut four gussets from rectangular stock ,but any scrap plastic of the correct thickness of the frame will do .The better the fit ,the less filling /sanding to do ;)
I find it easier to fix the gussets to one half of the frame first ,make sure everything is squared up and leave to dry ,once dry its just a matter of gluing the other section in place ..again ,keep it square & true otherwise the whole car will be out of line ;)

DSCF1545.jpg

It looks a bit messy here ...well ,it is really .. lol ,but once dry it will get a sand down ,and a little filler where needed and you wont even see the joins :)

DSCF1546.jpg

Another thing to consider now is the firewall ! ...Got to remember everything is relative ! I mean ,once you start changing things ,you have to continue changing ,its a knock on effect which you have to keep in mind . So here ,because I lifted the front of the frame right where the firewall sits I need to cut the firewall to let the frame slide up into it .
I will need to cut this part again because Im channeling the body ,but if you are not doing that ,then you wont need any further cuts .

DSCF1543.jpg

The cuts in the firewall should be the same depth as the height the frame was raised ;)

Next up I will look at 'Z' ing the rear of the frame ,which will be a bit different to the front as I need to lift it higher .

Any questions ,feel free to ask :)

Thanks for looking .

Chris.
 

Latest posts

Back
Top