WATER 1/144 U-Boat Type XXIII DONE! With final pics
- Thread starter nicholassagan
- Start date
suavetomcat
New Member
- Joined
- Mar 4, 2013
- Messages
- 303
Re: WATER 1/144 U-Boat Type XXIII
This is so cute.... I hate to use that word, but it's definatley a compliment. Love it mate.
Chris
This is so cute.... I hate to use that word, but it's definatley a compliment. Love it mate.
Chris
nicholassagan
sippin on gin + juice
- Joined
- Dec 28, 2011
- Messages
- 2,013
Re: WATER 1/144 U-Boat Type XXIII
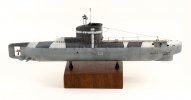
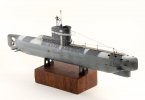
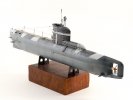
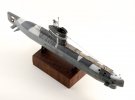
Thanks guys! SHE’S DONE! OMG I finished something for the contest!! I really wasn’t expecting to as priority has definitely been on the new baby. Still, she slept well last night so I was able to get the weathering and finish accomplished! With the exception of the final studio shots which I’ll be able to get up in the next week.
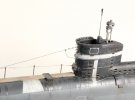
So…the final steps were a bit more complex than I anticipated, but really a fun process. I began by finishing the detail painting; deck tan for the wooden parts, flat metallic gray for some other parts, silver for the periscope and antennas and brass for the prop. While I had the brushes out I figured a good healthy dose of dry brushing was in order, so using the flat metallic gray and silver I went to town…or out to sea…or whatever. I used the silver to pick out the details like the ladder rungs, railings and hatches, etc.
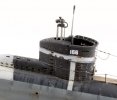
Second step was adding some dry transfers from the stash. I figured SOME markings would be cool and stumbled upon some nice gray skull and crossbones that I applied to the bow on either side. A registry number and some box stencils were also added.
Thirdly was the weathering process. Boy this was really fun since this is my first ever U-Boat!! I started with AK’s Kriegsmarine wash for gray ships and brushed lightly in select areas. I then used a cotton swap to ‘sweep’ the effect downwards on the hull. The same process was repeated with AK’s light rust effects (awesome stuff!) as well as engine oil effect and smoke pigments from their airplane sets.
Looking over my references I noticed that some larger scale builds featured some green glass on the sides of the conning tower, so I added the detail before applying the final clear coat of TAMIYA FLAT!!!! First time using it in a couple of years because it wasn’t available for the longest time. I forgot how much I love this flat coat…
Once it was dry I began the rigging process. At first I was going to use Uschi’s rigging wire but the spool I have is too small a gauge and wasn’t quite right. Rooting around on my desk turned up some braided picture frame wire that I separated and used. To mount it I drilled small holes at the joining points on the hull and stretched it across each contact point. To make the little insulation bubbles or whatever they are I just dabbed some gunmetal on until the size looked right.
Final touch was adding some Future to those green areas mentioned previously. But THEN I realized Future makes a great “wet effects†alternative! So I spent some time adding dripping water from various parts of the hull. The idea is that it was plucked right out of the water.
These should do until I get the final pics taken.


JohnSimmons
For Spud: I was once Merseajohn
- Joined
- Jan 4, 2011
- Messages
- 5,645
Re: WATER 1/144 U-Boat Type XXIII
Noice!
Noice!
nicholassagan
sippin on gin + juice
- Joined
- Dec 28, 2011
- Messages
- 2,013
Re: WATER 1/144 U-Boat Type XXIII
Thanks guys! Now I can probably whip out an AT-ST!!!
Thanks guys! Now I can probably whip out an AT-ST!!!
nicholassagan
sippin on gin + juice
- Joined
- Dec 28, 2011
- Messages
- 2,013
nicholassagan
sippin on gin + juice
- Joined
- Dec 28, 2011
- Messages
- 2,013
Re: WATER 1/144 U-Boat Type XXIII
Oh haha you mean the actual kit size. Yeah 9-10in or so.
Oh haha you mean the actual kit size. Yeah 9-10in or so.
nicholassagan
sippin on gin + juice
- Joined
- Dec 28, 2011
- Messages
- 2,013
nicholassagan
sippin on gin + juice
- Joined
- Dec 28, 2011
- Messages
- 2,013
I just realized this fits the "dirty/rusty" theme! Totally forgot.
JohnSimmons
For Spud: I was once Merseajohn
- Joined
- Jan 4, 2011
- Messages
- 5,645
Very cool mate 8)
nicholassagan
sippin on gin + juice
- Joined
- Dec 28, 2011
- Messages
- 2,013
LOL I don't do enough 

