Edbert
Well-Known Member
- Joined
- May 16, 2024
- Messages
- 1,078
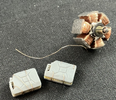
That would be cool, or, to mirror Cuckoo here, a captured Sherman. Germans could not get parts to keep the Continental running so they dropped in that BMW.What-if model: a Panther with the engine from a Border Models 1:35 Fw 190
Jakko
Well-Known Member
- Joined
- Oct 9, 2024
- Messages
- 782
There was still some doubt whether Cuckoo had a British antenna, but I think I've found conclusive proof:
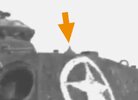
That pointed thing is not a normal fitting on Panther turrets, but does match the conical shape of the 'A' aerial base for the British No. 19 set. Holding my turret in front of the screen in such a way that it covers the turret in the film of Cuckoo as closely as possible, the aerial base I glued to the Nahverteidigungswaffe lines up almost exactly with the one in the film footage, so I feel confident in saying I probably got that bit right
I noticed this when going back and forth through that footage to try and work out what stuff is tied onto the right-hand side of the tank. I made some progress with that stowage but I'm not there yet:
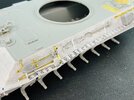
On the left, I added a second shovel (from the Tamiya set of British infantry on the move) and an axe (from a Sherman kit) because they're visible in the photo of Cuckoo driving down the forest road. That picture also shows the handle of something halfway down the left-hand side of the hull, and though I can't make out what it is, it was probably held in the rear clasp intended for the crowbar that sat above the tube for the gun cleaning rods (which was missing on Cuckoo). I decided to add the hammer from the kit, glued around a tool clasp from the crowbar, because it's plausible and sticks forward approximately far enough.
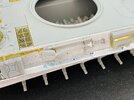
On the right, I converted a shovel I found in my 1:35 tools spares into something that can pass for a common Dutch shovel and glued it into the tool rack.

That pointed thing is not a normal fitting on Panther turrets, but does match the conical shape of the 'A' aerial base for the British No. 19 set. Holding my turret in front of the screen in such a way that it covers the turret in the film of Cuckoo as closely as possible, the aerial base I glued to the Nahverteidigungswaffe lines up almost exactly with the one in the film footage, so I feel confident in saying I probably got that bit right
I noticed this when going back and forth through that footage to try and work out what stuff is tied onto the right-hand side of the tank. I made some progress with that stowage but I'm not there yet:


On the left, I added a second shovel (from the Tamiya set of British infantry on the move) and an axe (from a Sherman kit) because they're visible in the photo of Cuckoo driving down the forest road. That picture also shows the handle of something halfway down the left-hand side of the hull, and though I can't make out what it is, it was probably held in the rear clasp intended for the crowbar that sat above the tube for the gun cleaning rods (which was missing on Cuckoo). I decided to add the hammer from the kit, glued around a tool clasp from the crowbar, because it's plausible and sticks forward approximately far enough.
On the right, I converted a shovel I found in my 1:35 tools spares into something that can pass for a common Dutch shovel and glued it into the tool rack.
mustang1989
Active Member
- Joined
- Aug 6, 2022
- Messages
- 147
Jakko
Well-Known Member
- Joined
- Oct 9, 2024
- Messages
- 782
Finally, I've figured out the tow cable to my own satisfaction! 
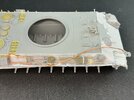
In the D-clasp at the front, then through the tow cable bracket at the top of the right-hand tool rack, down past the jack block, then in front of the thing stowed behind that (I'll get back to that in a bit), up in front of the shovel, through the frontmost spare track hanger, then around the second and back forward along the top of the side skirt rail.
I can't prove that the tow cable was stowed exactly like that when the film of Cuckoo was shot, but this is the most plausible way as far as I'm concerned, based on what is and isn't visible in those pictures.
I did have to scratchbuild a new front hanger, because during the various attempts to fit the cable, first the top and then the bottom bits of it broke off. That's what you get with small etched parts with folding lines The fix was to take a bit of leftover fret, drill two 0.55 mm holes near the ends (the ones in the Dragon parts are 0.5 mm) and bend it into shape before sticking it to the model.
I also made the wash basin:
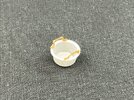
This started as a bucket in the Bronco set of British accessories, from which I sawed off the bottom half. I then made two discs from 0.25 mm plastic card using my oversized punch-and-die set, one for the bottom and a second for the top that stuck out a little along the bucket's rim. Once the glue was dry, I stuck a knife tip through its centre and cut away everything inside the bucket. Then all that remained was to add two handles from bent copper wire.
Here it is on the model, for which I stuck one handle behind the L-shaped pin through the bracket that also holds the tow cable:
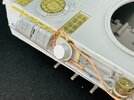
I made that pin from 0.45 mm brass rod, just bending it with pliers to the dimensions of the plastic pins you get with the kit. I put a pin like this in just over half of all these brackets, but I still want to add the little chains you get for them in the etched parts.
Then we get to two two remaining items on the right-hand side of the tank, that I had a hard time figuring out, so I took an educated guess and made them things that have approximately the correct dimensions and which seem plausible:
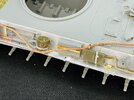
At the back (left) an oil can, at the front a jack block from a Churchill tank. I'm not certain about the oil can, but the film does show that the item here sticks out beyond the side skirt rail, and it also gives me the impression that it may be circular. The can I used is from Tamiya, and at first turned out to be too tall: after I glued it in place, the turret couldn't rotate without sweeping it off the tank. So I sawed it in three pieces to remove a section, but I had taken out too much, which I solved with a piece of 1 mm plastic card that I trimmed to size once the glue had dried. A bit of copper wire ties it to the tank.
The Churchill jack block is because I had first measured the approximate size of this item in images of the real tank, and when digging through spares to find something of around that size, I found this block from an AFV Club Churchill kit. Its dimensions are very similar to whatever was on the real tank, and Cuckoo did belong to a unit equipped with Churchills — and though I can't think of a reason why they would take this when the Panther's jack block was still present, I think it's plausible enough.

In the D-clasp at the front, then through the tow cable bracket at the top of the right-hand tool rack, down past the jack block, then in front of the thing stowed behind that (I'll get back to that in a bit), up in front of the shovel, through the frontmost spare track hanger, then around the second and back forward along the top of the side skirt rail.
I can't prove that the tow cable was stowed exactly like that when the film of Cuckoo was shot, but this is the most plausible way as far as I'm concerned, based on what is and isn't visible in those pictures.
I did have to scratchbuild a new front hanger, because during the various attempts to fit the cable, first the top and then the bottom bits of it broke off. That's what you get with small etched parts with folding lines
I also made the wash basin:

This started as a bucket in the Bronco set of British accessories, from which I sawed off the bottom half. I then made two discs from 0.25 mm plastic card using my oversized punch-and-die set, one for the bottom and a second for the top that stuck out a little along the bucket's rim. Once the glue was dry, I stuck a knife tip through its centre and cut away everything inside the bucket. Then all that remained was to add two handles from bent copper wire.
Here it is on the model, for which I stuck one handle behind the L-shaped pin through the bracket that also holds the tow cable:

I made that pin from 0.45 mm brass rod, just bending it with pliers to the dimensions of the plastic pins you get with the kit. I put a pin like this in just over half of all these brackets, but I still want to add the little chains you get for them in the etched parts.
Then we get to two two remaining items on the right-hand side of the tank, that I had a hard time figuring out, so I took an educated guess and made them things that have approximately the correct dimensions and which seem plausible:

At the back (left) an oil can, at the front a jack block from a Churchill tank. I'm not certain about the oil can, but the film does show that the item here sticks out beyond the side skirt rail, and it also gives me the impression that it may be circular. The can I used is from Tamiya, and at first turned out to be too tall: after I glued it in place, the turret couldn't rotate without sweeping it off the tank. So I sawed it in three pieces to remove a section, but I had taken out too much, which I solved with a piece of 1 mm plastic card that I trimmed to size once the glue had dried. A bit of copper wire ties it to the tank.
The Churchill jack block is because I had first measured the approximate size of this item in images of the real tank, and when digging through spares to find something of around that size, I found this block from an AFV Club Churchill kit. Its dimensions are very similar to whatever was on the real tank, and Cuckoo did belong to a unit equipped with Churchills — and though I can't think of a reason why they would take this when the Panther's jack block was still present, I think it's plausible enough.
- Joined
- Sep 4, 2022
- Messages
- 1,573
Fine scratch building there!small etched parts with folding lines
The French term "débrouillard" very aptly applies to you for the way you figured solutions out as challenges presented themselves!
Jakko
Well-Known Member
- Joined
- Oct 9, 2024
- Messages
- 782
Due to my only rather basic grasp of French, I had to select that and press Translate. It tells me débrouillard means "vindingrijk," which is usually translated into English as "resourceful" but I don't think that's a particularly close translation. So yes, I guess débrouillard is a good word for itThe French term "débrouillard" very aptly applies to you for the way you figured solutions out as challenges presented themselves!
Jakko
Well-Known Member
- Joined
- Oct 9, 2024
- Messages
- 782
I think I'm done building the model now. Well, except for the wheels and exhaust pipes, which I'll only add after painting, and the tracks, that still aren't cooperating 
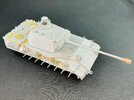
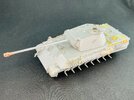
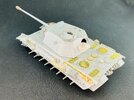
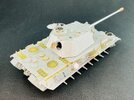
On the left-hand side, I added a rolled-up camouflage net, the old-fashioned way by soaking a bit of bandage in thin PVA glue, and while it was still wet, rolling it up and tying it in place on the tank with more copper wire. The jerrycan on that side is now further back than before, because when I looked closely at the film footage of Cuckoo from the left, I noticed that there appears to be the net, then a gap, and then an item. I can't tell if it's actually a jerrycan or the bag-like thing that's visible there in the photo taken in Tilburg, but as I already had the jerrycan but no bag, I took the easy way out
I did try to add etched chains to the pins in the track hangers, but I had a great deal of trouble doing that, and when I finally got one in place I could hardly see it anymore, so: too bad, but I'm not going to bother with them. There's just one on the right rear, because I put a loose-hanging pin there, which makes the chain a little more obvious.
The pencilled circles on the turret sides and roof, BTW, are where the white stars will go. I'll probably only add them after painting, but I drew them now to get an idea of where they will go. This mainly because I was checking if it's possible at all to put a white stars on the turret roof in such a way that both the left-hand Pilz and the left front lifting eye end up being painted white. And yes, it turns out to be exactly like that if you draw a ring as large as possible on the roof in front of the commander's cupola
Jakko
Well-Known Member
- Joined
- Oct 9, 2024
- Messages
- 782
After a comment elsewhere that a British camouflage net should have strips of hessian in it, which I had considered but decided against because of the difficulty in weaving it through the mesh of the gauze bandage, I took the advice anyway and glued some strips to the net:
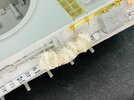
I just cut a strip, maybe 2 mm wide, from a paper handkerchief, peeled the layers apart and then cut one of those into different lengths. I then put each piece into some thin PVA glue, placed it on the net and pressed it in place with a stiff brush. Roughly three minutes' work, I guess

I just cut a strip, maybe 2 mm wide, from a paper handkerchief, peeled the layers apart and then cut one of those into different lengths. I then put each piece into some thin PVA glue, placed it on the net and pressed it in place with a stiff brush. Roughly three minutes' work, I guess
- Joined
- Sep 4, 2022
- Messages
- 1,573
... hmmm, if that's anything like our north American facial tissue, I'd suggest testing it out before painting if you haven't already... some of our brands literally melt away with more than a little humidity.paper handkerchief
Jakko
Well-Known Member
- Joined
- Oct 9, 2024
- Messages
- 782
These have been soaked in PVA, so even if the paper melts away, there should still be that left  OTOH, if they do disappear without a trace under the first coat of primer, I'll just try again — it's not like this is a part of the model that will be very hard to do some additional work on.
Jakko
Well-Known Member
- Joined
- Oct 9, 2024
- Messages
- 782
Tonight I had to quickly add the last thing I had forgotten:
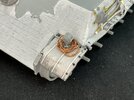
This is the cable that should be fitted on the right-hand side, wound around the round brackets that I put the oil can in/against. In the picture of Cuckoo on the forest road there's a similar cable wound around the headlight, and this one seems to fit the bill quite nicely.

This is the cable that should be fitted on the right-hand side, wound around the round brackets that I put the oil can in/against. In the picture of Cuckoo on the forest road there's a similar cable wound around the headlight, and this one seems to fit the bill quite nicely.
Jakko
Well-Known Member
- Joined
- Oct 9, 2024
- Messages
- 782
Everything faded to grey before my eyes …
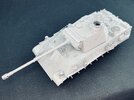
That is to say, I sprayed a couple of coats of grey primer over the whole model Nothing fancy, but "Spectrum" brand primer from an Action discount store, and that cost me all of, IIRC, €2.99 for a 400 ml aerosol can. But it covers well, and dries quickly and hard. However, when spraying it I realised I should have gone for white instead, as the grey was almost the same colour as the plastic so it was hard to see whether I had missed some spots.

That is to say, I sprayed a couple of coats of grey primer over the whole model
Jakko
Well-Known Member
- Joined
- Oct 9, 2024
- Messages
- 782
On to the real colour! I sprayed most of the tank with SCC 15 British olive drab from AK 3rd Gen:
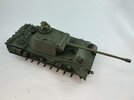
This is why I got out the white background again, because with the black one I doubt the colours would be very good in the pictures. That Zimmerit, incidentally, doesn't make spraying any easier. You have to do it all from at least two sides to make sure there's paint everywhere. Before I sprayed the tank, I painted parts of the commander's hatch in Tamiya Dark Yellow 2, so that the bits that would be covered by the closed hatch would keep that colour. I don't know if the real tank was like that or if they touched it up after spraying it, but the model is more interesting this way.
The bottom of the hull got a coat of black, after I got advice from a fellow modeller with a background in soil types about the colours of the soil in the area of the Netherlands in which Cuckoo operated. Some of the soil there is very dark, black-brown, and since photos of Cuckoo show its undercarriage to be darker than the upper parts, I figure it was probably covered in thin mud of that sort of colour. Thus, I sprayed it black:
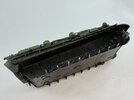
Though slightly more involved than that The parts that will be behind the wheels are simply black airbrush-ready paint from AMMO, while the bits higher up and more in the light, I sprayed with that same paint with Field Drab from Vallejo Model Air mixed in. The proportions were more or less random as I did this by eye, but probably around 1:1, though it obviously varied every time I had to refill the paint cup.
The difference is very hard to see in the photo above, but I painted the wheels the same way, and it's clearer there by holding them side-by-side:
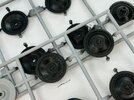
The inner two rows of roadwheels are simply black, while the outer two and the drive sprockets and idler wheels are the lighter mixture.

This is why I got out the white background again, because with the black one I doubt the colours would be very good in the pictures. That Zimmerit, incidentally, doesn't make spraying any easier. You have to do it all from at least two sides to make sure there's paint everywhere. Before I sprayed the tank, I painted parts of the commander's hatch in Tamiya Dark Yellow 2, so that the bits that would be covered by the closed hatch would keep that colour. I don't know if the real tank was like that or if they touched it up after spraying it, but the model is more interesting this way.
The bottom of the hull got a coat of black, after I got advice from a fellow modeller with a background in soil types about the colours of the soil in the area of the Netherlands in which Cuckoo operated. Some of the soil there is very dark, black-brown, and since photos of Cuckoo show its undercarriage to be darker than the upper parts, I figure it was probably covered in thin mud of that sort of colour. Thus, I sprayed it black:

Though slightly more involved than that
The difference is very hard to see in the photo above, but I painted the wheels the same way, and it's clearer there by holding them side-by-side:

The inner two rows of roadwheels are simply black, while the outer two and the drive sprockets and idler wheels are the lighter mixture.
Similar threads
- Replies
- 0
- Views
- 298
- Replies
- 41
- Views
- 2K

