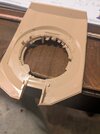
There has to be an easier way ..
- Thread starter sapper23
- Start date
Dan the Modeler
Well-Known Member
- Joined
- Jan 8, 2025
- Messages
- 285
Sheet styrene thickness to match pin mark depth, and simple punch and die sets.I have always used putty to fill ejector marks then sanded ... There has to be a better way...
Dan the Modeler
Well-Known Member
- Joined
- Jan 8, 2025
- Messages
- 285
Dan the Modeler
Well-Known Member
- Joined
- Jan 8, 2025
- Messages
- 285
I think it boils down to preference. I prefer to fill imperfections with plastic so that I have like surfaces when sanding, scribing, attaching other plastic or PE parts and not having to worry about separation, shrinkage, or cracking over time. Also no worries of possible primer/paint issues.OK. I must be missing something. Why all the multi-step processes with gluing in styrene on what amounts to a non-structural surface defect?
chrislunetta
Member
- Joined
- Aug 15, 2024
- Messages
- 47
Don't do the caulking. It's only temporary, it will dry up and shrink eventually.Actually thinking of trying paintable caulking lmao
Jakko
Well-Known Member
- Joined
- Oct 9, 2024
- Messages
- 1,081
I'm not suite sure I see the severity of this problem. Most of them are in flat areas, so just smear some putty into them, wait for it to dry and sand flat?
Though I am a bit puzzled why the ones toward the front would be visible on the finished model. Unless you plan to keep the turret top loose so you can show the interior?
Though I am a bit puzzled why the ones toward the front would be visible on the finished model. Unless you plan to keep the turret top loose so you can show the interior?
Interior will be shown yes ...I'm not suite sure I see the severity of this problem. Most of them are in flat areas, so just smear some putty into them, wait for it to dry and sand flat?
Though I am a bit puzzled why the ones toward the front would be visible on the finished model. Unless you plan to keep the turret top loose so you can show the interior?
Will start a seperate thread for this build when I get a little further in it but is a full interior builds out and all of it pretty much will be visible.
It is just irritating is all... Slows down the process for sure. I would think they could have done a little better there. I can see a few spots but 13 just on the lower turret alone!I'm not suite sure I see the severity of this problem. Most of them are in flat areas, so just smear some putty into them, wait for it to dry and sand flat?
Though I am a bit puzzled why the ones toward the front would be visible on the finished model. Unless you plan to keep the turret top loose so you can show the interior?
Pantherman
Well-Known Member
- Joined
- Feb 10, 2022
- Messages
- 4,039
I tend to use a coloured sprue goo to match the plastic colour, it's self levelling and can be cut, scraped or sanded as required. PanthermanI have always used putty to fill ejector marks then sanded ... There has to be a better way...
This is a ridiculous piece to illustrate my pain.
13 things to fix there.
View attachment 136978
Edbert
Well-Known Member
- Joined
- May 16, 2024
- Messages
- 1,570
This is what a lot of meta-builders do.Sheet styrene thickness to match pin mark depth, and simple punch and die sets.
I tend to ignore them until it is too late, then I regret them for life. Or just seal the hatches so nobody can point at them
Similar threads
- Replies
- 13
- Views
- 595

