You are using an out of date browser. It may not display this or other websites correctly.
You should upgrade or use an alternative browser.
You should upgrade or use an alternative browser.
1/350 Radiant VII
- Thread starter nicholassagan
- Start date
nicholassagan
sippin on gin + juice
- Joined
- Dec 28, 2011
- Messages
- 2,013
Thanks for the support guys! I'm in a bind on the cockpit windows though...do I leave them open or do I trim and place clear acetate over them and mask before painting?
nicholassagan
sippin on gin + juice
- Joined
- Dec 28, 2011
- Messages
- 2,013
STILL ALIVE!!! The building phase wrapped up this weekend while I was wrapped up to protect myself from the death that awaits outdoors. Seriously some good progress was made. To start off, the fins that go inside the engine nozzles were a little too tall and made contact with the LEDs so my options were to trim or to rebuild. I opted for the latter. A template was made and then I cut new pieces from stock, filed them to interlock and then added some quarter round to match some of the detail from the original part.


There are some cool little details on the studio model that I figured would be good to add. For instance, there appears to be photo-etched ladders on the forward part of the trench so I added those, as well as a few other strategic details around the hull. The areas where that were treated with putty were sanded down and still didn’t look perfect so I added some other details to spruce them up.


This build also marks a first for acrylic rod bending for me! I’d seen some other fantastic displays using this technique and after some research it seemed easy enough. All I needed was a candle and some patience! I first drilled a couple of holes on my base where I knew I wanted the rods. The first set of bent pieces were more experimental…I tried to create “cups†for the model to sit in. By and large they were OK but the smooth curves were a little more precarious than I had hoped (any light bump would cause the ship to slip!). The second set I opted to just bend the ends. The forward is “hooked†at the tip and curves around the side. The rear rod not only curves under the center engine, but also has a “hook†that fits inside the support fits. They’re still a bit tall and will need to be cut down an inch or two. But success!


Before priming I put some silver on the inner rim of the nozzles and covered them up with shaped foam. I decided to leave the cockpit windows as open frames but didn’t mask them. The holes are so narrow that any overspray would be kept to a minimum and at worst the paint diffuses the LED a touch more.


Lastly, a few rounds of priming and everything is ready to go!


There are some cool little details on the studio model that I figured would be good to add. For instance, there appears to be photo-etched ladders on the forward part of the trench so I added those, as well as a few other strategic details around the hull. The areas where that were treated with putty were sanded down and still didn’t look perfect so I added some other details to spruce them up.


This build also marks a first for acrylic rod bending for me! I’d seen some other fantastic displays using this technique and after some research it seemed easy enough. All I needed was a candle and some patience! I first drilled a couple of holes on my base where I knew I wanted the rods. The first set of bent pieces were more experimental…I tried to create “cups†for the model to sit in. By and large they were OK but the smooth curves were a little more precarious than I had hoped (any light bump would cause the ship to slip!). The second set I opted to just bend the ends. The forward is “hooked†at the tip and curves around the side. The rear rod not only curves under the center engine, but also has a “hook†that fits inside the support fits. They’re still a bit tall and will need to be cut down an inch or two. But success!


Before priming I put some silver on the inner rim of the nozzles and covered them up with shaped foam. I decided to leave the cockpit windows as open frames but didn’t mask them. The holes are so narrow that any overspray would be kept to a minimum and at worst the paint diffuses the LED a touch more.


Lastly, a few rounds of priming and everything is ready to go!


JohnSimmons
For Spud: I was once Merseajohn
- Joined
- Jan 4, 2011
- Messages
- 5,645
Looks awesome Nick well done mate. Stand looks good too 
nicholassagan
sippin on gin + juice
- Joined
- Dec 28, 2011
- Messages
- 2,013
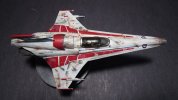
I fixed the height on the rods so she sits a little lower. A bit funky on the angle but I kind of like it. This way you don’t have to stand directly above it to get a good look. I also started painting the base in the Old Republic Fleet Insignia colors.


She’s also been preshaded! Now I need to re-assess the references to see whether or not I should begin the chipping/weathering process before the red base coat goes down. Any suggestions?


She’s also been preshaded! Now I need to re-assess the references to see whether or not I should begin the chipping/weathering process before the red base coat goes down. Any suggestions?


JohnSimmons
For Spud: I was once Merseajohn
- Joined
- Jan 4, 2011
- Messages
- 5,645
Nice work Nick, what method you using for the chipping?
nicholassagan
sippin on gin + juice
- Joined
- Dec 28, 2011
- Messages
- 2,013
Not sure yet. I have some Micro Mask but Janne's vaseline trick might be nice. Do you think I should apply it before the red base?
JohnSimmons
For Spud: I was once Merseajohn
- Joined
- Jan 4, 2011
- Messages
- 5,645
Yeah it does look cool at that angle, I've not used the Vaseline method before....I'd definitely try it out on some scrap first though. I've been loving a bit of Maskol chipping with my Landy at the mo though ;D
nicholassagan
sippin on gin + juice
- Joined
- Dec 28, 2011
- Messages
- 2,013
it looks like there isn't a TON of chipping on the red...but it's still something to try. as for painting, i'm going to try fichtenfoo's method of applied the base coat then applying filters and other strategic washes. but however i get there, i'm aiming for studio model...
here's ceasar toro's photoset:
http://www.flickr.com/photos/toromodel/sets/72157622554743180/
here's ceasar toro's photoset:
http://www.flickr.com/photos/toromodel/sets/72157622554743180/
nicholassagan
sippin on gin + juice
- Joined
- Dec 28, 2011
- Messages
- 2,013
actually, now that i'm looking at these shots, i might do a bunch of the chipping effect by using a pencil over the MiG black pigment AFTER the red + white goes down. however, i think i'll have to use the chipping effect before i put the white down on top of the red...


nicholassagan
sippin on gin + juice
- Joined
- Dec 28, 2011
- Messages
- 2,013
Similar threads
- Replies
- 4
- Views
- 1K


