You are using an out of date browser. It may not display this or other websites correctly.
You should upgrade or use an alternative browser.
You should upgrade or use an alternative browser.
1967 Lindberg Oldsmobile 442
- Thread starter Jimbot58
- Start date
I don't think I could own a car that is all red inside and out as I am getting burnt out on the red. The 442 is getting a little closer to coming together as it's seems I can never get the time to sit down at the desk, One evening at the desk actually ended up repairing the shop light over the bench. One of the tubes started flickering and the end of the tube turned black almost as I watched. No work at the bench that night as I headed to Depot to find replacements. I had decided to convert to LED tubes some time back and found some that were supposed to be a direct replacement for ballasted fixtures. Went to install them and one tube worked, one tube didn't. Long story short, I had to exchange them for a couple of type "B" tubes, which required the removal of the ballast and rewiring the fixture. In the end, it was two days lost for Hobby Time!
Finally back to the bench!
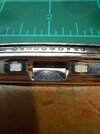
On those back-up lights imbedded in the bumper, I went with some very thinned white enamel paint in the recesses, and then after several days drying (see above tale!) I put a drop of Future. These macro shots show too much detail and a normal viewing they look ok. The Future is fresh here and will tend to shrink as it dries. It's just the light angle that makes one appear yellow.

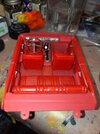
The interior tub. Seems I'm constantly touching things up, but it may finally be going to be mounted inside the body. I've Future dipped the windshield and rear glass, though I did end up doing the front over as a speck of dust found it's way onto the glass right in front of the driver. Windex to remove the Future
Think I'm finally, finally done with the interior, though in hindsight I would have done a few things different.

Think I'm finally, finally done with the interior, though in hindsight I would have done a few things different.
Some setbacks on the 442, First, I tried spraying the body with Mr. Color Superclear. This stuff really worked great I thought, my only problem is that I chose to spray outdoors, The problem was that there were several wildfires burning in the distance. There was some fine ash in the air that was not visible to my eye but certainly showed up in the finish. Took days to polish that out before I could respray,
Then I found out that because the fenders are molded with the body, you can not mount the engine first as the body will not fit over the engine! I had mounted the engine and had to break it loose again!
Then I had fit issues with chromed wing vents. They did not want to fit and the plating was horrible! I ended up destroying them. Trying to rebuild them now with strip styrene and some clear sheeting.
Next came the worst part. Trying to spray some Alclad Dark Aluminum on another project and I spilled the bottle! My bad for leaving it open! But in the path of the spill were the radiator, master brake cylinder, and one of the wheel rims from the 442! The solvent seems to be very strong and ate into everything. The wheel rim was the worst. Tried to clean it up but just made it all worse.
Off to Ebay to see what I could find! I actually found another kit somebody was accepting offers for, so I bid 15 bucks and they accepted! Shipping was cheap as well!
This wasn't the first time I ended up buying a second kit to complete a project due to lost or damaged parts but I am already to deep into this project, with detailing I added and all, I wasn't going to abandon it!
BattleScale Collectica
Active Member
- Joined
- Jun 10, 2024
- Messages
- 112
wow. that's some bad luck. I'm glad your forging ahead anyway.Some setbacks on the 442, First, I tried spraying the body with Mr. Color Superclear. This stuff really worked great I thought, my only problem is that I chose to spray outdoors, The problem was that there were several wildfires burning in the distance. There was some fine ash in the air that was not visible to my eye but certainly showed up in the finish. Took days to polish that out before I could respray,
Then I found out that because the fenders are molded with the body, you can not mount the engine first as the body will not fit over the engine! I had mounted the engine and had to break it loose again!
Then I had fit issues with chromed wing vents. They did not want to fit and the plating was horrible! I ended up destroying them. Trying to rebuild them now with strip styrene and some clear sheeting.
Next came the worst part. Trying to spray some Alclad Dark Aluminum on another project and I spilled the bottle! My bad for leaving it open! But in the path of the spill were the radiator, master brake cylinder, and one of the wheel rims from the 442! The solvent seems to be very strong and ate into everything. The wheel rim was the worst. Tried to clean it up but just made it all worse.
Off to Ebay to see what I could find! I actually found another kit somebody was accepting offers for, so I bid 15 bucks and they accepted! Shipping was cheap as well!
This wasn't the first time I ended up buying a second kit to complete a project due to lost or damaged parts but I am already to deep into this project, with detailing I added and all, I wasn't going to abandon it!
There was a time some years ago I was working on an F-16 kit that was 99% done. I went to open a bottle of CA and didn't realize there was pressure in the bottle. I snipped off the tip and sprayed droplets of CA all over the the kit! All the painted and decaled surfaces, and the canopy! Totally ruined! Only one logical thing to do! I pretended I was 10 years old again and took it o the back yard. squirted lighter fluid on it and set it ablaze! Stood back and watched as those bright orange flames melted and consumed the styrene! Wisps of black smoke from the hydrocarbons burning rising into the sky! Fitting end as that project really crashed and burned!
Ok, so I got a bit carried away there......
Ok, so I got a bit carried away there......
Similar threads
- Replies
- 2
- Views
- 1K
