UPDATES
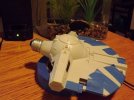
The solar panels are just about done. I won't know for sure until they've been primed. You'll noticed I decided not to rebuild the modules on the exterior. Given the scale and the quality of the kit, it wasn't worth the effort.
The holes for the laser turrets have been drilled and puttied. Because of the thickness, shape and angle of this area, a single pass with the Dremel seemed risky. So, instead, I worked my way through several bit sizes (3/32" to 5/64") and finished it off with a rattail file.
I'll need to work on the cockpit before I can actually install the turrets. The plan, right now, is to draw them into the cockpit area and light them from behind with 3mm LEDs, which will be hidden behind a scratchbuilt console.
The forward recesses are, for the most part, done. They look fine from the front, but I noticed there's still quite a bit of space that should be filled. When you look down and toward the cockpit area, it's obvious that it's just stage dressing. Rather than mess with the inserts, I'll glue a few odds and ends onto the interior of the hull.

The exhaust ports have been glued, hogged and puttied. I'm not entirely confident they're symmetrical. The registration(?) outlines were smaller than the parts, and none of the detail molded into the kit is symmetrical. So, I just had to eyeball it and hope for the best.
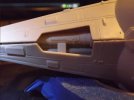
Ideally, the inserts for the fuselage should be stripped and rebuilt for added dimensions. I didn't want to invest that much time, so I just made a few simple modifications.
The top insert needed to be filed down on one end, so the wires or conduits were flush with the hull. The subsequent gap at the back will be filled with styrene when I mount the endcap or tailpiece. The horizontal ridge toward the back of the insert was too short, particularly on one side. Rather than dump putty on it, and risk filling in the detailwork, I rounded off the corners. I also had to fill a pothole toward the front, where the plastic sank during/after the molding process.
For the bottom insert, I shortened the gap between the conduits and the hull and will fill in what remains with a scrap of styrene. Also, the conduits were close enough to the edge that I just rounded the sides of that section off, to give it more dimension. The back section had an odd shape, and I wasn't confident I'd be able to putty and sand it cleanly. So, I beveled the strips on either side and contoured the middle.
The lids for the boxes (I don't know what else to call them) gave me some grief. They weren't a perfect fit, and it was hard to get in there with a file or sandpaper. After it's primed, I might try an emory board... or maybe a coat of glue... to get rid of any seams.
The fuselage itself has been a challenge. I wanted to recreate the panel lines along the sides, as seen on the original model. I thought it looked better. Unfortunately, I did a lousy job scribing them. A few have already been puttied over. Again, I'll wait until it's primed before I decide to keep them (and fix them) or scrap the idea altogether.
That's about it, for now. Hopefully, I'll get some more work done over the weekend.


