I'm interested in people's thoughts and advice on how you dry fit parts of a model before cementing in place. I've tried to hold the pieces together, but that gets me only so far. It's hard to hold in place more than two or three parts. Tape doesn't work unless it's large parts, like a wing. But if it's cockpit components or the underside of a car, the parts are usually too small and fragile to tape. I've been in situations where after cementing, the parts don't come together easily or fit right. So clearly dru fitting is important, but how to do it?
You are using an out of date browser. It may not display this or other websites correctly.
You should upgrade or use an alternative browser.
You should upgrade or use an alternative browser.
Dry Fitting
- Thread starter Martyhh
- Start date
mark2
Well-Known Member
- Joined
- Oct 1, 2024
- Messages
- 218
Two or three parts is probably all anyone will manage and probably the most you should need to try in one go really.I'm interested in people's thoughts and advice on how you dry fit parts of a model before cementing in place. I've tried to hold the pieces together, but that gets me only so far. It's hard to hold in place more than two or three parts. Tape doesn't work unless it's large parts, like a wing. But if it's cockpit components or the underside of a car, the parts are usually too small and fragile to tape. I've been in situations where after cementing, the parts don't come together easily or fit right. So clearly dru fitting is important, but how to do it?
Plastic Pilot
Member
- Joined
- May 25, 2024
- Messages
- 30
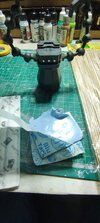
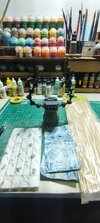
What I do when I have to dry fit is that I use this modeling clay and adhesive, it has the texture of chowing gum, there are different brands out there:
Blu Tack
I all so use it to stick the figure or the part I'm painting to the handle or that stick with a sharp end for frying meat and vegetables, don't know what is called
An a special handle with arms that have pliers attached.


Blu Tack
I all so use it to stick the figure or the part I'm painting to the handle or that stick with a sharp end for frying meat and vegetables, don't know what is called
An a special handle with arms that have pliers attached.


Last edited:
- Joined
- Mar 6, 2023
- Messages
- 1,809
A skewer maybe?What I do when I have to dry fit is that I use this modeling clay and adhesive, it has the texture of chowing gum, there are different brands out there:
Blu Tack
I all so use it to stick the figure or the part I'm painting to the handle or that stick with a sharp end for frying meat and vegetables, don't know what is called
An a special handle with arms that have pliers attached.
View attachment 131183
View attachment 131184
OldManModeller
Active Member
- Joined
- Aug 25, 2024
- Messages
- 76
When I am in this situation, it comes down to the glue type. Slower dry if you may have fitment issues and need to adjust parts as you go to add other parts.I'm interested in people's thoughts and advice on how you dry fit parts of a model before cementing in place. I've tried to hold the pieces together, but that gets me only so far. It's hard to hold in place more than two or three parts. Tape doesn't work unless it's large parts, like a wing. But if it's cockpit components or the underside of a car, the parts are usually too small and fragile to tape. I've been in situations where after cementing, the parts don't come together easily or fit right. So clearly dru fitting is important, but how to do it?
First, I dry fit each part individually. I make sure that it fits in its place and that there are no issues with clearance. Clearance issues are fixed with tasks such as sanding, etc. Then I dry fit the many-part assembly if i can hold it in place.
Then I determine which glue to use. A slower drying glue which is usually a thicker glue, for multiple part assembly that needs adjustment or alignment is what I use. I use a toothpick for thick glue application.
This way, I can glue several parts and be able to adjust them into place as I assemble BEFORE the glue dries.
I think that you would be well off to have several glue types on hand with every build.
It may be a shock to some, but I still use Testors tube glue from time to time. If I need to glue and add parts before they dry... It's Testors old school or Tamiya 87012. Usually. I have Testors 3507 liquid and 3521 as well.
It depends on each glues drying and setting time. And that comes with experience and learned failures. And frustration sometimes too.
The thin set and extra thin like Tamiya 87038 set fast, evaporate fast and allow less time for multiple parts assemblies. But they are usually my go to glue. Unless I need to add many parts at the same time and align them. Then it's the thicker glues.
Be Well. Model On.
Eric
Eagle-1
Well-Known Member
- Joined
- Jan 16, 2014
- Messages
- 905
Do like I do.
Once you get all them separate pieces in place, add a little glue, try to hold them in place, add a smidge more glue.
Unstick it off your finger.
Add more glue, straighten it, and more glue. Reposition everything one more time and probably add just a tad more glue.
Hold everything in place for NO MORE than 15 seconds. Let it go to 'check it' and then dig it out of the tiniest crevice in the most inaccessible part of the model where it fell and got stuck solid from the glue if possible.
If not possible, add more glue and call it PERFECT!
Mileage may vary using this technique.
Rob.
BarleyBop
Member
- Joined
- Sep 4, 2022
- Messages
- 46
Like OldManModeler said; and also depends on the position variability: is it a part like a figure arm that needs to be rotated to the right spot (where I have drilled and inserted a tight fitting pin to hold it), or a part that needs to be centered or aligned (where I might lightly score the reference piece at the exact spot).
The worst is when there are no features like a dimple or notch to register one piece with another: a common situation with resin kits!
The worst is when there are no features like a dimple or notch to register one piece with another: a common situation with resin kits!
Edbert
Well-Known Member
- Joined
- May 16, 2024
- Messages
- 569
I might be misunderstanding, but typically dry-fitting is to ensure the parts fit together and if they do it is about observing the mating surfaces and where to glue.
I can see that involving 3 or more parts on some occaisions but rarely. I did have a wing attachment issue with a 1/32 Bf109 that involved over a dozen parts and it could not be held together with hands and tape, just was not possible.
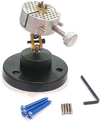
I have a soldering aid kinda like Plastic Pilot's that can hold two separate parts or small assemblies while I use hands on the other. I also use one of these quite often, but more as a vise, I find it more stable for heavier things.

I put little rubbery like covers on those pins to avoid damage to parts.
But it sounds like you want to pre-assemble significant items as part of your dry-fitting. I imagine things like a landing gear assembly which could be 5+ bits. You could use white glue (Elmer's or PVA) for this, it is easy to remove and will not harm the plastic.
I can see that involving 3 or more parts on some occaisions but rarely. I did have a wing attachment issue with a 1/32 Bf109 that involved over a dozen parts and it could not be held together with hands and tape, just was not possible.
I have a soldering aid kinda like Plastic Pilot's that can hold two separate parts or small assemblies while I use hands on the other. I also use one of these quite often, but more as a vise, I find it more stable for heavier things.

I put little rubbery like covers on those pins to avoid damage to parts.
But it sounds like you want to pre-assemble significant items as part of your dry-fitting. I imagine things like a landing gear assembly which could be 5+ bits. You could use white glue (Elmer's or PVA) for this, it is easy to remove and will not harm the plastic.
