How do you know what paint to use on my model

Huh? Why would she say that? What does the military or the Dept. of Defense has to do with anything you're building /painting it your way? Just follow the instruction guide and choose whatever option you want. If you want to paint it pink and purple, have at it.
I have to admit that now because I'm not doing this for the Department of Defense and am only doing it for fun I have lots less anxiety.

EDIT:: I ended up painting the windows of the JLTV black and cemented the doors shut because I couldn't figure out how the dashboard fit. NOw I have a problem with the air filter intake on the JLTV fits on the body, but because i'm not trying to wow anyone I have WAY less anxiety.
 
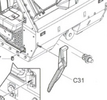
This was supposed to be a new camouflage for the M1278. Instead I spent tons of money on a 'I love Kit' model that has terrible instructions. I had to resort to finding videos of people building them. (My intake and fender might actually be wrong. Now I see from the videos I might have used the hood placement against the fender for locating the rear part of the front fender on that side. I hope I got it right. I then ran into this.... C31... how is it supposed to fit? Should I try and find a better model with batter instruction manual?

C31.png
 
This was supposed to be a new camouflage for the M1278. Instead I spent tons of money on a 'I love Kit' model that has terrible instructions. I had to resort to finding videos of people building them. (My intake and fender might actually be wrong. Now I see from the videos I might have used the hood placement against the fender for locating the rear part of the front fender on that side. I hope I got it right. I then ran into this.... C31... how is it supposed to fit? Should I try and find a better model with batter instruction manual?

View attachment 128423
OK… I'm at a loss with your statement.

It's clearly shows how and where it's suppose to go…. in that slot where the arrow points to it. I don't understand how you can't see it.

I don't think it's the instruction guide is terrible as you say it is. I honestly believe you're having a hard time how to read the instruction guide and comprehend how & where parts suppose to go. Everything is right in front of you. Look at the picture, look at the cab you've assembled. It's like reading a blueprint. It's not rocket science.

Looking at scalemates, I found a similar instruction guide. I'm guessing you're on step 16.

Look at the cab you assembled. Do you see Part C31? Good. It goes on the LEFT SIDE FRONT !!!

You should see a small slot hole there. Do you see it????? Glue it there as shown on the instruction guide!!
 
Last edited:
It's not a terrible kit. You're simply losing focus and confused. I believe you're having a hard time understanding and comprehending how to build the kit.

I found the instruction guide on scalemates. It's not all that hard at all.
I watched a video and found out how to put the intake on. It's twisted around in the instructions and is shown backwards.
 
OK… I'm at a loss with your statement.

It's clearly shows how and where it's suppose to go…. in that slot where the arrow points to it. I don't understand how you can't see it.

I don't think it's the instruction guide is terrible as you say it is. I honestly believe you're having a hard time how to read the instruction guide and comprehend how & where parts suppose to go. Everything is right in front of you. Look at the picture, look at the cab you've assembled. It's like reading a blueprint. It's not rocket science.

Looking at scalemates, I found a similar instruction guide. I'm guessing you're on step 16.

Look at the cab you assembled. Do you see Part C31? Good. It goes on the LEFT SIDE FRONT !!!

You should see a small slot hole there. Do you see it????? Glue it there as shown on the instruction guide!!
It's actually .
RIGHT side front !!!!!!!!!!!!!!!!!!!
scream-loud-scream.gif
 
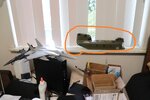
I finally found a flat spot out of the way. I heated my Helicopter fuselage over a baseboard heater to soften the fuselage. (I used Gorilla Tape to hold the right and left halves of the fuselage together and the heat to slightly soften the plastic.) Then I found an out of the way spot and let the fuselage cool on the window sill. (I outlined the Helicopter in orange so you can see it easier.)

God told me, using a YouTube video, that It's close enough now...

cooldown001.jpg
 
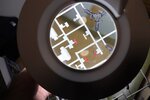
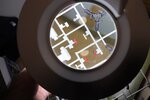
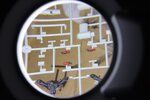
It took a bit of moving around and looking through the magnifying glass before I found out that the model parts need to be a certain distance from the glass. I WAS just using the LED ring light... I just today used it to try and work on my rotor blades for the Chinook and it worked better than expected. I like it SO much now with such tiny parts. I thought I needed reading glasses but the LED Magnifying glass is WAY better!

EDIT:: I asked God for reading glasses and he gave me something WAY better!!!

firehydrants.jpg
 
Last edited:
Still trying to get the fire hydrants covered in paint.

EDIT:: I accidently got some black paint mixed in my
red paint. on the bottom one I somehow got it red red instead of black red.
sucky.jpg
 
You're making progress, keep it going.

We all have frustrations, and I've never seen perfect instructions. You already found that youtube can be helpful, and the best advice there is says to test-fit or dry-fit many times before getting the cement.

But when you feel the frustration rising, put the kit and the tools down, go for a walk, watch a movie, something. In my case, if I keep pushing when filling up with anxiety and anger, I end up making a small problem bigger.
 
Last edited:
You're making progress, keep it going.

We all have frustrations, and I've never seem perfect instructions. You already found that youtube can be helpful, and the best advice there is says to test fit or dry-fit many times before getting the cement.

But when you feel the frustration rising, put the kit and the tools down, go for a walk, watch a movie, something. In my case if I keep pushing when filling up with anxiety and ager I end up making a small problem bigger.
WOW! Thanks... I have anxiety because I deleted the wrong post... I spent hours trying to get it prefect and then I deleted the wrong post.
 
I need help.

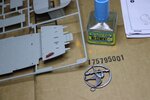
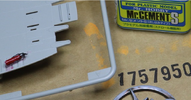
Mr. Cement is soaking up paint. I tried gluing a Fire Hydrant onto the floor of the cockpit and when I brushed on the glue the brush that comes with the glue it soaked through. I'm scared of the glue getting tainted and I have painted rotors and stuff. Will the Cement be ruined over time? If you look you can see red paint staining the floor next to the Fire Hydrant.

EDIT:: This glue has had several days to dry if that matters. Is there a better paint the doesn't stain the parts around it?

gluecolor.jpg

gluecolorupclose.jpg.png
 
Last edited:
That " glue " is solvent .
it dissolves the plastic at the joint and creates a weld .
the solvent then evaporates completely leaving the new , solid connection .

It also dissolves the acrylic resin in the paint .
It will dissolve enamel paint also .
Those types of plastic cement are essentially the same formula as many airbrush cleaners .
Butyl acetate and acetone . Sometimes also butanone or ethyl acetate when it's the " fast setting " variety .

You can glue pre-painted parts in place but you need to use a smaller brush to apply a tiny amount of that solvent to only the point of contact .
Dab on a small amount of solvent to the tab of the part and then quickly install it .
that way you avoid flooding the joint with solvent .

If you don't have a spare brush you can still use the bottle's brush - just hit the lip of the bottle with the brush to knock off the majority of the solvent prior to touching it to the part to be attached .
 

Latest posts

Back
Top