How do you know what paint to use on my model

That " glue " is solvent .
it dissolves the plastic at the joint and creates a weld .
the solvent then evaporates completely leaving the new , solid connection .

It also dissolves the acrylic resin in the paint .
It will dissolve enamel paint also .
Those types of plastic cement are essentially the same formula as many airbrush cleaners .
Butyl acetate and acetone . Sometimes also butanone or ethyl acetate when it's the " fast setting " variety .

You can glue pre-painted parts in place but you need to use a smaller brush to apply a tiny amount of that solvent to only the point of contact .
Dab on a small amount of solvent to the tab of the part and then quickly install it .
that way you avoid flooding the joint with solvent .

If you don't have a spare brush you can still use the bottle's brush - just hit the lip of the bottle with the brush to knock off the majority of the solvent prior to touching it to the part to be attached .
Maybe use Nano Brushes that I accidently purchased?? I have a dozed of those.
 
I suffer from Memory losses and I keep forgetting what paint is Acrylic and what paint is lacquer; what paint is flat and what paint is gloss. I am disabled due to this and live off of Social Security Disability Income.

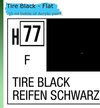
SoI decided to make a list of Acrylic Paint and Lacquer Paint. The way I did it was I looked up my paint in SCALEhobbyist.com and copy and pasted the description into a Word Processor. I had to add the paint number like what is shown in the attachment picture.

Lets use the Flat Tire black... (number H77)

In this picture I have highlighted in Blue the name and type that I need to copy and the number in the picture is H77. Then I paste the blue highlighted words in a
word processor and add the number of the paint, H77 would be Tire Black - Flat and I add : H77 so that it looks like::
"Tire Black - Flat: H77."

(This only works for SCALEhobbyist.com) ((My example is below the picture))

HOWTO.jpg


The list should look like this::


Olive Drab Fs34087 – Semigloss: H304
10 ml bottle of Acrylic paint.

Red – Gloss: H003
10 ml bottle of Acrylic paint.

Silver – Metallic: H8
10 ml bottle of Acrylic pain

Tan – Gloss: H27
10 ml bottle of Acrylic paint.

Aircraft Gray – Gloss: H57
10 ml bottle of Acrylic paint.

Khaki – Flat: H81
10 ml bottle of Acrylic paint.

Dunkelgrun - Dark Green: 70 F
10 ml bottle of Lacquer paint.


Burnt Iron – Metallic: H76
10 ml bottle of Acrylic paint.

Black – Flat: H12
10 ml bottle of Acrylic paint

Black – Metallic: H28
10 ml bottle of Acrylic paint.

RLM02 Gray Grau – Semigloss: H70
10 ml bottle of Acrylic paint.

Tire Black – Flat: H77
10 ml bottle of Acrylic paint.

Olive Drab Fs34087 – Semigloss: H304
10 ml bottle of Acrylic paint.

Blue Angles Yellow Fs13538 – Gloss: H329
10 ml bottle of Acrylic paint.

Xf-64 Red Brown
23 ml bottle of Acrylic paint.

Flat Clear: H20
10 ml bottle of Acrylic paint.

Olive Green/USMC Green RAL 6003 Fs34095
10 ml bottle of Lacquer paint.

Medium Olive Green - Fs34128
17 ml bottle of Acrylic paint.
 
Last edited:
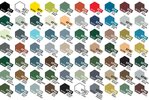
This seems like a lot of work to me. Do they not have a color chart?
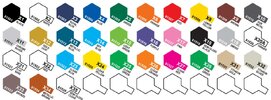
Because I use Tamiya paint almost exclusively I print out their color chart and pin it to the wall above my bench. This gives me a quick reference.

tamiya-xf-paint-chips-7011.jpg

tamiya-x-paint-chips-ad42.jpg
 
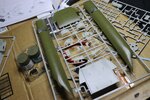
Is there a better paint the doesn't stain the parts around it?
PVA or "white glue" (Elmer's?) will not dissolve the paint, but it is hard to use without being visible when it dries.

For things like you show with the fire extinguishers I would use CA (cyanoacrylate or something sciency like that) or "superglue".

Note, it will also dissolve paint, but unlike the thin cements it is easier to control how much you put and where it goes. I use a superglue that it a bit on the thick side, there are MANY brands and I do not think it matters much. But you can use a toothpick and get a tiny little ball of it under the extinguisher where the dissolved paint will not be seen.
Okay thanks. My house only has plastic toothpicks at the moment though.
 
I painted these parts with a regular paint brush... (not airbrushed) NO paint brush marks at all whatsoever!
My dude! That is REALLY good, very seldom see a brush job look that good, patience pays!

Also, plastic toothpicks will work with superglue/CA, it is not a solvent like the super-thin stuff from Mr. Hobby or Tamiya.
 
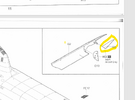
I ran into a problem. I've been looking for several hours trying to find part G5 on step 21 of the manual. I dropped it and cannot find where it went. Maybe I should just close the back tailgate? (I highlighted the sponson in yellow.) (( I think it's called a 'sponson'))

lostpart.png
 
Last edited:
first paint.... now sanding...

I bought sanding files and hated them... I need something wider than 3mm wide. they have decent grit but I need something wider. This is making me want to learn more and buy less if you know what I mean.
 
I suffer from Memory losses and I keep forgetting what paint is Acrylic and what paint is lacquer; what paint is flat and what paint is gloss. I am disabled due to this and live off of Social Security Disability Income.

SoI decided to make a list of Acrylic Paint and Lacquer Paint. The way I did it was I looked up my paint in SCALEhobbyist.com and copy and pasted the description into a Word Processor. I had to add the paint number like what is shown in the attachment picture.

Lets use the Flat Tire black... (number H77)

In this picture I have highlighted in Blue the name and type that I need to copy and the number in the picture is H77. Then I paste the blue highlighted words in a
word processor and add the number of the paint, H77 would be Tire Black - Flat and I add : H77 so that it looks like::
"Tire Black - Flat: H77."

(This only works for SCALEhobbyist.com) ((My example is below the picture))

View attachment 129250


The list should look like this::
There is a wonderful app called "paintRack" and it filters all the paints you own by brand and types. I highly recommend it. I use it because I have so many paints from so many different companies. The only downside is entering them all in, but it's as easy as touching the screen. If they don't have a company you like, email them and they will get to working on adding them. I highly recommend this phone app to anyone and everyone.
 
I ran into a problem. I've been looking for several hours trying to find part C5 on step 21 of the manual. I dropped it and cannot find where it went. Maybe I should just close the back tailgate? (I highlighted the sponson in yellow.) (( I think it's called a 'sponson'))

View attachment 129278

WOW! I can't believe it!!! ...

Well, I found the part I was looking for...

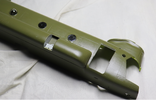
I decided to paint the other side hull that only had one coat of H304 and as I was working I noticed part G5! G5 was already glued in place! My roommate and I spent a LONG time last night looking together for it searching the floor and bedding and everything. God told me I would find it.
 
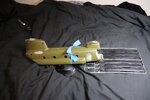
Painted Sponsons Cemented in place. I put the rotor blades there so you can see how big the CH-47A Chinook is with the rotor blades on. I had a blood draw at the doctor's office and I kept the blue rubber band so that I could sort of clamp pieces on to the CH-47A. I found out that if you put cement on before you 'Clamp' the parts together you the outcome of that is NOT good. 'Clamp' first with this type of 'Clamp"

layout.jpg
 
The hull halves fit together pretty well, but I was holding them together over the cook stove with Gorilla Tape. It didn't take a whole lot of heat and I could easily have done without the heat and Gorilla Tape but I'm a perfectionist. I can see how 'perfectionist' and 'Scale Modeler" could put you in a bind. I Love God and He loves me. I will be cementing slowly for sure. starting with the rear halves on the bottom where the two tabs line up and working my way around the model to get the best fit. I WANTED files but the tiny little things I got are too small and I started using a box cutter to shave the bits that were left over from the sprue being clipped off.

This is a REALLY good model. You can find it here: Trumpeter 1/35 scale CH-47A
 
Last edited:
https://www.scalehobbyist.com/catag...772&pg=1&ppp=48&sb=stocknumber_a&so=d&man=AKI
AKI00011237_0_d.jpg

https://www.scalehobbyist.com/catag...772&pg=1&ppp=48&sb=stocknumber_a&so=d&man=AKI
 

Latest posts

Back
Top