Measure the paint quantity, to get it right all the time.

Plastic Pilot

Member
Joined
May 25, 2024
Messages
35
Hello kind sires,

I'm having a problem with measuring the paint quantity, because I don't have a particular shade of green that I need for a model, so I have to mix up paints to get what I need. The problem is that even if I use the eyedropper, I have to use a big amount of paint each time for the mixing and after painting I have to trow away what is left because the first layer dose not dry in time in comparative with amount of time that the paint stays wet on the pallet, even if I use a wet pallet the paint just dries out.

So to get the same shade again, I have to mix the paints at the same amount as for the first time, and to get the same shade right you have to waste the paint, I thought to use paint retarder so it can stay wet for some more time, and the in the first half our I usually wait for the first layer to dry, the paint may still be wet.

Please, if you wish, can you tell me how do you manage to get the shade you want exactly the same every time you need it, of course if you don't mind trowing away the surplus paint.

Thank you for your answer.
 
I use Tamiya paints and keep the empty bottles if I have to mix a color I know I will use again I mix it and put it in an old bottle and label it. You are not going to avoid losing paint when you mix paint. When I mix and keep it like that I use a shot glass with measurements on it for mixing in those amounts. Tamiya is big on giving you mixes for some colors and if it's just a one time mix, I mix it in the airbrush using a stir spoon to add the appropriate drops the instructions call for. If the shade isn't perfect it doesn't really bother me. If hand painting I mix it with retarder in one of those multiple cup plastic trays. Like I said though when mixing you will lose paint and I stopped worrying about that some time ago. It's just a fact of paint mixing life.
 
Thanx Jim, a friend of mine told me the same thing as you did, so I guess it is a general rule. Guess I will have to settle with it and make the decision of discarding the remaining paint as a part of the process of model building, in this case.
 
Yeah, for me, it's experimenting to get the ratios, rather than the exact amount. I'll second Jim that you'll end up losing some paint.
It's important for me, too, to note the brand and manufacturer's name for a color, because I have had projects where I let a piece sit, and then came back later and realized that I didn't recall the particular paint that I used.
 
To be honest, the only way to get consistent paint colour is to use something you can buy off the shelf — and even then, it could be the manufacturer changes the formula and you end up with two distinct shades …

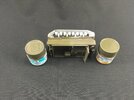
IMG_0205.jpeg

This is Takom's M29 Weasel. I started spraying it with the bottle of Mr. Aqueous H78 Olive Drab (2) on the right. That ran out when I was about three-quarters finished, so I opened a new bottle of the same (on the left) to spray the rest, and, well, you can see the result :( In the end, I had to respray the whole model with the new paint.
 
The key for me is to be methodical and make notes of everything. Example: I recently needed to match "Arctic Orange" for the vertical stabilizer on a Cold War era F-102. I didn't find anything that quite matched photos (another source of error and confusion, but it's what we have). I generally work with MRP paints, so started by blending International Orange and Insignia Red. These first stages can be pretty rough approximations. Start with 1:1. Maybe 5 drops of each to get enough to cover a plastic spoon for a sample. Not there? Try 7/3 or 3/7. That gets you headed in the right direction. Let's say you like how 7/3 looks. Fine tuning time. Make a 30 drop batch, 21/9. Still happy with it? Great! If not, fine tune it a bit more. With the larger batch, individual drop size becomes less of a variable and the increments get finer. 20/10 or 22/8. When you are satisfied, make a batch. I generally do 30ml in an empty Tamiya bottle using whatever ratio I was happy with. Label it with your paint numbers and ratios and write it down in several places. I spray a sample card, and also put notes in a spreadsheet of materials used in completed models.

OK. Way too much OCD there for some, but it's how I like to do it. :) When you need more in a few years for that F-106 you decide to build, the process will be simple unless the manufacturer discontinues or drastically changes the formulas.
We all have a bit of OCD in this hobby. It just isn't always in the same area of the build. Some it's the perfect shade of paint. Some it's painting absolutely every part to include those that aren't seen. Some it's getting absolutely everything perfect and without blemish. Panel lines, and the one for the counters, every rivet accented, Or perhaps following every single step that the powers that be deem necessary to properly build a model. The list can go on and on and we all suffer from at least one of them. :)
 
Matching "authentic" colors, even for a professional with access to a lab, is not quite an exercise in futility—but it comes close, even for the paint manufacturer. (Been there. Done that.) That's only one reason you can buy two bottles of the same color, from the same manufacturer, that don't match. And once the paint is applied, either in the "real world" or in your spray booth, the variables don't just multiply, they exponentiate. Color matching in the paint industry is not an exact science. It's a blend of science and art. Like I said, been there, done that.

So knocking yourself out, and wasting large quantities of Very Expensive Paint, to get an exact match, even when matching to an FS color chip, is not only futile, it's false in so many ways. Close enough is not only good enough, it has an excellent chance of being TECHNICALLY AND HISTORICALLY CORRECT. Once a paint is applied to a real vehicle, and that vehicle is exposed to the elements, especially sunlight, it begins to change immediately. After a week in strong sunlight, some paint colors change drastically (all historical "olive drab," for example, is notorious).

So if it looks right to you, it's close enough. Anyone who criticizes one of your builds because they think the color is wrong, is wrong, period. That is, or course, assuming you didn't substitute hot pink for olive drab.
 
^^^^^

OK, got it. I'm an idiot for trying my best to create a color that looks right (based on photos) since a particular aircraft may have sat in the sun a bit too long since rolling off the line. "Expensive paint"? 30ml of MRP costs $7.50. Not exactly a budget killer considering what some kits cost.
30 ml = 1 oz. 128 oz. = 1 gallon. $7.50 x 128 = $960 / gal. 1 gallon of premium paint costs ~$55 at Home Depot. I rest my case.
 
You paint models with latex house paint? How in the heck am I "wasting" paint by mixing the color? Sure, there might be a few ml wasted in work up, but the model needs paint either way. Sometimes, I think people just like to be argumentative.
 
You paint models with latex house paint? How in the heck am I "wasting" paint by mixing the color? Sure, there might be a few ml wasted in work up, but the model needs paint either way. Sometimes, I think people just like to be argumentative.
You miss my point entirely. The cost to produce a gallon of paint to a specific color requirement is, essentially, the same for any given binder system (in this case, acrylic). Of course, the cost of a hobby paint as distributed is higher: those small bottles, even if they are plastic dropper bottles, cost money, and it takes more time & money to fill and label each one. There are also issues of quality control and formulation. Then there is marketing. But 1745% more? Not hardly.

That said, a good hobby paint has a shelf life of decades, especially if stored in glass (the experiment with plastic dropper bottles is still running). That is high quality, which is why I chose a premium acrylic interior/exterior house paint for comparison. Is the mark up justified? That depends. For some brands, absolutely not. For others, still not justified, though they certainly come closer. I knew someone who produced a line of hobby paints of excellent quality. His prices were just as high as others, perhaps higher. They were some of the best paints I have encountered, both personally and professionally. My only complaint of them was that they weren't shelf-stable for very long, but that was due to the fact that they were metallics, and he chose a poor product container. He went out of the business, I don't think he sold the formulation (nobody would meet his price.)

So I don't waste hobby paint. I pay their price for quality, and I can afford it. A poor quality hobby paint is not worth the label on the bottle. In terms of cold, hard cash is a high quality one?—but in terms of user satisfaction and lack of frustration, they are worth it. But I never waste them, and I'm seriously P.O. if I'm forced to do so. It's not a rip-off if the customers are happy.
 
You miss my point entirely.
I think the point that you have missed entirely is that we are grown adults building plastic toys. Doing so gives us satisfaction for a variety of reasons. Ultimately, every penny spent on kits, tools and paints is "wasted". However, you seem convinced that you are among the few, if not only, model builder that understands how to do this correctly.

Seriously, I don't care if you want to build glue bombs and paint them with latex. The OP asked about making accurate mixes. I tried to help. That's it.
 
There is hope...
I paint with a brush, and I find that as I gain more experience, I am getting better at estimating how much paint will be required for the whole job.
It does start to get complicated when you start mixing a lighter hilight tone, and deeper shadow tone based on the same base tone. But I figure I'll get better at that too!

Another aspect I'd like to touch on is how thin a coat you apply each time. If you are slowly building the colour, the overall effect is distributed all over the build, unlike painting one area to final colour at a time.

Finally, techniques I'm sure are understood by model makers that I learned painting on canvas, are those of washes, glazes and filters.
Each of these have the effect of lending an overall unity of hue, even across different colours, especially in the case of filters. So two areas aren't exactly the same? Applying a filter or a wash and you will even out the chromatic playing field, so to speak.

Experiment! With time you may find other ways not mentioned here.

Cheers, and a happy, build filled, new year!
 
Just an after-thought: does anyone know if that tried and true method for latex paint work with acrylic model paints?
When rolling latex, expensive roller, yadayada, wrap it in saran wrap without cleaning it, put it in a plastic bag, then into the fridge. I've had rollers last several days in 'stasis' that way!
There is a difference between "latex" and "acrylic" paints. Acrylic paints, like enamels form a film by chemical cross-linking of their polymeric (acrylic) components. Latex paints form a film by agglomeration. Latex paints are a suspension of a latex compound in water (with other chemical agents). As the water evaporates, the latex particles come together to form a continuous film. If you prevent too much of the solvent (water) evaporating, this cannot happen.

Acrylics form a film by polymer cross linking. The process will begin as soon as sufficient solvent is lost, generally a relatively small amount. You can slow the process by preventing solvent loss, but it will occur, and more rapidly than with a latex paint. Also, the chemical mixture of any paint tends to be hard on bristles. It's a good plan with rollers for latex paints, which can be a bear to clean adequately, but with acrylics there is significant hazard to the brush.
 
I think the point that you have missed entirely is that we are grown adults building plastic toys. Doing so gives us satisfaction for a variety of reasons. Ultimately, every penny spent on kits, tools and paints is "wasted". However, you seem convinced that you are among the few, if not only, model builder that understands how to do this correctly.

Seriously, I don't care if you want to build glue bombs and paint them with latex. The OP asked about making accurate mixes. I tried to help. That's it.
If you wish to misunderstand and misinterpret what I have said, there is nothing I can do about that.
 
There is a difference between "latex" and "acrylic" paints. Acrylic paints, like enamels form a film by chemical cross-linking of their polymeric (acrylic) components.
Aha, first learning of 2025! Thx!
I should read up, especially since I like mixed media, I'm bound to create a disaster down the line!
 
Or tins. I have Humbrol paints from the 1970s and '80s that are still as usable as they were when they were new — if I spend ten minutes stirring until my fingers ache, anyway.
The Humbrol paint tin is a classic case of good thinking in product packaging. I used them for years and loved them. Switched entirely to acrylics—besides, my fingers are too arthritic to tolerate ten minutes of stirring!:cool:
 

Latest posts

Back
Top