You are using an out of date browser. It may not display this or other websites correctly.
You should upgrade or use an alternative browser.
You should upgrade or use an alternative browser.
Messerschmitt Me-329
- Thread starter Papermodder
- Start date
Papermodder
Modeller in both Plastic and Paper Card
- Joined
- Jan 2, 2013
- Messages
- 1,224
Thank you John.
Jim
Jim
THE NEW ONE
follow me on twitter @SpaceSavy
- Joined
- Oct 4, 2011
- Messages
- 346
i should try these paper models out sometime
Papermodder
Modeller in both Plastic and Paper Card
- Joined
- Jan 2, 2013
- Messages
- 1,224
Hi New one.
You should at some point. There are a lots of free ones out there.
Something that I always recommend. Start with easy ones first and learn the techniques. I've seen too many people try a more advanced model first, because it is a design they like, and end up bogged down with it and frustrated. Sometimes leaving this aspect of the hobby feeling it is just too difficult for them.
Jim
Papermodder
Modeller in both Plastic and Paper Card
- Joined
- Jan 2, 2013
- Messages
- 1,224
Hello.
Short update.
Short setback. Yesterday started to cut out bulkheads for the front fuselage, and discovered that the card that was used to laminate those parts with was too thick. I needed 1mm and had 2.5mm, not going to work. It will just introduce an error that will cause problems ahead. So today went to the art store and found some 0.6mm card. With the thickness of the normal 110lb card laminated to this works out to 1mm exact.
Reprint those pages and laminate to the new card and wait to dry.
Tonight started again to cut out the bulkheads and so far so good. ;D
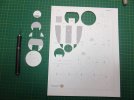
Cutting these out puts me back to when I use to build RC aircraft, same procedure, just balsa & ply instead of card.
Have a good evening.
Jim
Short update.
Short setback. Yesterday started to cut out bulkheads for the front fuselage, and discovered that the card that was used to laminate those parts with was too thick. I needed 1mm and had 2.5mm, not going to work. It will just introduce an error that will cause problems ahead.
Reprint those pages and laminate to the new card and wait to dry.
Tonight started again to cut out the bulkheads and so far so good. ;D

Cutting these out puts me back to when I use to build RC aircraft, same procedure, just balsa & ply instead of card.
Have a good evening.
Jim
Papermodder
Modeller in both Plastic and Paper Card
- Joined
- Jan 2, 2013
- Messages
- 1,224
Good evening.
A little more productive day today.
Finished cutting out the required spars and bulkheads for the front fuselage, and started fitting and assembly.
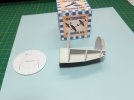
That bulkhead W6 will have to wait for the skin before it is installed.
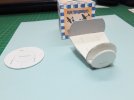
This is the box for the front landing gear, as well as the front pivot for the gear. This is a piece of wire rod wrapped in paper.
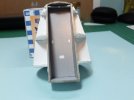
It's not glued in place yet, but did place the cockpit in position to check it's fit.
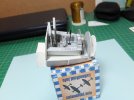
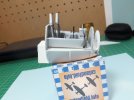
This is all for tonight. Next is to secure the cockpit, then to apply the inner skin around it.
Thank you for following.
Questions and comments are always welcome.
Jim
A little more productive day today.
Finished cutting out the required spars and bulkheads for the front fuselage, and started fitting and assembly.

That bulkhead W6 will have to wait for the skin before it is installed.

This is the box for the front landing gear, as well as the front pivot for the gear. This is a piece of wire rod wrapped in paper.

It's not glued in place yet, but did place the cockpit in position to check it's fit.


This is all for tonight. Next is to secure the cockpit, then to apply the inner skin around it.
Thank you for following.
Questions and comments are always welcome.
Jim
Papermodder
Modeller in both Plastic and Paper Card
- Joined
- Jan 2, 2013
- Messages
- 1,224
Than you Patrick and Guido.
Jim
Jim
Papermodder
Modeller in both Plastic and Paper Card
- Joined
- Jan 2, 2013
- Messages
- 1,224
Hello
Next update on the Me-329.
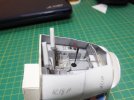
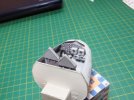
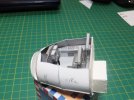
Today was quite productive. Started out the cockpit was glued in place into the front fuselage.
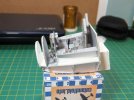
The skins for the cockpit inside walls were cut out, shaped to match the curve of the fuselage and then glued in place, one panel at a time. These had to be edge glued to the inside of the bulkheads, not on top. With no glue tabs these could only be glued a small section at a time and when the glue dried move up and glue a little bit more. Hense this process takes a few hours to complete.
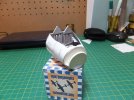
Do you remember me saying that the kit had the arms on the quadrant wrong and they had to be canted inwards. This is the reason why. If they were left straight, they would ether hit the walls of the cockpit or be very awkward to use. Here is where I am at tonight.
Have not checked the plans tonight yet, so I am not sure what is next on this build.
Have a good evening and thank you for following.
Jim
Next update on the Me-329.
Today was quite productive. Started out the cockpit was glued in place into the front fuselage.

The skins for the cockpit inside walls were cut out, shaped to match the curve of the fuselage and then glued in place, one panel at a time. These had to be edge glued to the inside of the bulkheads, not on top. With no glue tabs these could only be glued a small section at a time and when the glue dried move up and glue a little bit more. Hense this process takes a few hours to complete.

Do you remember me saying that the kit had the arms on the quadrant wrong and they had to be canted inwards. This is the reason why. If they were left straight, they would ether hit the walls of the cockpit or be very awkward to use. Here is where I am at tonight.


Have not checked the plans tonight yet, so I am not sure what is next on this build.
Have a good evening and thank you for following.
Jim
Papermodder
Modeller in both Plastic and Paper Card
- Joined
- Jan 2, 2013
- Messages
- 1,224
Thank you Chris.
Jim
Jim
Papermodder
Modeller in both Plastic and Paper Card
- Joined
- Jan 2, 2013
- Messages
- 1,224
Time for an update.
Good evening.
Yesterday worked on the gun tubes for the sides of the front fuselage.
These tubes are only 3/32" in dia. and on top of that they have to be edge glued, no glue tabs here.
Rolled the tubes on a metal armature as normal, applied glue to the seam. Then inserted the tube into a metal tube of 3/32" inside dia. to dry. Only glued half the tube at a time, then when dry, reversed the tube and glued the other half.
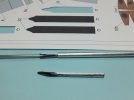
Here are two of the tubes inserted into place. There is enough friction here that with the open ends glued to the skin, the rest of the tube will not require glue.
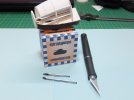
Last night started on the outer skin for the fuselage. as well as the rear deck for the cockpit. This will be inserted after the back skin for the cockpit area is in place.
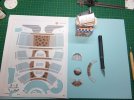
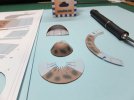
First up is the skin for the nose. The nose piece can be troublesome. We get the curvature of the nose though the use of petals. They have to be shaped over then glued together as a group, in-order to achieve the desired shape. There is a lot of opportunity her to make a real botch of it, Some people have nothing but trouble with them. I even cut out 2 just in case. I got lucky on the first try. :
After it was dry went over the nose with a large dapping tool to fix the shape and glued in a small bulkhead to secure it.
In this pic is the finished nose piece, the spare one to show what the piece looks like before being folded, The finished rear cockpit deck, the next piece of the skin, as well as the sheet with the skin sections for the front fuselage.
A more closeup view of the finished nose piece.
The skin for the front fuselage will be all assembled then install onto the framework as a unit.
Thank you for following.
Have a good evening.
Jim
Good evening.
Yesterday worked on the gun tubes for the sides of the front fuselage.
These tubes are only 3/32" in dia. and on top of that they have to be edge glued, no glue tabs here.
Rolled the tubes on a metal armature as normal, applied glue to the seam. Then inserted the tube into a metal tube of 3/32" inside dia. to dry. Only glued half the tube at a time, then when dry, reversed the tube and glued the other half.

Here are two of the tubes inserted into place. There is enough friction here that with the open ends glued to the skin, the rest of the tube will not require glue.

Last night started on the outer skin for the fuselage. as well as the rear deck for the cockpit. This will be inserted after the back skin for the cockpit area is in place.
First up is the skin for the nose. The nose piece can be troublesome. We get the curvature of the nose though the use of petals. They have to be shaped over then glued together as a group, in-order to achieve the desired shape. There is a lot of opportunity her to make a real botch of it, Some people have nothing but trouble with them. I even cut out 2 just in case. I got lucky on the first try. :
After it was dry went over the nose with a large dapping tool to fix the shape and glued in a small bulkhead to secure it.
In this pic is the finished nose piece, the spare one to show what the piece looks like before being folded, The finished rear cockpit deck, the next piece of the skin, as well as the sheet with the skin sections for the front fuselage.

A more closeup view of the finished nose piece.

The skin for the front fuselage will be all assembled then install onto the framework as a unit.
Thank you for following.
Have a good evening.
Jim
Papermodder
Modeller in both Plastic and Paper Card
- Joined
- Jan 2, 2013
- Messages
- 1,224
Thank you Patrick.
Jim
Jim
cargoman5126
Anything in scale I'm into it...
- Joined
- Nov 7, 2012
- Messages
- 829
Great progress.. One question for you.. Is is better for you that the material are prefinished.. Thanx for sharing the paper building side of the hobby... 
Papermodder
Modeller in both Plastic and Paper Card
- Joined
- Jan 2, 2013
- Messages
- 1,224
Thank you Cargoman.
Right now I build mostly the coloured kits. I do have templates in the stash that are straight white card and not coloured. I can't say it's a real preference. Just what is common in the hobby, with more emphasis on the quality of the build. Any additional colouring I can do by importing the parts into a graphics program before the build. If I want to add additional weathering I will use artist acrylics and or pastels, after the fact.
I have a high detailed loader that I want to build and that one has to be painted, as it is a straight white build.
Jim
Papermodder
Modeller in both Plastic and Paper Card
- Joined
- Jan 2, 2013
- Messages
- 1,224
Thank you Guido.
Jim
Jim
Papermodder
Modeller in both Plastic and Paper Card
- Joined
- Jan 2, 2013
- Messages
- 1,224
Hello all.
I would like to post a video update on my build.
http://youtu.be/SU9c9C2_Po4
Thank you for following.
Jim
I would like to post a video update on my build.
http://youtu.be/SU9c9C2_Po4
Thank you for following.
Jim
