GaryG64
Well-Known Member
- Joined
- Sep 8, 2022
- Messages
- 2,567
Just my opinion but I would black panel line the rivetsAlright brothers, I need a little help.
Should I highlight the rivet heads with the light green for a little pop? Or does it look like a comic strip? I kind of think they stand out on their own.
I'm just trying different ideas with each model
View attachment 114101
View attachment 114102
View attachment 114103
I agree.Just my opinion but I would black panel line the rivets
That is certainly a fine looking piece of work. The tracks are exceptional. PanthermanAll of the red and white stripes are finished.
Time for highlights, washes and weathering.
View attachment 114085
View attachment 114086
View attachment 114087
I think because they are quite pronounced that I would leave them. It's really your call, could do a few to see what they look like maybe. PanthermanAlright brothers, I need a little help.
Should I highlight the rivet heads with the light green for a little pop? Or does it look like a comic strip? I kind of think they stand out on their own.
I'm just trying different ideas with each model
View attachment 114101
View attachment 114102
View attachment 114103
Well, brothers. I feel I have a few good years left for building our kits.
My hands are become less and less stable. Kind of hard dotting these rivet heads without making a mess and having to clean it and try again about 3 times before getting it fairly close.
There are some good days, though.

Some excellent advice about the guns. I broke a peg on one without realizing it and I broke a barrel on another gun. Think the model takes three to build and there's for in the kit. If I break another barrel I'll have to get the barrel kit.I was poking around in mine a little early as well. Guess we'll start on the 7th
I bought the Aber Gun Barrel set for it from scalehobbyist.
View attachment 113359
I went ahead and worked on the guns being as that isn't part of the normal kit. The Aber PE is microscopic. Between the end of the brass gun barrel and the point of the hobby knife there is a spec that is actually the blade for the top of the gun sight. The brass piece above it is one of the four legged brass pieces bent to make a mount for the blade.
View attachment 113360
Even with all my n scale experience I don't think I could work with anything smaller. But it is actually possible to use these. Here is the finished gun. With the site on it
View attachment 113361
After Pantherman (Thanks) mentioned it, I assembled the center section over the side plate.
View attachment 113362
When I mounted the front machinegun, I decided to add reinforcement. I was concerned those two tiny pins on the sides of the gun in the kit wouldn't hold if I accidently hit the barrel. I guarantee my five fingered wrecking ball will hit the barrel on the gun and knock it back inside as soon as I seal it up if it isn't reinforced. I just cut the additional piece from the side of the sprue, and glued it under the receiver to reinforce it.
View attachment 113363
I noticed the same drive wheel issue in my kit. Mine also had some of those pins broken. After studying the kit I realized it was a Mark IV kit with some additional parts for Building a Mark 1. There appears to be quite a few extra parts in the Takom Mark 1 kit. There is a set of Mark IV drive wheels that are not used people can steal the pins off of if needed.
Here's the Mark 1 on the right and Mark IV on the left. I put the broken pin on the left on the drive wheel on the right.

This looks awesome. Great job on this one Gary. Details are amazing and I love the paintI think I'm getting close to the finish.
View attachment 114130
View attachment 114131
View attachment 114132
View attachment 114133
View attachment 114134
View attachment 114135
Thank you, your dad's ship is looking great!This looks awesome. Great job on this one Gary. Details are amazing and I love the paint

Tickled pink.Gary, looks super to me. Going to try copying you track weathering in the next couple days.
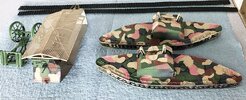
Okay so from what I read these tanks only had camo on the front, cab and sides. That is whay I did it in pieces.
I used the masking putty from Andy's HHQ. First time I tried it and I love it. I primed last night then, this morning at about 7am I put the base coat of brown on everything. I did some Saturday chores. An hour and a half later I put the first putty on for the light brown, then sprayed the pink and dark brown. Half hour later more putty over the Pink and Brown, sprayed green etc. I can put the putty on 30 minutes after the last coat and it sticks to the model but doesn't take the paint off. I went back and forth between the model and other things and here is what I have at 4 in the afternoon. The paint was all Vallejo or Tamiya acrylic. It is a bit bright but the wethering always tones it down a bunch.
I intentionally did more pink than the example from Takom just to emphasize that they actually used pink. This still needs some brush work on separating some of the color sections to better match the picture.
I'm really happy with it, you could say I'm tickled pink! Sorry; I just had to say it.
View attachment 114166
"Pinky, are you thinking what I'm thinking?"Tickled pink.Pantherman will love it! I think your camo is awesome, I love it!
I was not aware that pink was used.
"Pinky, are you thinking what I'm thinking?"
"I think so Brain, but how are we going to get the elephant to wear a pink thong?"
Sorry. Pinky and the Brain flashback

My heroes!!
Through –n– throughMy heroes!!
Thanks for the kind words of encouragement, Tim.Great job on this one. Over your last few builds I have noticed your painting and weathering skills have improved significantly. Keep up the great work.
