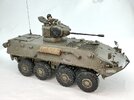
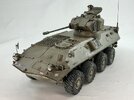
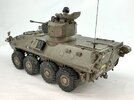
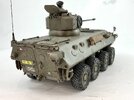
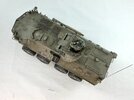
Piranha PWI-GR

had some decals printed
... really? How does that work? Guess I've not encountered that (or just forgot). I've printed my own, so I guess it makes sense as a service.

drydbrushed the whole model with Revell Light Olive
I wouldn't have thought of doing that over a lighter base. Please edify me as to the rationale, and specifics of the technique!
Finish looks good, but I haven't enough experience to recognize how the drybrushing contributed.

Cheers, Brian
 
... really? How does that work?
It's in essence somebody who owns a printer that can also print white, and who uses it to print decal sets he sells commercially, and also to order (once he's got enough to fill a sheet of A4, which is why it took about four weeks before I received my order).

I wouldn't have thought of doing that over a lighter base. Please edify me as to the rationale, and specifics of the technique!
It highlights the model, nothing more than that :) My painting technique boils down to four steps: a base colour over everything, followed by a lighter version of it sprayed as patches in the centres of panels, then a darker wash over everything, and finally a lighter drybrush over everything too. (For multicoloured camouflage, I do step 1 and 2 for each colour, then 3 generally for the whole model at once, though perhaps with different colours of wash over different base colours applied wet-on-wet, and then 4 per colour again.) The lighter patches break the monotony, and also serve to highlight the parts of the model that are turned towards the light, while the wash and drybrush create shadows and highlights that will make the model look more "alive" especially when displayed in fairly even lighting conditions.

The only thing that requires a fair degree of skill here is spraying the lighter patches, because you need an airbrush capable of fine work and a certain amount of practice with it to make it do that reliably. Which is where I occasionally fail :)
 
I used to just paint models in the base colour, but when I tried highlighting them I soon decided they simply look a lot better that way. Yes, it's somewhat artsy, but if you don't overdo it (as some people do), it helps the look rather than make the model look artificial.
 
With some dirt on the tyres and the underside of the hull, plus an antenna on the rear, I feel this one is finished:

IMG_2543.jpegIMG_2544.jpegIMG_2545.jpegIMG_2546.jpegIMG_2547.jpeg

I took the tyres off, drybrushed a light mud colour over the running surfaces, and spattered that same paint over the lower hull as well as a little over the sides of the tyres. The antenna is 0.3 mm spring steel that I painted OD after glueing it in place.
 
Nice! Treatment gives it presence and weight, crossing that illusive threshold that takes it from being a plastic model to something more real.

And the turret mounting, as well as all the extra details you researched and built/added turned out great.

My wife has often commented after work we've done on our old house, that when something looks like it has always been that way, and doesn't really stand out, we must have done a good job!

So, with that in mind, good job!
 
Thanks, guys :)

when something looks like it has always been that way, and doesn't really stand out, we must have done a good job!
IMHO, that's one of the most important things about what-if models: having it look like it's supposed to be like that. If it looks disjointed, you probably wouldn't suspend disbelief for it, but I don't think this model suffers from that — even if the turret looks too big for the vehicle, but then, it did that on the single real-world prototype too :)
 

Latest posts

Back
Top