Polar Lights: NX-01 Enterprise: 1/350
- Thread starter Grendels
- Start date
Capt_Taggert
Never give up, never surrender!
- Joined
- May 7, 2009
- Messages
- 169
YES YES YES!! Please start some lighting tuts. I've got this and the 1701A and a D model to build and light and could sure use help.
Grendels
Active Member
- Joined
- Nov 24, 2009
- Messages
- 9,092
I am working on a few basic tutorials for lighting. Basic lighting is much easier than most people think. For the NX-01, you have all the difficult circuits laid out here. I will post more as time permits. Right now, work is a major demand in my life. My job is seasonal, and the busy season comes to an end in 5 weeks, then I will have a lot of time to get this one done. I am pretty sure that the lighting has taken more time than the actual model building will.
Grendels
Active Member
- Joined
- Nov 24, 2009
- Messages
- 9,092
Well, I had some free time and did some work on the NX.
First thing, I finished the filler on the rear deck:
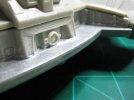
I still need to do a little clean up on the walls around the deck, but for the most part, this fill work is done. This area will be covered up with a large decal later, so I wanted it to look right.
I also spent some time inspecting the work I had done earlier on the saucer section, and found this sensor array was out of alignment:
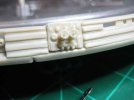
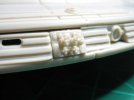
It was the same on both sides, so I sliced both of them off and realigned them. I remember when I first assembled these that I made sure that the registry pins lined up properly. My advice for those of you who might decide to build one of these is to put the rim of the saucer section together first, then glue down these sensor arrays, to make sure of the proper alignment. Here is a photo of the completed work:
I also did a little bit of touch up to the fit around the rim by adding a little bit of styrene rod:
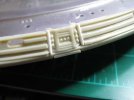
Without that styrene rod, there are large gaps between the parts. I didn't want to spend a lot of time filling, so I am cheating a bit. It looks much better with the lid of the saucer section in place.
I also did some work on the nacelles and lighting. Here is a shot of the lighting string for one of the nacelles:
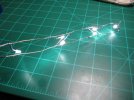
Basically there are 6 white LED's in a parallel array. Parallel arrays work great for lighting mainly because if one LED burns out, the rest keep on working. Each LED has a 326 Ohm resistor on it to step down the voltage from 9V to the 3.2 V that is required. If you have too high of a voltage across the LED's they will burn out. I have already run them for 10 hours one day to make sure that everything is good to go. Once I am done with final wiring, right before I seal up each nacelle, I will run it again for 10 to 20 hours just to make sure there are no burn outs. Electronics tend to fail pretty quickly, if there are no failures in that time frame, then I should be OK to glue up the nacelles.
I had also glued the light string to each nacelle. I used Epoxy for this, and the whole time my gut was saying to use CA. I found out why when I did a test fit. The two halves of the nacelles would not close up correctly. What happened is this: There is barely enough clearance in the back end of the nacelle for a 3mm led to fit. When you add a bit of epoxy, and then get a bit impatient, because the wires are not perfectly flat, and just keep adding epoxy until it is held down, you end with a part that is too think to fit. I spent about an hour tonight, chipping off epoxy until it would fit again. I even tried filling down the LED a bit:
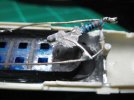
I had to do another coat of black paint in a few spots to fix the light leak, but I am done with that, and both nacelles now close up again.
In addition, I drilled out the upper hole for the navigation LED. The LED would have fit without this, but I can now pull it out a bit, and mask it off for painting. After painting, just stuff it down in the hole and it should be good to go. I would have gotten everything ready for the test burn tonight if I had not gone overboard with the epoxy. I read somewhere recently that patience is the enemy of the modeler, and it cost me about an hours work, tonight. No worries that is a part of the learning process, and I probably won't make that mistake again until my next model. By the end of the week, I should be ready to seal up the nacelles and start filling those horrible seams.
First thing, I finished the filler on the rear deck:

I still need to do a little clean up on the walls around the deck, but for the most part, this fill work is done. This area will be covered up with a large decal later, so I wanted it to look right.
I also spent some time inspecting the work I had done earlier on the saucer section, and found this sensor array was out of alignment:

It was the same on both sides, so I sliced both of them off and realigned them. I remember when I first assembled these that I made sure that the registry pins lined up properly. My advice for those of you who might decide to build one of these is to put the rim of the saucer section together first, then glue down these sensor arrays, to make sure of the proper alignment. Here is a photo of the completed work:

I also did a little bit of touch up to the fit around the rim by adding a little bit of styrene rod:

Without that styrene rod, there are large gaps between the parts. I didn't want to spend a lot of time filling, so I am cheating a bit. It looks much better with the lid of the saucer section in place.
I also did some work on the nacelles and lighting. Here is a shot of the lighting string for one of the nacelles:

Basically there are 6 white LED's in a parallel array. Parallel arrays work great for lighting mainly because if one LED burns out, the rest keep on working. Each LED has a 326 Ohm resistor on it to step down the voltage from 9V to the 3.2 V that is required. If you have too high of a voltage across the LED's they will burn out. I have already run them for 10 hours one day to make sure that everything is good to go. Once I am done with final wiring, right before I seal up each nacelle, I will run it again for 10 to 20 hours just to make sure there are no burn outs. Electronics tend to fail pretty quickly, if there are no failures in that time frame, then I should be OK to glue up the nacelles.
I had also glued the light string to each nacelle. I used Epoxy for this, and the whole time my gut was saying to use CA. I found out why when I did a test fit. The two halves of the nacelles would not close up correctly. What happened is this: There is barely enough clearance in the back end of the nacelle for a 3mm led to fit. When you add a bit of epoxy, and then get a bit impatient, because the wires are not perfectly flat, and just keep adding epoxy until it is held down, you end with a part that is too think to fit. I spent about an hour tonight, chipping off epoxy until it would fit again. I even tried filling down the LED a bit:

I had to do another coat of black paint in a few spots to fix the light leak, but I am done with that, and both nacelles now close up again.
In addition, I drilled out the upper hole for the navigation LED. The LED would have fit without this, but I can now pull it out a bit, and mask it off for painting. After painting, just stuff it down in the hole and it should be good to go. I would have gotten everything ready for the test burn tonight if I had not gone overboard with the epoxy. I read somewhere recently that patience is the enemy of the modeler, and it cost me about an hours work, tonight. No worries that is a part of the learning process, and I probably won't make that mistake again until my next model. By the end of the week, I should be ready to seal up the nacelles and start filling those horrible seams.
Capt_Taggert
Never give up, never surrender!
- Joined
- May 7, 2009
- Messages
- 169
Excellent work so far. I picked up some LED supplies this weekend and looking forward to starting on wiring and electronics. Keep up the good work.
Capt_Taggert
Never give up, never surrender!
- Joined
- May 7, 2009
- Messages
- 169
I'll contact you as I get started. I started playing around last night, I picked up some supplies at Radio Shack (I know, I know better) and played around with wiring. I hooked up a 9V battery to a couple of led's with 220 ohm resistors and it worked pretty well. I may have to order a flasher board from someone when I start my NX-01. But i'll contact you for sure.
Grendels
Active Member
- Joined
- Nov 24, 2009
- Messages
- 9,092
I wouldn't bother with a flasher board. The reason I say this, is that I bought a flasher board months ago, and they are expensive. They run about $50 each. The components for the circuits I have listed are pretty cheap on ebay. 555 timer chips are 10 for $2 US, The 4060 CMOS chip is a bit harder to find, but again my recent eBay search put them in at $11 US for 25. Capacitors, resistors and perf board cost nothing. You can also get these parts at places like Digikey: http://search.digikey.com/scripts/DkSearch/dksus.dll?vendor=0&keywords=MC14060B They have the 4060 listed from $0,16 to $0.52 each.
For the price of one flasher board, you can buy the tools and equipment to build these and experiment a bit. You gain the knowledge that will allow you to continue to build these circuits for many more models. I went ahead and took the plunge to figure this out because I have two TOS Enterprises and A,B,C,D and E to build. Buying flasher boards for all of those is a car payment. I don't mean any offense to those that sell these parts, I understand that they have to make a living, but it is much cheaper to do it on your own. I don't mind posting detailed photos of the circuits if you would like. I am pretty sure I detailed out all of the parts I have used.
For the price of one flasher board, you can buy the tools and equipment to build these and experiment a bit. You gain the knowledge that will allow you to continue to build these circuits for many more models. I went ahead and took the plunge to figure this out because I have two TOS Enterprises and A,B,C,D and E to build. Buying flasher boards for all of those is a car payment. I don't mean any offense to those that sell these parts, I understand that they have to make a living, but it is much cheaper to do it on your own. I don't mind posting detailed photos of the circuits if you would like. I am pretty sure I detailed out all of the parts I have used.
ScreamingSamuraiStudio
New Member
- Joined
- May 13, 2009
- Messages
- 257
This is some very useful advice
Thanks and keep up the great work.
Thanks and keep up the great work.
Capt_Taggert
Never give up, never surrender!
- Joined
- May 7, 2009
- Messages
- 169
Good advice. The commercial flasher boards are pricey. Has anyone tried flashing LED's? I hear they burn out pretty quickly but have never tried any.
Quaralane
Well-Known Member
- Joined
- May 22, 2009
- Messages
- 11,263
I used them in my Odysseus build, Capt.Capt_Taggert said:Good advice. The commercial flasher boards are pricey. Has anyone tried flashing LED's? I hear they burn out pretty quickly but have never tried any.
They were....disappointing. To get them all flashing at the same speed, they need to be on their own circuit and would still flash VERY quickly. Too quickly for a trek ship, I'm afraid.
I'll never use them again
Grendels
Active Member
- Joined
- Nov 24, 2009
- Messages
- 9,092
I have a few, but I have not used them for anything as of yet. When I get around to building something with a cockpit, like the moebius viper, I will give them a try. I suspect that Quaralane is right, that they are really hard to sync up, and that the blink rate is not correct for federation models. Just from the little bit of playing around that I have done, any noise in the circuit will affect them. What I mean by noise is another circuit that has either a blink or a pulse. In order to get a LED to blink you have to get the current to follow a wave pattern. The image below shows different wave patterns:

This is a graph of voltage vs. time. As time moves along the x-axis, the voltage changes, either it is there or it isn't. The red line in the second graph represents the voltage required to light the LED. The bottom graph shows what is required to strobe an LED. This would be the white quick blink, long off lights on the refit enterprise.
Now if you have a circuit that is pulsing like the top graph. This circuit is not "clean" if some of this pulse leaks out and can disturb other circuits. When the only other thing in the circuit is an LED, you might see it flicker a bit. But, if you have yet another circuit that is trying to pulse, you could get interference, which would cause the circuit to behave unpredictably. Just take a look at the top and bottom graph. We have a peak on the bottom graph where we have a valley on the top graph. This is where you get interference. The two should cancel out causing neither LED to blink.
This is why Quaralane could only get them to work when they where in the circuit together. These blinking LED's have nothing in them to prevent or cancel out noise in the circuit. The revised circuits on page one of this build, have this feature to them. That is why I can hook them all together and have them behave the way I want. None of the signal that allows the LED's to blink is leaking out of these circuits to disturb the other circuits.
If you don't feel comfortable with building your own circuits, I suggest you start with the 4060. That is what I did and I got it blinking pretty fast. There isn't much to a circuit with this chip, and it does regulate voltage for you. Once you get your feet wet, it will come easier. Build up your confidence before you tackle the big project. I am working on a lighting tutorial, but it will take time. Work is very demanding right now.
schweinhund227
New Member
- Joined
- Jun 24, 2009
- Messages
- 2,511
I like the way you have experimented with the Timer circuits and all !!!
The light test looks mighty cool ! but what I don't understand is why
you soldered some LED's on what appears to be Brass rods ? or some solid core
uninsulated wires ??? maybe my eyes are getting old?
None the less, This is an impressive build and it is sad about the Warped parts and bad fit... on a kit
this Young... it is not acceptable.... Maybe Quality control has taken a second place to profit making ?
keep us posted on your progress ! it should turn into a Great looking Ship !
Grendels
Active Member
- Joined
- Nov 24, 2009
- Messages
- 9,092
The brass rods as you called them are two wires with the insulation stripped off. Insulation does serve a purpose. If you accidentally touch two wires together, they will not short out. But in this case, I didn't know exactly where I was going to put the LED's so I just stripped away. This allowed me to place the LED's where they needed to go without guessing and trying to strip little bits of insulation in a specific area. In addition, the LED's themselves have pretty stiff wires to them. More than enough to keep the positive and negative wires separated. As long as no other bare wires are in that area, everything is fine.
You are not getting old, those are uninsulated wires. It works the same way a power bus does in your home. The one that has your circuit breakers connected to it. Or another example, the inside of a bread board. It is made the same way.
If you look at the very left end of the LED strip, you will see the insulation start up. Those ends are the ones that I have to thread through the ship. They need insulation.
Thanks for the comment, I will work on the nacelles some more this weekend, hopefully get them sealed up.
Capt_Taggert
Never give up, never surrender!
- Joined
- May 7, 2009
- Messages
- 169
Looks like i'll be steering clear of blinking leds. thanks for the info.
ScreamingSamuraiStudio
New Member
- Joined
- May 13, 2009
- Messages
- 257
BAH..
I just got three blinking LEDs in the mail today...I thought I would try them in my Defiant kit, but I guess a circuit board will be the only best option.
I just got three blinking LEDs in the mail today...I thought I would try them in my Defiant kit, but I guess a circuit board will be the only best option.
Grendels
Active Member
- Joined
- Nov 24, 2009
- Messages
- 9,092
If you are going straight blinking, just try the 4060 chip. Again it is pretty easy, only three parts. The chip, a resistor, and a capacitor. It will regulate voltage for you, so you will not need a resistor on the LED's. By far the easier of the two chips to work with. Not to mention, they are pretty cheap if you get them from the correct source. 
Grendels
Active Member
- Joined
- Nov 24, 2009
- Messages
- 9,092
Well, I got some work done on her. First I have most of the saucer rim taped up for light leak. There are a few spots left to square up, but not much. Here is a photo:
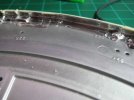
I am using the same aluminum foil tape as before. With that done, I only have one more thing to do to the saucer section, and I can start preparing her for paint.
Speaking of getting ready for paint. I have done a lot of work on the Nacelles. First, I was doing a test lighting for a video, and I found this:
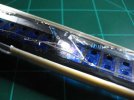
Yes, that is a non functional LED. It turned out that there was a short in the LED itself. It wasn't due to my soldering work, like I thought at first. (When you bumped the LED, it would light up, and then go out.) I had to hack that sucker out of my array, and replace it. That took a good couple of hours. Removing solder is not easy or fun, especially when you keep forgetting to buy the right tools when you walk past that electronics store......
What made this worse is that it was epoxied down to the model. I really had to be careful of the heat involved.
The next thing I had problems with was light leak out of the ends of the nacelles. The problem here is that this is a touchy area:
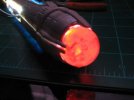
The light is leaking out around the end caps. I can't paint them to block the light, so what I did instead is paint them to disguise the light. A ring of clear red paint around the part that holds the LEDs fixed this:
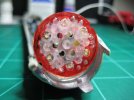
With that completed, I went ahead and soldered the spinner circuit into the LED array that lights the nacelles. They are one unit now, and both light up off of the same wires.
Next I tried to install the fiber optics that will power the position lights. These lights are the white quick blink long off lights. I am using fiber for this for two reasons. One, I didn't want a lot of wires leaving the nacelles, it might get confusing no matter how careful I am. And two, the hole for the position light is much smaller than the LED's I have on hand. It is also this way on the TV show, so I wanted to try and keep it in scale. This fiber is 1.5mm which is the exact same size as the part it is replacing. The problem is, this stuff is pretty stiff. I tried to glue it in with carpenters glue, with no luck. It just kept pulling itself out. I finally resorted to 5 minute epoxy. I didn't really want to do this, mainly because I figured that I would make a mistake and get some of it in the seam between the two parts. I was right about that, but the fix was pretty easy. I was worried about it for nothing.
Once that was glued in, I made a test video:
[youtube]http://www.youtube.com/watch?v=Wk0X7OZ4fwc[/youtube]
Please ignore my sloppy dialog. I have had a really long week at work, and have two more of those before a long vacation.
In the video you can see that the ambient lighting in the nacelles was leaking into my fiber. I gave the fiber a good coat of flat black paint, and solved this problem.
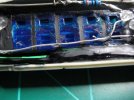
In the above photo, you can see one of the tricks for soldering. Make your two parts hook over each other, and soldering is much easier to do. Another problem I faced, and you can see it in the video is that the navigation lights are way too bright, they are overpowering everything. To fix this, I will solder a 4.7K ohm resistor in series with each light. That resistor steals enough of the energy in the circuit to dim the LED down to where the other lighting is.
Once these problems were solved, I glued them up. One of them was glued last night, the other one today right before I started this post.
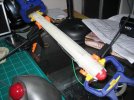
I also did a tape up of the model to try and find the center of gravity. I do not want to use the stand that came with the model. I have read too many post about this stand breaking and damaging the model. Finding the center of gravity of the model will put the least amount of stress on the brass rod, which will replace the kit stand.
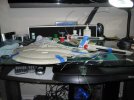
I am not happy with the location of the center of gravity. It is right in the middle of the shuttle bay. If I put the stand there, I cannot open up the shuttle bay. I will have a few weeks to think about this, I might just use the old mounting points with three brass rods instead of one mounting point.
The two little shuttle pods won't go to waste, I have can use them as switches for the lights. More on this later.
This is my last update for a few weeks. Work takes priority for a bit.

I am using the same aluminum foil tape as before. With that done, I only have one more thing to do to the saucer section, and I can start preparing her for paint.
Speaking of getting ready for paint. I have done a lot of work on the Nacelles. First, I was doing a test lighting for a video, and I found this:

Yes, that is a non functional LED. It turned out that there was a short in the LED itself. It wasn't due to my soldering work, like I thought at first. (When you bumped the LED, it would light up, and then go out.) I had to hack that sucker out of my array, and replace it. That took a good couple of hours. Removing solder is not easy or fun, especially when you keep forgetting to buy the right tools when you walk past that electronics store......
What made this worse is that it was epoxied down to the model. I really had to be careful of the heat involved.
The next thing I had problems with was light leak out of the ends of the nacelles. The problem here is that this is a touchy area:

The light is leaking out around the end caps. I can't paint them to block the light, so what I did instead is paint them to disguise the light. A ring of clear red paint around the part that holds the LEDs fixed this:

With that completed, I went ahead and soldered the spinner circuit into the LED array that lights the nacelles. They are one unit now, and both light up off of the same wires.
Next I tried to install the fiber optics that will power the position lights. These lights are the white quick blink long off lights. I am using fiber for this for two reasons. One, I didn't want a lot of wires leaving the nacelles, it might get confusing no matter how careful I am. And two, the hole for the position light is much smaller than the LED's I have on hand. It is also this way on the TV show, so I wanted to try and keep it in scale. This fiber is 1.5mm which is the exact same size as the part it is replacing. The problem is, this stuff is pretty stiff. I tried to glue it in with carpenters glue, with no luck. It just kept pulling itself out. I finally resorted to 5 minute epoxy. I didn't really want to do this, mainly because I figured that I would make a mistake and get some of it in the seam between the two parts. I was right about that, but the fix was pretty easy. I was worried about it for nothing.
Once that was glued in, I made a test video:
[youtube]http://www.youtube.com/watch?v=Wk0X7OZ4fwc[/youtube]
Please ignore my sloppy dialog. I have had a really long week at work, and have two more of those before a long vacation.
In the video you can see that the ambient lighting in the nacelles was leaking into my fiber. I gave the fiber a good coat of flat black paint, and solved this problem.

In the above photo, you can see one of the tricks for soldering. Make your two parts hook over each other, and soldering is much easier to do. Another problem I faced, and you can see it in the video is that the navigation lights are way too bright, they are overpowering everything. To fix this, I will solder a 4.7K ohm resistor in series with each light. That resistor steals enough of the energy in the circuit to dim the LED down to where the other lighting is.
Once these problems were solved, I glued them up. One of them was glued last night, the other one today right before I started this post.

I also did a tape up of the model to try and find the center of gravity. I do not want to use the stand that came with the model. I have read too many post about this stand breaking and damaging the model. Finding the center of gravity of the model will put the least amount of stress on the brass rod, which will replace the kit stand.

I am not happy with the location of the center of gravity. It is right in the middle of the shuttle bay. If I put the stand there, I cannot open up the shuttle bay. I will have a few weeks to think about this, I might just use the old mounting points with three brass rods instead of one mounting point.
The two little shuttle pods won't go to waste, I have can use them as switches for the lights. More on this later.
This is my last update for a few weeks. Work takes priority for a bit.
Similar threads
- Replies
- 0
- Views
- 86
- Replies
- 2
- Views
- 198
