Polar Lights: NX-01 Enterprise: 1/350

Glenn, thanks for the links. Yes those are the reference photos I am working from. As well as video clips from the show. The still images show the Aztec pattern very well, but do not show the blink rate of the lights. Also, the still images do not show which lights blink and which lights stay constant. So I need a little bit of both to get this done right. Those photos have been extremely helpful. :D

Quaralane, I am a teacher by profession. I have had to learn patience over the years. (Try teaching physics to an elementary education major who will never once use it in her life. You have to convince her that she needs to learn this to succeed in the class. You need a lot of patience to do that.) My earlier models do not show that patience at all. The happy thought is, I almost have all the hard work done. In a couple of weeks, I can start working on filling the seams on the nacelles. Once that is done, the only other hard part I can see is painting the Aztec. I still haven't decided yet if I want to just use the Aztec dummy patterns I have or make my own. I will decide that when I get to it.
 
Thanks Rocketrider for the link to the images. I can't see the top view however. Any way to get it?
 
Capt_Taggert: Send me a PM with your email address, and I will send you that top view.

Sorry no progress on this model, I have been working on my contest entry.
 
I got mine at a Lowes, which is similar to Home Depot in case you don't have one of those. It was in the paint section of all things. I couldn't find it, so I asked for aluminum tape and the clerk took me right to it. I think I paid $4 for the roll, and I haven't even dented it yet. It is basically used for duct work. But it works great for lighting.

I will get back to this build as soon as I am done with the Thunderchild........
 
Well here are the last two video updates. In the second one, you can see the different circuits in action:

Enterprise NX: Nacelle Recap part 1

Enterprise NX recap Nacelles part 2

And now the work I did on her today. Not a whole lot, but it is a start!!

Mainly I worked on seam filling. The Nacelles have the worst seams to fill. So I started with that, to just get it done.

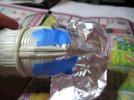
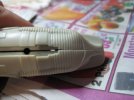
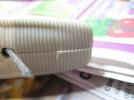
First to give you an idea of what I have to fill:

20101101_4.jpg
20101101_7.jpg
20101101_8.jpg


If any of you has any advice on how to fill the grooved seams I will be thankful. I am still trying to decide on how to approach that. It is really bad in a few places. Most of the builds of this model I have seen on the net completely ignore those seams.

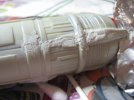
Here is a few photos of the seam work I have done, it is still rough, and needs to be sanded smooth.

20101101_9.jpg

In the next photo, I am filling a seam on a panel line. This model tried to use panel lines for seams as much as possible, reducing the amount of fill work a lot. The problem is I am lighting this thing, and this seam has to be filled. So once it sets, I will score the line if needed.

20101101_11.jpg
 
Nasty seamage there.
Wish I had advice to give other than fill and rescribe as needed
 
I don't know if they can be re-scribed, because they are rounded over. If it was just like a panel line, then it would be easy. I do have a few rounded over files, and may give that a try.
 
Fortunately, most of them do line up right, just bad fit, and in some places one side is elevated by almost 1/32 of an inch. (Or 0.7 mil for the metric crowd.)
 
I may just try to work through it with some putty, the other parts are coming out really well. I can only try, if it fails, sand paper will be my friend.
 
Grendels: I'm most impressed with your work, I just acquired this same model they appear to be somewhat rare so I jumped at the opportunity to get it. But I'm not about to share what it cost me at this moment it was a tad high once the UPS fees and duty was added :(

On to my post I would love to see how you have ventured since your last post and what pit falls I should watch for. Now I have a 60" computerized vinyl cutter and a possible image set of the paint panels but they seem to be basic and not as involved as what is on the show. Do you have any good sources for information on the paint patterns. Oh also the flasher circuit for the green/red lights only shows one led is that because you mad one for each light or did the led's in a parallel circuit there by only consuming the current of one led?

Regards
Rraven
 
I have done very little work on it. Right when I was about to pick up on it, I realized that my skill set was not quite what I needed to finish this up. So I have been building a few small cheap kits to improve my abilities. It has been working and when I am done with these builds I will be back at this one. Once I get back to this build, it should be ready for paint pretty fast. What I have left isn't much. And paint is where I stalled out.

I have almost finished up those seams by the way....

As for your other questions. I am using a wall wort to power this thing, so I am not worried about how many LED's are in use. Having said that, the 555 timer chip will handle many LED's in parallel so that is what I am going to do to run the nav. lights. This way all the lights flash at the same time.

If you go to page three of this thread, one of the members post links to the reference photos I am using. In addition to those I have three or four episodes on my DVR in hi def, so that I can check up on my timing, and when I get to it, the paint.

From what I read, they used four or five different colors to get the aztecing on the ship. I don't know if I am going to duplicate that yet. We will see.
 
Thanks for the info, as to the paint I have at work a pantone ColorMunki as well as an Eye One system for color sampling I'll see if I can't get some good accurate swatch pulls from some of the images we have floating around, I'll then translate them into paint chip codes and we may be able to have some of the more accurate paint schemes around :) I'LL also keep you posted on my progress on building up a good paint mask with my vinyl cutter if I get something I feel is easy to use I'll send you a set.
 
Accurate paint would be wonderful!! I do have vinyl paint mask already for her but I was thinking of making my own after taking a second look at the reference photos. I was going to use frisket film and cut them out by hand. There are literary five or six different shades of color on the ship, and it also looks like it was streaked on not painted. Thank you for the offer!!!
 

Latest posts

Back
Top