Tamiya 1/35 Ford GPA

Rimmer

Well-Known Member
Joined
Oct 3, 2024
Messages
202
Hi All,

Having just joined the forum I've been feeling bad about not posting up a build - I hate to be one of those people that comments, but never shares their work, however you'll have to bare with me as I currently have 4 projects on the go, all near completion. As soon as I start something new, I'll post it up.

I have over the past few months, been building Tamiya excellent little Ford GPA. For all intense and purposes it's finished, but I need to paint the driver and finish some bits and bobs for the interior - some of which is going to be new to me.

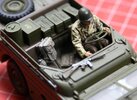
Here's where I am with the driver - only my third 1/35 figure painted. I've done the base colours and am in the process of adding a wash and some highlights. I have modified this figure to drop one arm as if reaching for the gear stick.

IMG-0325.jpg


I've used one of the new ICM paint sets - very nice paint - and followed their paint call outs - what do you think of the colours?

ICM03037.jpg


This, for those interested, this is where I am with the Ford. I want to add some rope to the front deck, and some more stores to the back seat, including something like a .30cal wrapped in a trap - although I've no idea how to do that yet. I'm also planning on adding the drivers pack to the front seat.

IMG-9946.jpg


Cheers!
 
something like a .30cal wrapped in a trap - although I've no idea how to do that yet.
Find a poorly detailed machine gun, cut a piece of aluminium foil to a size that seems right for what you have in mind, and wrap the gun in it. If it doesn't work out quite right, just take the foil off and try again, if necessary with a new bit of foil. Once you're happy with it, carefully fold it open a little, glue the gun inside with superglue and put the foil back the way it was.

The reason for using a poorly detailed gun is simply that all you need here is the shape. It would be a waste to use a well-detailed gun for this, if you ask me.

I do have a poorly moulded .30 as it happens. Foils a nice idea, I had thought about using tissue and PVA. I have plenty of potential wine bottle foils, all I need to do it open the bottle - I get drink the wine from the bottle too.

Thanks Jakko.
 
Thanks Mike, glad you like it.

I was building it for the D-day GB on the other forum. Overall I'm pretty pleased with how it's coming along, still new to the armour game.
 
Arnie,
looking good mate I made one a while back. It is a good idea with the foil around the MG.
 
Not done a huge amount of modelling over the past few weeks, largely due to some hefty work commitments for one of clients. I have however, managed to paint up and add the drivers pack to the passenger seat. I made the straps out of foil - not 100% perfect but not bad for a first attempt.

I've also painted up the Thompson SMG. It's not fixed to in this photo and I've got to make a sling for it, but it's just there for effect... or it would be if the bloody thing was in focus.

I've also primed up some more resin stowage to pack the back out a bit more.

bag.JPG


Cheers!
 
I finished this up Yesterday. A cracking little kit that was a lot of fun to build. Pretty much out of the box other than some additional Tamiya stowage from my spares box and some resin bits I picked up from ebay. The only others things I did were to re-position the drivers arm and add a sling to the Thompson and straps to the drivers pack from foil.

Paint was Humbrol's #155 OD spray and assorted other bits. The driver was painted using ICM's newish US Army paint set - really nice paint to work with. It's not the best bit of work ever, I'm still learning, but I was pretty pleased with it.

This is only my third bit of 1/35 Armour modelling so comments welcome.

IMG-9858.jpg


IMG-9860.jpg


IMG-9862.jpg


IMG-9863.jpg


IMG-9864.jpg


IMG-9869.jpg


IMG-9865.jpg


IMG-9866.jpg


IMG-9867.jpg


IMG-9868.jpg


Cheers!
Love the detail on the figure and the stowage items. Well done.
 
Back
Top