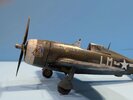
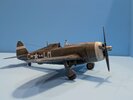
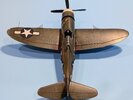
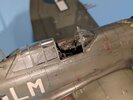
Tamiya's P47 Razorback completed- what do you think?

docsudy

Active Member
Joined
Feb 4, 2024
Messages
77
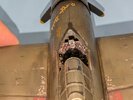
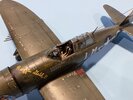
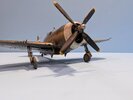
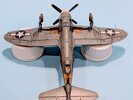
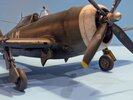
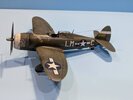
Fellow SMA's . Its been awhile but I been busy. I finally completed my late 1943 P47 Razorback. I used a variety of weathering techniques to attempt to achieve a battle worn warbird (after flying escort countless missions out of England). I am relatively happy how she came out. On previous posts I demonstrated steps in the build. Now the finale. What do you think. Comments and suggestions on this build or for future builds happily accepted.
Thanks for your interest
Doc SudyPXL_20241114_223408827~2-EDIT.jpg

PXL_20241114_222629628.PORTRAIT.ORIGINAL-EDIT.jpg

PXL_20241114_222727497.PORTRAIT.ORIGINAL.jpg

PXL_20241114_222906111.PORTRAIT.jpg

PXL_20241114_222951767.PORTRAIT.ORIGINAL-EDIT.jpg

PXL_20241114_223132603.jpg

PXL_20241114_223158822.jpg

PXL_20241114_223235510.jpg

PXL_20241114_223305892-EDIT.jpg

PXL_20241114_223545071.jpg
 
Very Nice !

one question about the stars on the wings ,
don't they always point forward ?
Maybe not , I have no idea , I just don't remember ever seeing them like that .
 
There are decals from warbird. They were designed for the p-47 razorback. So I presume that they're correct. They're the only way they could be laid down. Also the same way they were shown in their instructions. But thanks for noticing
 
I mean I have these particular decals are complete with the star roundelle and stripes together. So I laid down the decal exactly the way it was specified in the instructions , as well as the instructions by Tamiya. My research from images from 1943 and 44, which I could find also demonstrated that Tamiya's color replications where the decal should be were in sync with the real images.
Doc
 
Very Nice !

one question about the stars on the wings ,
don't they always point forward ?
Maybe not , I have no idea , I just don't remember ever seeing them like that .
Yes. Stars and bars will always point forward and/or up
 
Nice. She looks well worn. Just blame those upside down roundels on gremlins and you've got it covered.
 
Thank you so much. I worked hard on the weathering trying out some new techniques I have learned from other modelers. Thanks for comments. Really appreciate them.
Doc Sudy
 
The paint work is tremendous!! I love Jugs and this is a fine example!!
This is a well known aircraft...even Corgi did a diecast model of it!...you represented it well.


Yes, there are a few issues with the decals.
So, just for clarity:.
The "stars and bars" are indeed wrong way around.

The wing insignia may also be a bit too far forward. They should be closer to the aileron gap.

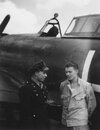
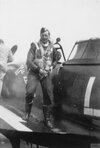
The Pilot info block is never way up there. It should be below the canopy line, just ahead of the pilot entry.
[see photo]

Same issue with the noseart name - it can't be read on top of the cowl.
Its basically for the benefit of those standing on the ground beside the aircraft, inline with the noseart pinup.
This name (Rozzie Geth" is quite long and does stretch onto the upper fuselage, but not by much. [see photo]

The side insignia (and 'C') are too high at the rear...the "horizon" line would be the vent doors.
And when they switched to Insignia type3B (the one with the surrounding blue stripe) they often moved up and rearward
with only a small portion of the bar on the vent door. (I don't have a photo of the aircraft that shows, so I can't be sure)

I can't tell, from the photo, if there is a wing walk strip (the black anti-slip stripe) because it's partly hidden by the invasion stripe.
But I do see the "No Step" warning block (which is missing from your model).
Its that red area that the pilot is avoiding stepping on.
media-377491.jpg42-26628-P-47D-Thunderbolt-or-42-75207-56FG62FS-LMC-Miss-Fire-artwork-of-nude-(L)-Rozzi-Geth-I...jpg
 
Last edited:
Thank you so much for your comments, they really appreciated. Obviously you're knowledge about the p-47 is impressive. Yes, I did need to move around some of the nose art in the front because I didn't quite have the room but didn't think anybody would notice. Obviously I was wrong on that end, LOL. I did unfortunately put the rondells upside down and didn't notice it or even know about it at the time. I've learned some good lessons from this model. I plan to do a version of the bubble top very soon and will do my best to be more accurate with placement of the markings. Concerning the no walk strip, on this model by Tamiya they only showed a small red block strip that I thought myself was significantly smaller than it might have actually been. I did however follow there design and then try to make it appear worn and weathered.
Thanks again for noticing and for your comments. It's great learning from people like yourself who are much more experienced than I am. As a lifelong learner I enjoy the game. !
Thanks again
Doc Sudy
 
Thanks so much. I've learned a lot from my fellow SMA colleagues. One has to try to balance between what looks good on a model and what's accurate. Honestly the rondells being turned upside down was something I never knew about till today and I've learned a good lesson. But once again thanks for your comments. I really appreciate them.
Doc Sudy
 
HI DOCSUDY yes you have a few probs on the model but you know for the next model an i think you have done very well on the wheathering looks very real well done sir as yes we all make mistakes but learn from them so keep on modelin sir
CHRISB
 
HI DOCSUDY yes you have a few probs on the model but you know for the next model an i think you have done very well on the wheathering looks very real well done sir as yes we all make mistakes but learn from them so keep on modelin sir
CHRISB
Hello Chris
Thank you for the kind words and good advice. I plan to keep learning and make better and better models.
All the best
Gary (Doc Sudy)
 
Fellow SMA's . Its been awhile but I been busy. I finally completed my late 1943 P47 Razorback. I used a variety of weathering techniques to attempt to achieve a battle worn warbird (after flying escort countless missions out of England). I am relatively happy how she came out. On previous posts I demonstrated steps in the build. Now the finale. What do you think. Comments and suggestions on this build or for future builds happily accepted.
Thanks for your interest
Doc SudyView attachment 129779

View attachment 129771

View attachment 129772

View attachment 129773

View attachment 129774

View attachment 129775

View attachment 129776

View attachment 129777

View attachment 129778

View attachment 129780
Love how you brought this kit to life!
 

Latest posts

Back
Top