Definitely

And there's a good deal more of that to come, it turns out … And, since it seems people like to be educated, I'll throw in some more Sherman details you never knew you might someday care about — or probably not

Because I want to build a tank with HVSS, I need to modify a few things on the glacis plate. The hull is pretty much 100% correct for an M4 with VVSS, but the ones with HVSS had slightly later details than the kit hull has: the bullet deflectors in front of the fixed periscopes were narrower on the late hulls, the lifting eyes were further outboard, and the top edge of the glacis plate was not bevelled. That last bit is to say: until then, the upper edge was cut so it was horizontal when the glacis plate was on the tank, but to simplify production, this was changed to just cutting it square, leaving an edge at the top of the plate. For an M4 (105 mm) VVSS tank, and also for
very early HVSS ones, you can leave these as the ABM hull provides them, but I had to modify all of this. Furthermore, ABM made a small mistake, which you can't really blame them for because hardly anybody realised this until fairly recently: they put the hinges for the barrel crutch centrally, when on the real tank they were offset to the left a little because the howitzer barrel is offset to the left in the turret as well.
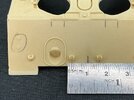
Here, I've circled the locating points for the lifting eye, which needs to be shifted outboard a little. I just sanded them away on both sides.
At the top, the two pairs of vertical lines show the parts of the bullet deflectors that must be cut and scraped away, to basically put them level with the rest of the top of the glacis plate, so that an edge can be put onto this. I made that edge from a piece of 1 mm square rod that I scraped to a triangular cross-section, and then glueing it to the hull with the flat I scraped on it facing down.
The vertical lines show at the bottom shows the centreline of the barrel, and therefore, where that ofd the gun crutch needs to be as well. As you can see from the ruler, the hinges are not in the right places. (Determining where that line had to go required a bit of improvisation, BTW. I put the hull onto a piece of lined paper, put the turret with mantlet and gun on that and made sure it was pointing dead forward, then put a machinist's square on one of the lines on the paper and moved the hull so the barrel was touching it and the hull was parallel to the lines on the paper.) Then I added a pencil line above the hinges and sawed them off with one of those razorblade saws that makes a very thin cut. After that, I could file away the remains and determine where to glue the hinges by putting an Asuka gun crutch against the hull on the correct centreline.
All in all, you end up with something like this:
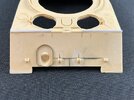
As you can see in the picture, I also replaced the ring around the bow machine gun by one in plastic from an Asuka kit that I had in my spares box. This was for the simple reason that the Asuka part is better, since it has little studs that represent where the canvas cover foer the machine gun attaches (as that's what this thing is for).
The white strips at the top still need to be filed and puttied to hopefully blend seamlessly into the glacis plate.
And then a quick couple of things for the engine deck:
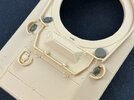
I added filler caps and a ventilator cover from my spares box, again all Asuka parts. You get both in the ABM hull kit, but you have to saw the filler caps from a resin sprue, which is more effort than just taking them from a spares box — I've got literally a couple dozen of them from various makers' M3 and M4 medium tank kits, all left over because they give you more caps than the model actually needs.
The ventilator cover is because the ABM set provides one with bolts equally spaced around the outside, but that's only correct for a very specific production run of Shermans. The vast majority had a cover like the one here, with unevenly spaced bolts. The reason is that this way, all of the bolts screw into the flat plate that the cover sits on; with equal spacing, two of them would screw into the sloping plate that forms the sponson roof, meaning the bolts would have to be longer and anyone removing them would need to take care to get the right bolt in the right place.
Also, since I've been going on about gun crutches, here's some more background on them

Initial Shermans didn't have one at all, but it was recognised that one would be useful, so later Shermans got one from the factory and many existing tanks had one retrofitted. But it's not quite as simple a subject as it seems to be:
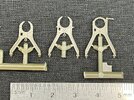
As you can see, there were three types. On the left is the one for tanks with 75 mm guns, in the middle is a taller type that was used with 76 mm tanks and also those armed with 105 mm howitzers (like my model). The one on the right is the same height, but is a post-war type. The wartime ones have two claws which are opened by pulling on the ring on the underside, while the post-war one has a hinged latch that goes over the barrel, and is secured by a handle on the other side.
Now, where do you get all this kind of knowledge in the first place? Basically: reading things by people who know more about this than you do

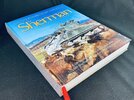
That's my primary source for details for this model:
Son of Sherman second edition, book 2 (it's part of a two-book set — yes, two books this thick …). This is a rather expensive work, though, and not something I would recommend tracking down unless you're
really serious about Sherman details

The next best thing is
the Sherman Minutia Website, which has the great added benefit of being entirely free.
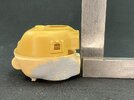
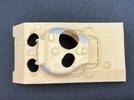
 For today, though, the main education here is that there is something fundamentally wrong with the turret I have … The shell is around 2 to 2.5 mm longer front-to-back than side-to-side, which means it's pretty much impossible to fit and look even reasonably correct
  From above, Sherman turrets are basically round with a bustle at the back, but this one is oval. Not enough that you'll see it with the naked eye, but it's obvious if you get out the calipers. It's odd because the separate turret ring does seem to be (almost) circular, but that does fit properly in the turret shell! I'm going to have to have some serious thoughts about how to fix this, and I'm not seeing how just yet.
