A-Wing newb build
- Thread starter fubar
- Start date
You've done excellent progress since my last visiting this topic, very well done, bud! 
On the paint "pooling" - I'd agree with merseajohn, try making the paint a bit less thinned. It is often spoken about the consistency of a milk. As I understand it, the paint must be just thin enough to leave a slight trace on the walls of the bottle when You are shaking it. But to tell the truth, when I get a "fresh" paint if it is tamiya I often don't thin it at all - it is already good for an airbrush for my taste. Try to spray a couple of drops of unthinned paint - You might enjoy it this way as well.
On the paint "pooling" - I'd agree with merseajohn, try making the paint a bit less thinned. It is often spoken about the consistency of a milk. As I understand it, the paint must be just thin enough to leave a slight trace on the walls of the bottle when You are shaking it. But to tell the truth, when I get a "fresh" paint if it is tamiya I often don't thin it at all - it is already good for an airbrush for my taste. Try to spray a couple of drops of unthinned paint - You might enjoy it this way as well.
fubar
New Member
- Joined
- Nov 10, 2011
- Messages
- 502
Thanks guys it's nice to see things moving on, i've no idea if i'm working too fast or too slow on this project but the main thing is i'm having fun. ;D
Next thing on my ever expanding shopping list is some proper mixing jars for mixing and keeping paint in, i had to eat a whole jar of jam just to get something i could mix paint in!!
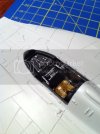
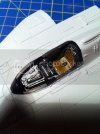
Been working on the cockpit and pilot tonight, so that i can then get it all sealed up ready for airbrushing a white primer layer over the whole body of the ship.
I'm quite happy with the results considering painting is definitely my weak spot. I even gave the pilots seat a worn leather look despite the fact that when the pilot is seated he will hide nearly all of it.....still i know its there. lol
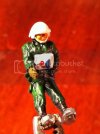
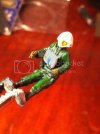
My little scratch built pilot, or as Igard said 'Porkins little bro', came out better than i had thought he would. I'm torn between making his headgear the same colour as the pilots in ROTJ or leaving it white as he stands out better in the cockpit.
This means that i get to set up the fibre optics in the cockpit panel next prior to sealing up the two halfs of hull. If you have any thoughts on how i can improve my painting feel free to say, i'm all ears and willing to learn.
Midnight modeller signing off.
TTFN Matt
Next thing on my ever expanding shopping list is some proper mixing jars for mixing and keeping paint in, i had to eat a whole jar of jam just to get something i could mix paint in!!
Been working on the cockpit and pilot tonight, so that i can then get it all sealed up ready for airbrushing a white primer layer over the whole body of the ship.
I'm quite happy with the results considering painting is definitely my weak spot. I even gave the pilots seat a worn leather look despite the fact that when the pilot is seated he will hide nearly all of it.....still i know its there. lol


My little scratch built pilot, or as Igard said 'Porkins little bro', came out better than i had thought he would. I'm torn between making his headgear the same colour as the pilots in ROTJ or leaving it white as he stands out better in the cockpit.


This means that i get to set up the fibre optics in the cockpit panel next prior to sealing up the two halfs of hull. If you have any thoughts on how i can improve my painting feel free to say, i'm all ears and willing to learn.
Midnight modeller signing off.
TTFN Matt
JohnSimmons
For Spud: I was once Merseajohn
- Joined
- Jan 4, 2011
- Messages
- 5,645
As Q said cockpits looking real nice mate. I may have gone with a darker helmet but that's just personal preference. The seat looks great! Regarding paint pots I have collected over the years loads of mini jam jars (the tiptree jam jars you can get from cafe's and hotels etc). There great because they have a rubber seal in them so the paint won't dry up.
fubar
New Member
- Joined
- Nov 10, 2011
- Messages
- 502
JohnSimmons
For Spud: I was once Merseajohn
- Joined
- Jan 4, 2011
- Messages
- 5,645
Good lighting, good paintwork, good model, good music!
fubar
New Member
- Joined
- Nov 10, 2011
- Messages
- 502
Well i've got most of the build finished today, except for deciding what to do about the hopeless fitting for the laser cannons, you can start to see the shape of her now. ;D
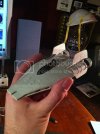
I tested the lighting rig out and it worked better than expected, i had to fix some light leak in the engines but a quick coat of squadron green fixed that right up.
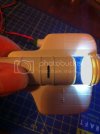
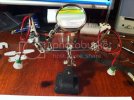
This has left me with a small problem to work out.
If i'm to fit the engines properly i need to fit the two halfs of the hull together first, but of course once i do that i cant get inside to wire up the engines to the rest of the wiring loom! ???
Also i cant decide if it would be easier to paint the enigines fitted to the ship or free of the ship?
Which of course leads me back to the problem of wiring up the engines if the hull is already assembled. :
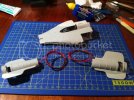
Next model i light i will fit conectors on the LED fly leads and make up a small PCB to just plug them onto for ease of final build.
Oh well my modelling holiday comes to an end, back to work tomorrow. It's been nice just having plenty of time this week to spend working on this but i expect i'll slow up now with Xmas and work. :-\
Have a good weekend....whats left of it.
TTFN Matt

I tested the lighting rig out and it worked better than expected, i had to fix some light leak in the engines but a quick coat of squadron green fixed that right up.


This has left me with a small problem to work out.
If i'm to fit the engines properly i need to fit the two halfs of the hull together first, but of course once i do that i cant get inside to wire up the engines to the rest of the wiring loom! ???
Also i cant decide if it would be easier to paint the enigines fitted to the ship or free of the ship?
Which of course leads me back to the problem of wiring up the engines if the hull is already assembled. :

Next model i light i will fit conectors on the LED fly leads and make up a small PCB to just plug them onto for ease of final build.
Oh well my modelling holiday comes to an end, back to work tomorrow. It's been nice just having plenty of time this week to spend working on this but i expect i'll slow up now with Xmas and work. :-\
Have a good weekend....whats left of it.
TTFN Matt
Hey, and You were afraid of your painting skills!
In my opinion the seat looks FASCINATING! You've really dig those old leather look, thumbs up!
And I think its pointless to speak about the lighting.Simply brilliant!
Man, You've really dived into modeling with head. Wish only I had suck excellent results with my first models..
In my opinion the seat looks FASCINATING! You've really dig those old leather look, thumbs up!
And I think its pointless to speak about the lighting.Simply brilliant!
Man, You've really dived into modeling with head. Wish only I had suck excellent results with my first models..
Jamaicanmodels69
New Member
- Joined
- Apr 17, 2011
- Messages
- 604
WOw your really working hard on this and
its looking great!
its looking great!
blakeh1
Well-Known Member
- Joined
- Oct 26, 2011
- Messages
- 1,166
fubar said:This has left me with a small problem to work out.
If i'm to fit the engines properly i need to fit the two halfs of the hull together first, but of course once i do that i cant get inside to wire up the engines to the rest of the wiring loom! ???
Also i cant decide if it would be easier to paint the enigines fitted to the ship or free of the ship?
Which of course leads me back to the problem of wiring up the engines if the hull is already assembled. :
I put the hull together and left the engines and back wall of the ship as separate asemblies so I could slide the whole thing off to change batteries (I used a flat round 3 volt watch style battery) That way the whole thing is self contained with no wires hanging out to connect to a base. The problem though is room to stuff the wires in while leaving them long enough to allow separation of the engines and back wall from the main hull. I had to use 30 gauge wire
At the very least. I found painting the engines much easier disconnected from the hull since the tubes are mainly red
fubar
New Member
- Joined
- Nov 10, 2011
- Messages
- 502
Thanks for the encouragement guys. ;D
It very nearly all went very badly wrong tonight though, i wired up the fibre optics into the cockpit, tested them one final time and then glued them in using super glue........BAD MOVE THAT MAN. lol
I noticed a funny smell and with luck spotted that the super glue wasn't just setting but was doing its very best to melt a hole straight through the model....just like an Aliens blood.
I managed to get the electronics off and remove the glue using cutters, unfortunatly i lost all my LED's and fibre optics and ruined a nice pair of side cutters but...............i did save the upper hull. ;D
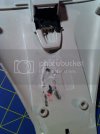
What a newb......still i wont make that mistake again. lol
On a lighter note look what i found.....
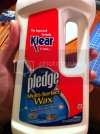
....please tell me it's the right stuff!
TTFN Matt
It very nearly all went very badly wrong tonight though, i wired up the fibre optics into the cockpit, tested them one final time and then glued them in using super glue........BAD MOVE THAT MAN. lol
I noticed a funny smell and with luck spotted that the super glue wasn't just setting but was doing its very best to melt a hole straight through the model....just like an Aliens blood.
I managed to get the electronics off and remove the glue using cutters, unfortunatly i lost all my LED's and fibre optics and ruined a nice pair of side cutters but...............i did save the upper hull. ;D

What a newb......still i wont make that mistake again. lol
On a lighter note look what i found.....

....please tell me it's the right stuff!
TTFN Matt
Jamaicanmodels69
New Member
- Joined
- Apr 17, 2011
- Messages
- 604
I have never seen super glue do that,
did you use a kicker with it or
something?
did you use a kicker with it or
something?
Could You please take a photo of the glue tube, maybe it is not CA we are talking about ? 'cause the melting effect from the pic is common to themodel glue for plastic, yes, but it is first time I hear anything like this about cyacrine ...
fubar
New Member
- Joined
- Nov 10, 2011
- Messages
- 502
Here's the CA i used.....
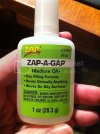
...think it needs a name change to 'melt a hole'. lol
The glue was used between the model, the heatshrink over the LED's and a little of the wire (which i believe is PVC and not PTFE which is what i wanted to buy). If a kicker is activator then no i didn't use a kicker just the glue on it's own.
TTFN Matt
Well, I'm using pretty much same glue, except it is called Medium CA (no +) and has a yellow lable instead the green one. Maybe a special formula to be used with oily surfaces (mine doesn't have that option) which after getting through the oily layer tries to get through the plastic layer as well? ;D
Anyway, good You've noticed the problem before it was not to late!
Anyway, good You've noticed the problem before it was not to late!
