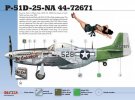
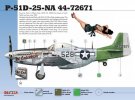
Dragon 1/32 P-51

Yea I think you are right Carsenault. I'm going to go with the gloss black. Those are some great photos, and yea, turns out the photo I was looking at was a restored engine.

Promising results from the Mr. Surfacer.

Here is a shot after brushing it on

IMG_20110705_082729.jpg


After sanding with some Tamiya 800 and 1200

IMG_20110705_090139.jpg


And after a quick spray with some Tamiya primer

IMG_20110705_090949.jpg


As you can tell, this definately muted the rivet detail. I think this technique and a combination of two coats of Tamiya primer, and a coat of the Alclad primer will take these down to near perfect scale.
 
Re: Dragon 1/32 P-51 -- OOB

ENGINE WORK

28 Parts comprise this nice OOB engine.

IMG_20110704_163938.jpg


IMG_20110704_175703.jpg


IMG_20110704_175709.jpg


IMG_20110704_181922.jpg


IMG_20110704_181938.jpg


Primed it with some leftover NATO Black. Turns out this is a pretty good base color when you factor in ageing and scale.

IMG_20110705_103809-1.jpg


IMG_20110705_103851.jpg
 
Love that Big Engine..... Grrrrr !

28 parts... Feeww !

and great save on those rivets... the Mr Surfacer, and primer does make them look a lot less pronounced !

this will be good !!!


take care buddy !
 
Carsenault said:
The rivet argument has been going on for years, I am sure no 2 planes were alike. General concensus is the rivets are there on the full sized Mustangs, but are flush with the outer skin, the fasteners whick look like large flat head sloted screws are more visible. The wings were pre finished at the factory to have as many seams, gaps and rivets puttied over, then painted silver to aid in the airflow over the wing while the fuselage was nornally untouched. Some ground crews would wax and polish the aircraft to help with the airflow and overall top speed. We cant really look at a restored aircraft to be a definitive reference as many times, the aircraft are stripped to the bare metal or fabric and repainted, sometimes not even using the correct colors. Rarely are panel lines and rivets refilled during a restoration. On a 1/32 Warbird, there should be some detail but Dragon has over done it, and looking at the Tamiya kit, it looks like they were a little heavy handed too. Hopefully the pictures I have seen are of test shots and not sprues from the actual production run.

Here is one of Bud Anderson's Mustangs, quite visible are the fasteners used to hold the engine access panels in place. Barely visible are a few rows of rivets.
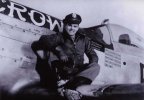
WEB11081-2008_640.jpg

Here is Bud sitting in a restorede P-51D, again, rivets are there but barely visibnle on the fuselage.

0810019_5.jpg


and just posting this coz its one of my fovorite period Mustang pictures... And it isnt colorized, it was originally photgraphed with color film. Note the 2 lead aircraft are featured as markings options with the standard Tamiya 1/48 8th AF P-51D Mustang kit.
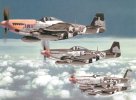
air_mustang27.jpg

And here is an example of a really bad restoation of the second Mustang in the above picture, they somehow thought (probably based on a b/w photo) that they should use a glossy medium blue instead of a mat olive drab???, there are many other examples liek this, niot just of mustangs, but other a/c as well.

p51d_01.jpg

Clarence Anderson is one of my idols.
 
Nice update, Myke especially with the engine most of the parts are really small how long did you assembled it? and how did you remove it from the sprue tree with losing the tiny parts? I'm quite worried with the raptor lots of small parts. Thanks!!!

cheers!!!
 
Nice work. Wow, 28 parts for the engine alone. I've built a few 1/72 scale models that didnt have that many parts total.
 
Engine's looking good.
This should be one very sharp build when you get her done
 
Great job on the engine!
I'll have to build an engine like that for a P-51D in the near future ::)

Rivets are shaping up as well, brilliant fix!
 
Re: Dragon 1/32 P-51 -- OOB

Myke said:
ENGINE WORK

28 Parts comprise this nice OOB engine.

IMG_20110704_163938.jpg


IMG_20110704_175703.jpg


IMG_20110704_175709.jpg


IMG_20110704_181922.jpg


IMG_20110704_181938.jpg


Primed it with some leftover NATO Black. Turns out this is a pretty good base color when you factor in ageing and scale.

IMG_20110705_103809-1.jpg


IMG_20110705_103851.jpg

ooh god i want this kit so.. bad.... is this detail straight out of the box?
 
Eastrock said:
Nice update, Myke especially with the engine most of the parts are really small how long did you assembled it? and how did you remove it from the sprue tree with losing the tiny parts? I'm quite worried with the raptor lots of small parts. Thanks!!!
cheers!!!

It took me about two hours to cut them off, clean them up, and glue them all together. It went together quite easily too.
I removed them with sprue cutters and cleaned them up with a knife and file. I usually clip the part away from the sprue a little so i can grab the part while i snip it off. Gets tough with my stubby fingers though.
 
Re: Dragon 1/32 P-51 -- OOB

13aceofspades13 said:
ooh god i want this kit so.. bad.... is this detail straight out of the box?

straight out of the box! ;)
 
does anyone know where i can just get the engine, i would be happy to have that engine man!

Rolls Royce Packard Merlin V-1650-7

1,490HP at takeoff

1,695HP Military Power

1,720HP War Emergency Power!
 
That would be sweet to have. Never seen one on the market though.
Build up a sweet 1/20 Scale engine or something. Awesome


So I was looking at the shots of the Tamiya version and I can say with most certainty that if this is what is coming out, then the surface detail is WAY better than the Dragon kit I'm building.

http://www.luckymodel.com/scale.aspx?item_no=TA%2060322
 
Just a correction on my part. I mis identified the engines of the early Mustang variabnts as a Griffin, I believe thats actually a later engine variant. The early Mustangs were powered by an Allison engine.
 
Engine inspiration!

Really cool decals by the way - not my cup of tea, as I prefer the "grunt" looking ones. :D

The Tamiya P-51D is a real beauty.
 

Latest posts

Back
Top