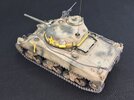
M4 (105 mm) HVSS on Okinawa

Jakko

Well-Known Member
Joined
Oct 9, 2024
Messages
165
After I finish building the Piranha what-if I'm currently working on, which should hopefully not be too much longer, I intend to start on what will be a fairly major kitbash-conversion. There are plenty of Sherman kits you can buy, but oddly, it's difficult to get a late-model M4 ("A0") unless you're happy to settle for a Dragon kit, which I'm not really :) I much prefer Asuka Shermans, but they only do M4 Composites ("M4 Hybrid" to the British), which have a cast hull front with the rest of the hull welded, not a late-model M4 hull that's all-welded. I guess this is because there were really only two variants of the Sherman that were built like that: with a 105 mm howitzer and VVS suspension, and the same with HVSS — it was never produced with a 75 or 76 mm gun. Asuka has only just released an M4A3 with 105 mm howitzer, so the explanation is probably that they simply didn't have the parts for this model of M4.

However, last year I bought a box full of somebody's Sherman spare parts, which appear to have been mainly intended for building an M4 (105 mm) VVSS using a Tamiya Sherman as the basis. I decided to make use of them but with Asuka parts instead, given that they're so much better than the old Tamiya parts. A few months ago, I ordered some spares straight from Asuka in Japan to build this model:
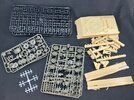
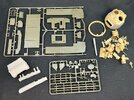
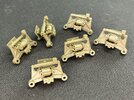
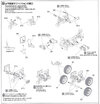
IMG_1782.jpegIMG_1783.jpeg

In the first photo is a full set of Asuka HVSS including T66 tracks, as well as a resin M4 hull and all (I hope :) ) of its detail parts from Armoured Brigade Models, like I said intended for the Tamiya kit. The second photo has an Asuka M4 Composite lower hull and a sprue with more HVSS parts, plus a resin 105 mm turret also from Armoured Brigade Models, complete with interior that I'm not sure yet I'll use, and a final drive housing from Formations (though I may instead use an Asuka round-nose one instead, modified to be sharp-nosed — again, not sure yet). All of the resin parts came from the Sherman spares I bought, and the previous owner had already started on the turret, as you can see. It will probably take more parts from my Sherman spares box to build this, but I think that's up to the challenge:
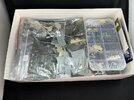
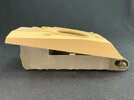
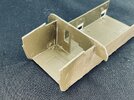
IMG_1785.jpeg

:)

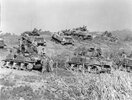
It's going to be a US Army tank on Okinawa in 1945, like the ones in the background in this photo:
IMG_1784.jpeg

The tanks at the front are M4 Composites (with 75 mm guns and VVSS, because all Composites were like that), the one at far right in the background is a large-hatch M4 (75 mm) VVSS, and all the others on the ridge line at the back are M4 (105 mm) HVSS tanks, all with T66 tracks except the tank to the right of No. 6, which has T80 tracks. Most have the remains of deep-wading gear on the hull rear, but I'm not going to add that, because I kind of want to show the hull rear too. I will add sandbags on the engine deck, though, because it will make the model more interesting.
 
After I finish building the Piranha what-if I'm currently working on, which should hopefully not be too much longer, I intend to start on what will be a fairly major kitbash-conversion. There are plenty of Sherman kits you can buy, but oddly, it's difficult to get a late-model M4 ("A0") unless you're happy to settle for a Dragon kit, which I'm not really :) I much prefer Asuka Shermans, but they only do M4 Composites ("M4 Hybrid" to the British), which have a cast hull front with the rest of the hull welded, not a late-model M4 hull that's all-welded. I guess this is because there were really only two variants of the Sherman that were built like that: with a 105 mm howitzer and VVS suspension, and the same with HVSS — it was never produced with a 75 or 76 mm gun. Asuka has only just released an M4A3 with 105 mm howitzer, so the explanation is probably that they simply didn't have the parts for this model of M4.

However, last year I bought a box full of somebody's Sherman spare parts, which appear to have been mainly intended for building an M4 (105 mm) VVSS using a Tamiya Sherman as the basis. I decided to make use of them but with Asuka parts instead, given that they're so much better than the old Tamiya parts. A few months ago, I ordered some spares straight from Asuka in Japan to build this model:

View attachment 128029View attachment 128030

In the first photo is a full set of Asuka HVSS including T66 tracks, as well as a resin M4 hull and all (I hope :) ) of its detail parts from Armoured Brigade Models, like I said intended for the Tamiya kit. The second photo has an Asuka M4 Composite lower hull and a sprue with more HVSS parts, plus a resin 105 mm turret also from Armoured Brigade Models, complete with interior that I'm not sure yet I'll use, and a final drive housing from Formations (though I may instead use an Asuka round-nose one instead, modified to be sharp-nosed — again, not sure yet). All of the resin parts came from the Sherman spares I bought, and the previous owner had already started on the turret, as you can see. It will probably take more parts from my Sherman spares box to build this, but I think that's up to the challenge:

View attachment 128032

:)

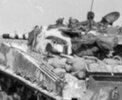
It's going to be a US Army tank on Okinawa in 1945, like the ones in the background in this photo:

View attachment 128031

The tanks at the front are M4 Composites (with 75 mm guns and VVSS, because all Composites were like that), the one at far right in the background is a large-hatch M4 (75 mm) VVSS, and all the others on the ridge line at the back are M4 (105 mm) HVSS tanks, all with T66 tracks except the tank to the right of No. 6, which has T80 tracks. Most have the remains of deep-wading gear on the hull rear, but I'm not going to add that, because I kind of want to show the hull rear too. I will add sandbags on the engine deck, though, because it will make the model more interesting.
Why am I not surprised reading this post full of detail , a seat please Jakko and near the front.;)
 
Is it just me or does that one in the middle of the front rank have some kind of camo painted over the turret and gun barrel?

I'll pull up a chair too - sounds like a fascinating build.
 
Front rank meaning nearest the camera, or from the tanks' perspective, so in the back of the photo?

I take it you mean the one with No. 6 on the back of the deep-wading gear. That has mud camouflage over the turret, as well as over the star on the hull side. The tanks at the front of the photo have dark paint over the stars. I just noticed they also have grousers attached to their tracks, which you don't see a lot in photos.

That's the one - the one with the 6 in the middle of the front line of tanks from their perspective. Mud camouflage - LOL Is that paint to look like mud, or actual mud mud? :D

An interesting photo actually - there really is a lot of variation between those tanks.
 
Mud camouflage is mud (usually home-made by mixing water with local dirt) smeared over the vehicle :) If you remember my last M4, I painted it in mud camouflage also:

IMG_1035.jpeg

The idea here is to show a tank that had had mud applied pretty much all over it, except for the markings on the turret, but a lot of it has worn away where the crew walk and where general wear has flaked or washed it off.
 
Hi Jakko

I think Rimmer (Tell me if I am wrong) is referring to the white paint on the turret and barrel. It is certainly not mud as the shade is different to the star which is covered in mud. Certainly an odd choice for camo colour. Maybe a photo distortion??
IMG_1784.jpeg
 
Soon after I actually started on this model yesterday, I discovered my choice of parts could have been better. I had bought an M4 Composite lower hull, largely because it's correct for the M4 (105 mm) too, but would have been better off with an M4A3 HVSS hull. It would have been much easier to convert the lower rear plate to that of an M4 than the work I ended up having to do on the hull sides :(

For starters, I had to file five chamfered areas into the bottom edge, which are there on the real tank so the hubs of the inner wheels won't bump into the hull when they get pushed all the way up. I measured them in Asuka instructions for an HVSS Sherman kit and converted the measurements to the hull sides parts, which was straightforward enough to do. Some filing and scraping later, I had the chamfered edges alright.

Once that was done, I discovered the real problem: the HVSS bogies don't mount to the hull in the same way as the VVSS ones that the kit parts are intended for. Basically, there are three mounting plates with bolt heads moulded to each hull side, but for the HVSS bogies, the whole side needs to be flat. As I was working on this at a model show, I didn't have all my normal tools at hand, which made this rather more difficult than I had expected. I started by filing one of the mounting plates down, but that was a ton of work that I didn't care to repeat, so for the next one, I cut through the hull from the inside (there's a recess slightly smaller than the mounting plate there) and then filed down the bits remaining on the outside. This was also a lot of work, but less strenuous than filing the whole thing down even if it took about as long, so I also did the third that way. After that one, though, I had had enough for the day and moved on to building the bogies :)

Today, back home and with all of my tools available, I decided to tackle the fourth by sawing through it with the saw held flat against the hull side. This kind of slices off the mounting plate, after which I filed down the remains again, which altogether was less work than either of the other two methods, so I also used it for the other two. I then sanded the hull sides to get rid of the worst of the file marks. In all of this, the bolt heads at the front edge of the hull sides also got obliterated, but hey, those are easy to replace later.

The moral of this story is to put more thought into things before buying :) A fellow modeller at the model show suggested it would be simpler to replace the whole hull sides with plastic card, and I agree with him — had I done that before starting to remove the mounting plates, that is. By the time he put forward this thought, I was already so far in that I estimated it would be about as much work as finishing what I already had. Now that I've finished, I still think that was pretty accurate.

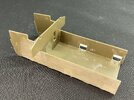
IMG_1818.jpeg

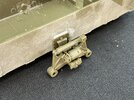
Once I had built a bogie, I then discovered that the two holes that were now in the hull side, are higher than the bogies' mounting plates … So, I glued a bit of plastic strip into the hole, as you can see in the photo above. With a bogie against the hull, it looks like this:

IMG_1820.jpeg

Measuring an Asuka M4A3 HVSS model I had already built, it does turn out that the bogies are at the correct height this way. I was afraid that they would be too low because the hull is the wrong type, but luckily, they aren't.

And all of the bogies:

IMG_1819.jpeg

I will add here, for those building Asuka HVSS Shermans, that the best way to build them is not per the instructions:

IMG_1821.jpeg

These tell you to first fit the shock absorber B14 to the roadwheel arms B13, but it's much better to build the bracket B2/B3/B12 first, then fit arms B13 (with B15) without glue and secure them in place with B10. After that, you can slip the springs B6 between them and only then add the shock absorber without needing three or four hands to keep everything together.
 
Last edited:
As expected, the resin hull doesn't fit the plastic one:

IMG_1823.jpeg

That, of course, is simply because the resin is much thicker than the plastic of the hull that's supposed to fit there. In the end I had to prune the lower hull quite a bit before things fit like they should:

IMG_1828.jpeg

About a millimetre from the sides of the firewall, which drops the upper hull a lot because it rests on the very edges, and about 2 to 2.5 mm from all the top edges, as well as rounding off some of the corners.

For the nose, my first plan was to use the Formations one you can see at lower left of the second photo at the start of this thread, but that's meant for Tamiya or Italeri, and though it will fit the Asuka hull, I would need to remove the teardrop-shaped plates on the sides and glue supports in the hull top keep it in place. Plan B was to take a rounded nose from Asuka, of which you get one in every kit of an early Sherman that also includes a three-piece nose, so you quickly have one or more of them as spares. On the Internet, I found a cross-section drawing of the "sharp" nose, which made for an obvious a solution: trace over that on my computer, print it out at 1:35 scale, paste it to thin card, cut it out, and you've got a template for shaping the nose with putty etc.

That proved to be easier said than done :( The round nose appears to be more bulbous on the underside than the sharp one, and no matter how much I filed it down, I couldn't get it down far enough to put the template in the right position. I don't understand why, but it just didn't want to work, and I soon had taken so much off the underside that it would need a lot more work to make the underside presentable again. (It would have been better to just trim the template to fit the underside of the rounded nose, but you only realise that once you discover it's too late for that.)

Time for plan C:

IMG_1824.jpeg

A sharp nose from Dragon, side plates from Asuka and a strip with bolts of unknown origin but certainly not the one that should go with this nose. The Dragon nose is a millimetre too narrow for the lower hull, but because the Asuka plates have chamfered inner edges while the Dragon nose doesn't, I could glue them to it and have everything end up at the correct width — leaving a big gap between the green and the grey plastic:

IMG_1825.jpeg

Then I filled the gaps and once that had dried, sanded away some of the texture to tone it down a little because it's a bit overdone, but left some of it still. I also applied texture with some thinned putty and a stiff brush to the filled areas:

IMG_1827.jpeg
 
Last edited:
IMG_1829.jpeg

On the nose, I added the pens for the tow cables, the steps for the crew and the housings for the drive sprocket axles. The pins are just a length of plastic rod cut and filed so it fits between the lugs, with the ends made from a punched disc and a bit of square rod.

The hull sides now have the bolts again that got obliterated by all the filing, made with a hex punch and die set from RP Toolz — one of those tools that makes you wonder how you did without, once you're used to having it :)

At the back, I put on the rear hull plate and the idler wheel mounts. I've not yet decided if I want to build it with or without deep-wading gear, so I didn't add an engine door yet because that would be wasted effort if I do decide to go for the wading gear.
 

Latest posts

Back
Top