Meng M3A3 Bradly

Edbert

Well-Known Member
Joined
May 16, 2024
Messages
292
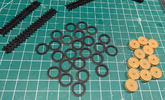
On one hand, 48 parts to build road wheels, as in not the drive the idler, or the rollers; it feels like extreme or punishment.

Until you realize, this is the PERFECT solution to painting the rubber portions!
1723501621560.png

1723504735502.png
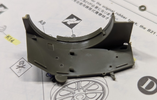
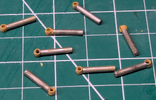
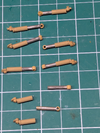
These are the internal pistons of shock absorbers, or dampers. The outer part shipped as brass tubes that fit perfectly.

1723504844601.png

So far so good, very impressed.
 
Last edited:
On one hand, 48 parts to build road wheels, as in not the drive the idler, or the rollers; it feels like extreme or punishment.

Until you realize, this is the PERFECT solution to painting the rubber portions!
View attachment 121902

View attachment 121904
These are the internal pistons of shock absorbers, or dampers. The outer part shipped as brass tubes that fit perfectly.
View attachment 121905

So far so good, very impressed.
Just love meng armour, it fits nicely and usually very little flash. Pantherman
 
Meng has some very nice quality kits. I picked up their 1/48 F-18 and it is impressive. The weapons loadouts are all poly-capped pressure fit so you can easily change up the loadout. And the details are great and also has very nice detailed pilots as well

Also picked up the 1/72 ornithopter and the rotors are all poseable as well as having landing gear you can swap out for in flight vs landed

Great engineering with various configuration options that are easily swapped out
 
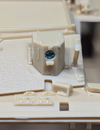
This pic is from a different kit than the above shots. But these are the thingies, they protrude to the inside hidden portions. I was leaving them be, but some of them had to be snipped to fit some parts together.

1723563294633.png
 
Last edited:
This pic is from a different kit than the above shots. But these are the thingies, they protrude to the inside hidden portions. I was leaving them be but they had to be snipped to fit some parts together.

View attachment 121943
Maybe, I have seen things like that on the Bandai Millennium Falcon I am building, and it turns out they were actually spacers for the part that went over it, but hard to tell here. I'd try dry fitting the parts and see if it allows things to mate properly and if not then nip them

I know Bandai instructions usually show a pair of scissors/razor blade or scissors/razor blade with a line through it on things like that showing what needs to be cut off or not

of course if there is no other part that mates to or goes over this one, then I would definitely snip them off
Me too, I was not nipping those off but when dry fitting some parts they had to come off. Others, like the ones shown above, will stay.
 
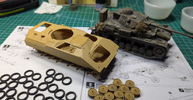
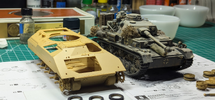
So it is an interesting thing to see the size of a modern AFV compared to an old MBT.

The Pz4 is something I made in the late '80s, covered with real dust not pigments, just put there for size reference.

1723590906402.png

1723590939764.png

I'm noticing that my 1/48 F-4B is much larger than even the twin engine (yeah yeah, I know the Phantom-II is twin engine too) P-38/Me401 at the same scale.
 
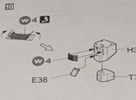
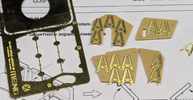
I'm looking for advice here. There's a small bit of clear in the little hole of the "Driver's Vision Enhancer", I have put some liquid mask in there for painting, will remove it to expose the clear bit. But I'm facing a problem. There's a small screen of PE that is supposed to go around it. Easy enough to install for paint but then getting the liquid mask out will be pretty much impossible.

1723663908704.png

1723663984489.png
E38 is not installed, W4 is the part in question. Obviously I could paint it loose and install after removing the mask, but I'm worried about scratching the paint off the brass as well as getting the glue to work on painted surface.


What would you do here?
 
I'm looking for advice here. There's a small bit of clear in the little hole of the "Driver's Vision Enhancer", I have put some liquid mask in there for painting, will remove it to expose the clear bit. But I'm facing a problem. There's a small screen of PE that is supposed to go around it. Easy enough to install for paint but then getting the liquid mask out will be pretty much impossible.

View attachment 121997

View attachment 122005
E38 is not installed, W4 is the part in question. Obviously I could paint it loose and install after removing the mask, but I'm worried about scratching the paint off the brass as well as getting the glue to work on painted surface.


What would you do here?
I would keep the mask on the clear, dry fit, prime and paint the PE when you do the main area. To fit I would remove the mask, scratch the paint on the main part back with the tip of a knife. Tiny drop of CA on the scratch each side and apply the PE. I would recommend 60 second CA just to give yourself a chance to adjust the part.

Others may have a way better idea but that's how I would do it. Pantherman
 
I'm looking for advice here. There's a small bit of clear in the little hole of the "Driver's Vision Enhancer", I have put some liquid mask in there for painting, will remove it to expose the clear bit. But I'm facing a problem. There's a small screen of PE that is supposed to go around it. Easy enough to install for paint but then getting the liquid mask out will be pretty much impossible.

View attachment 121997

View attachment 122005
E38 is not installed, W4 is the part in question. Obviously I could paint it loose and install after removing the mask, but I'm worried about scratching the paint off the brass as well as getting the glue to work on painted surface.


What would you do here?
If you have some burnishing solution for metal tracks / photo etch you can treat part W4 with that for a couple minutes and then neutralize it in water. Gently wipe the part with a dry paper towel and you should be good to paint it, then attach with a small spot of PVA glue. Any excess glue can be removed with a damp brush or Q- Tip. The burnishing fluid lightly etches the surface of the photo etch so it will allow the paint to adhere rather well, also since it etches the surface it is not adding to it like a coat of primer will which can obscure the detail.
 
Thanks for the tips guys!

Still working through this kit. Made one mistake in getting the wrong "lower control arms" (probably the wrong term) into the wrong spots. Will require some surgery to repair and some loss of function from the torsion bars.

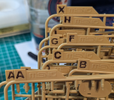
But one of my favorite features of Meng is their labeling of the sprues. This is so helpful!

1723832758868.png
 
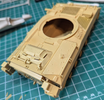
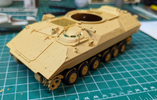
I keep plugging away on the Bradley. A pretty high parts count for 1/35, at least in my limited experience. But so far the only big issues I've run into were my own mistakes.

1724506152809.png

1724506194237.png
If you count the camera as a vision port, this thing has 16 or 17 of them! I'm going to put an orange tint on them based on photos I've seen.
 
I recently pulled this back out to work on, as is obvious from above that would be the turret.

1725310456759.png

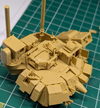
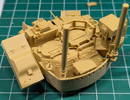
Overall I found it very enjoyable, but there were lots of parts, some that I found myself fighting with in the dry-fit-phase. Then I realized those edges were not supposed to line up, the gap was meant to be filled with applique armor, plates in most cases, plates with ERA in others.

It was slow going, lost of places where I (unfamiliar with modern AFVs) had to dry-fit more than thrice. Partially because there were a lot of parts, also the instructions were very detailed overall, but some blind spots that just had to be figured out. Still went together very well.

I'm going to have to retink my method of keeping the view-ports clear, but after working on the turret I realized they are a much smaller concern. So many view-ports and clear bits, but lots of parts overall.

1725310360240.png

1725310379618.png

Did I mention lots of parts? I just went back in the destructions and using fingers on both hands counted over 200 parts not counting decals on just the turret. Almost 200 more for just the tracks.

Yup, lots of parts :cool:
 
Last edited:

Latest posts

Back
Top