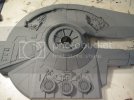
Merseajohn's Corellian YT-2400 'outrider' 1/72 Resin

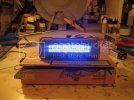
Ok post has been and I'v installed all 36 LED's!! And my God is it bright! EERrmm going to need some more assistance on dulling these lights because I'v nearly burnt my retina out twice. When I connect them to the battery it lights up my whole street. Ok so heres some pics for you to laugh at:
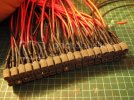
IMG_0564.jpg
IMG_0568.jpg
There not that bad I suppose, I was thinking maybe maskol (liquid mask) each bulb?? ??? Spray them with matt varnish a few times??? ??? My pastic sheet didnt work and the clear resin has done nothing soooo heres metallica with hit the lights (nice to see this actually because I was so drunk I dont remember it!):
Metallica - Hit The Lights (Sonisphere Festival '09)
 
HA HA i told ya that was gunna be way too much! think how bright staring into just one LED is now x 36!!! EEK! but im sure you can dull them down. This build is gunna be awesomeness!!!
 
That's awesome! Insane but awesome. Is there a way you can simply decrease the voltage to dim dem sum.
 
Cant say you didnt warn me John! And thanks Scott I might try 'misting' the back of the clear resin with tamiya smoke?? I'll try a few techniques and keep you guys posted.
 
Hey, John, my suggestion to You not to try the tamia smoke, really. I've tried it once and was lucky to clean the LED's liens (this stuff got away much harder than I supposed). The effect turned out to be.. well, quite not as I expected, the particles of the pigment were clearly visible while the LED was on, and absolutely didn't affect it's brightness.
I'd recommend You to put a 0-800 Om micro-rheostat in a seria to your LED circuit and change the resistance from zero to max until You get the result needed.
Another, but a harder way, which good site is prolonging the LED's life in comparison to the upper way (You probably wouldn't notice the difference, 99 percent that both way those LEDs would outlive us all )) ) is to put in a seria a CR circuit with a very high Hz. By matching the correct C and R parameters You would be able to receive a LED's blinkage, that would be invisible for a man's eye, but would visibly decrease the brightness.
 
Is a micro-rheostat the same as a potentiometer, or are there differences?

But, yeah, that sounds like a good idea to me. You could control exactly how you want it.

It's gonna make a really nice effect, John. Keep us posted. :)
 
Or, you could leave them that bright, and just say that Dash is going for Han's old Kessel Run record.
:p
 
Igard said:
Is a micro-rheostat the same as a potentiometer, or are there differences?

But, yeah, that sounds like a good idea to me. You could control exactly how you want it.

It's gonna make a really nice effect, John. Keep us posted. :)

The same, but different sizes. They both serve the same function.

When I wanted to reduce the brightness of an LED, it took a bit more than 800 Ohms. I actually used a 2K ohm resistor.

The best way is what Solander described. Get a potentiometer, or a Reostat and dial up the resistance until you get the light level you need. I would not try the paint, unless it is on a test piece.
 
Well, get as much Ohms rheostat as the free space inside your model allows you, and turn it until the result satisfies You. It all depends on the circuit, and it is much easier to use a colibrational device, then trying to make head-blowing maths in order to learn how much more resistance You need to add in order to recieve the required value of Lumens.

Here is how this stuff looks:

potentiometer http://www.chipdip.ru/product/ca9v-22-kom.aspx

micro-rheostat http://www.chipdip.ru/product/3006p-1-502.aspx
 
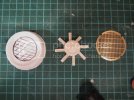
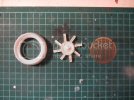
Time for another small update folks! First of I'd like to say a big thankyou to a member of the herd that sorted me out some parts I needed (you know who you are!) It's people like that that makes this place such a nice place to hang out and chill. This whole community is wicked and you guys rock! Anyway onto the progress, with these new parts I recieved I was able to start work on the resin and photo etch parts of the 'engine fans' that I put on my falcon. (apologies for the bad pics!)
IMG_0615.jpg
And hollowed out ready for the parts
IMG_0616.jpg
 
@Grendels and Solander,

Sorry, forgot I'd asked that question. Thanks for answering. I think I've got a mixed bag of both rheostats and pots, so I'll play around with them sometime.

John. Nothing wrong with those pics, looks really good. This thing is gonna look awesome!
 
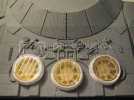
Cheers Q, Igard, punkpigpen and Grendals. Finished the engine fans and Iv given them a coat of primer heres the progress:
IMG_0624.jpg
 
Very nice, John. The extra greebles you put on there make a big difference.
 
Thanks mate! Iv put a little how to for the resin fans and photo etch grills over on the Falcon group build thread.
 
Those engine vents look....A W E S O M E !!!!!!!
This will be one sweet ride!
Dash Rendar is a lucky fellow
 
Wow, this is SWEET! This looks so great, I think I should consider adding such fans under the grills of my future FM MF to.
 
Thanks guys! really gives you the push to finish when you get positive comments. Solander I'd definitley recomend picking them up. And heres a quick pic of it primered with the addition of the top turret (that was shaped like an egg! little bit of sanding soon brought back to round ;))
IMG_0630.jpg
Currently listening to Led Zepplin while I build:
Led Zeppelin- Gallows pole
 

Latest posts

Back
Top